
Our exclusive discount offers and vouchers on SAAS subscriptions are subject to availability and may be subject to change or expire without notice

Payroll software refers to a specialized computer application designed to simplify and streamline the complex process of calculating and processing employee payroll. Typically, payroll software automates critical tasks such as computing employee compensation, tax deductions, and pay stub generation.
Gusto payroll software is a leading payroll software and HR administration platform that has built a reputation as a people-focused company. With over 40,000 small businesses using its platform in all 50 states, Gusto is known for its ease of use and focus on employee benefits and automation.
Founded as ZenPayroll in 2012, Gusto was started by three founders. Originally intended as a backend system to pay themselves for their work, Gusto has since expanded to serve over 100,000 businesses across the country. Gusto has offices in San Francisco, New York City, and Denver and boasts a list of investors that includes celebrities like Jared Leto, Ashton Kutcher, and Alexis Ohanian.
Gusto’s platform is user-friendly, and its payroll management makes it a valuable tool for both employees and contractors. The platform’s automation and onboarding tools help businesses avoid manual errors and simplify the payroll process.
Gusto’s comprehensive setup tools and management of payroll runs make it a top choice for payroll managers and small businesses (1-10 employees).
Read our other review post on paychex review to know about how paychex is different from gusto software.
Plan | Pricing | Features |
Gusto Payroll Simple Plan | $40 per month + $6 per person paid | Full-service single-state payroll Health benefits administration Financial benefits for employees Basic hiring and onboarding tools and templates Limited customer support Custom admin permissions |
Gusto Payroll Plus Plan | $80 per month + $12 per person paid | Everything in the Simple plan plus:
Custom onboarding templates |
Gusto Payroll Premium Plan | Custom based on your business size | Everything in the Plus plan plus:
HR experts on call Performance reviews |
Specifications | Rating | Our Verdict |
Ease of Use | User-friendly and offers a simple interface for payroll and HR management. | |
Ease of Setup | Offers a straightforward onboarding process, making it easy to set up and get started. | |
Value for Money | Gusto's pricing is competitive and offers great value for small businesses. | |
Features | Comprehensive suite of payroll and HR features, including benefits management, time off accrual, and tax filing. | |
Support | Offers excellent customer support with access to a dedicated support team via phone, chat, or email. | |
G2 Rating | Gusto has a high rating on G2 with positive reviews from verified users, highlighting its ease of use, functionality, and customer support. |
This refers to how user-friendly and intuitive software is to use. Ease of use is an important factor for businesses as it affects the overall productivity and efficiency of the payroll and HR processes. Gusto offers a simple and intuitive interface, making it easy for users to navigate and perform tasks.
This is how quickly and easily a software can be set up and implemented in a business. Gusto offers a straightforward setup process, with a helpful onboarding experience that guides users through the steps necessary to get started.
The balance between the cost of the software and the features and benefits it provides is important. Gusto offers a competitive pricing model with affordable plans that include a wide range of features to help businesses manage their payroll and HR processes.
This includes the capabilities and functionalities of the software. Gusto offers a comprehensive set of features, including payroll processing, tax management, benefits administration, time off tracking, and more. These features are designed to help businesses streamline their payroll and HR processes, saving them time and money.
This refers to the level of customer support and assistance provided by the software company. Gusto offers a dedicated support team, with a range of resources and tools to help businesses get the most out of their software.
G2 is an independent software review site that provides ratings and reviews of software products. Gusto has a high rating on G2 of 4.0/5.0, indicating that it is well-regarded by users and provides a high level of customer satisfaction.
Gusto offers a wide range of features to help streamline payroll and HR processes for small businesses:
Features | Availability |
Reporting & Dashboards | Yes |
User, Role & Access Management | Yes |
Performance & Reliability | Yes |
HR-Add on | Yes |
Scalability | Yes |
Web Portal | Yes |
Benefits Manager | Yes |
Mobile Usability | Yes |
Payroll Entry | Yes |
Time Off Accrual | Yes |
Direct Deposit | Yes |
Pre-Tax Deductions | Yes |
Check/W-2 Delivery | Yes |
Check/W-2 Printing | Yes |
Tax Calculation | Yes |
Tax Filing | Yes |
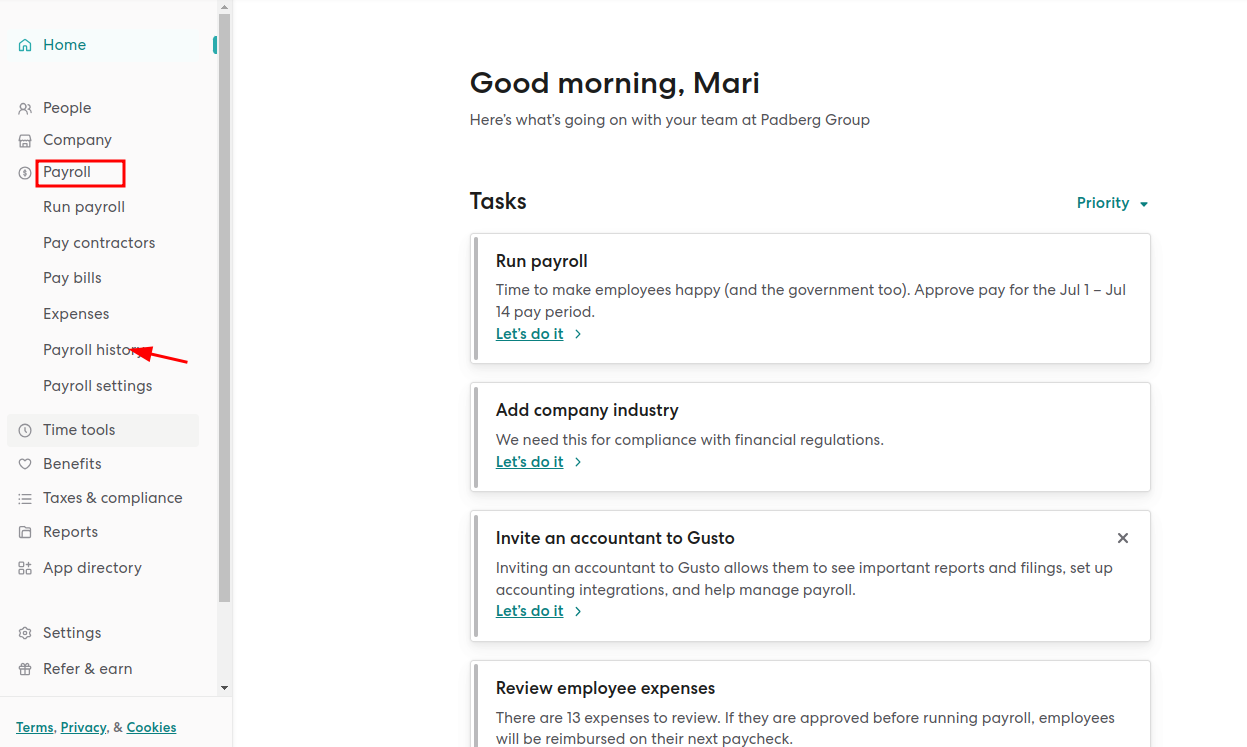
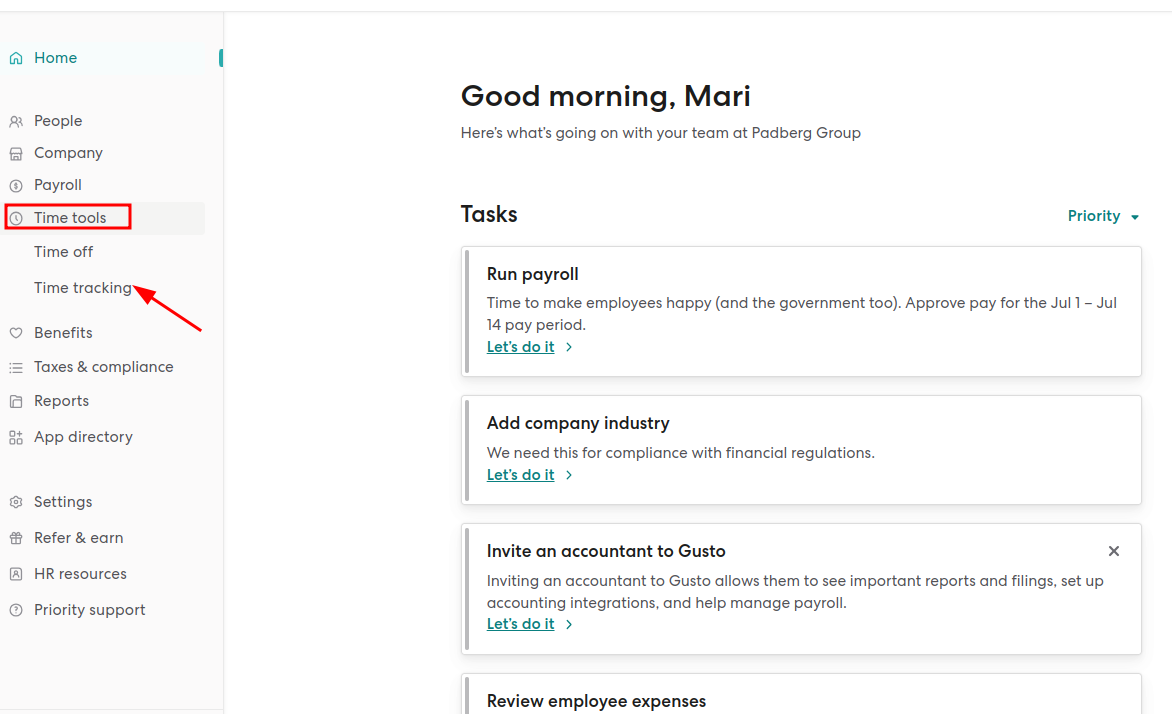
The homepage of the Gusto Payroll Software is where you begin with. It has all the important information that can help you plan your day, such as:
If you want to sync your reminders to your calendar, move to the bottom right corner of the page for the same. Gusto is compliant with Google, Outlook and iCall.
In this tab, you can add the information of the new employee or the contractor that you welcome in your organization. Here you can find several forms which require you to mention the correct information of the new joining. The tab also has a section for the employer to add the documents of the employee.
You can send offer letters right from the system and Gusto will file the new hire reports with the IRS for you.
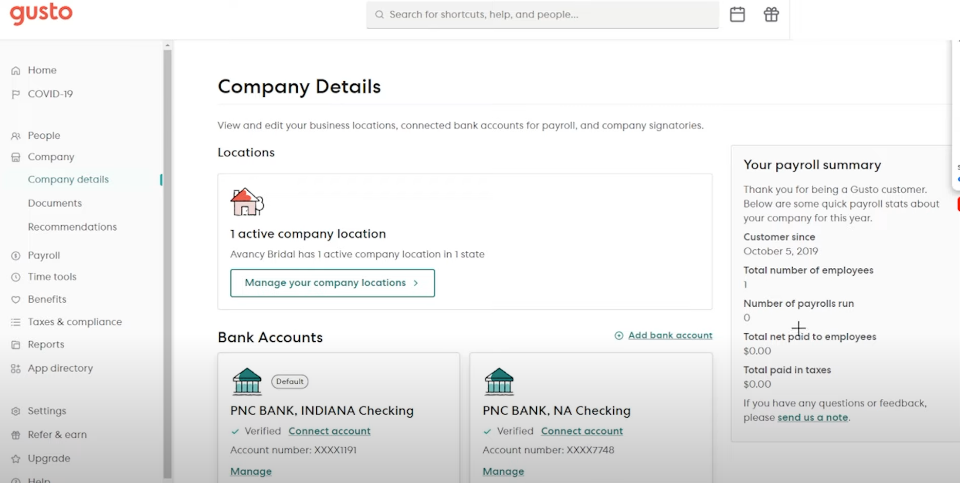
In the company, you can store all the information related to your company like:
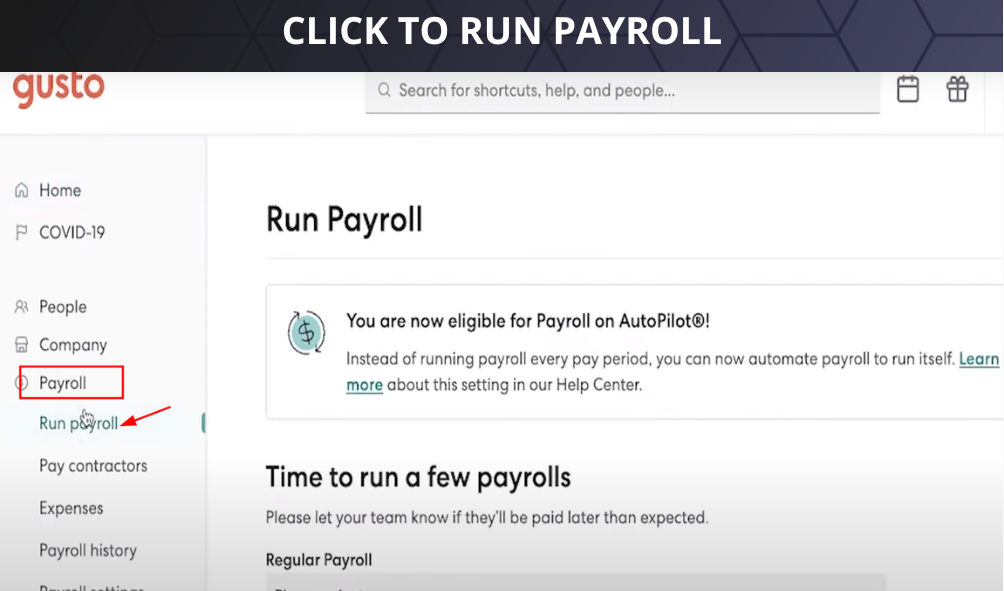
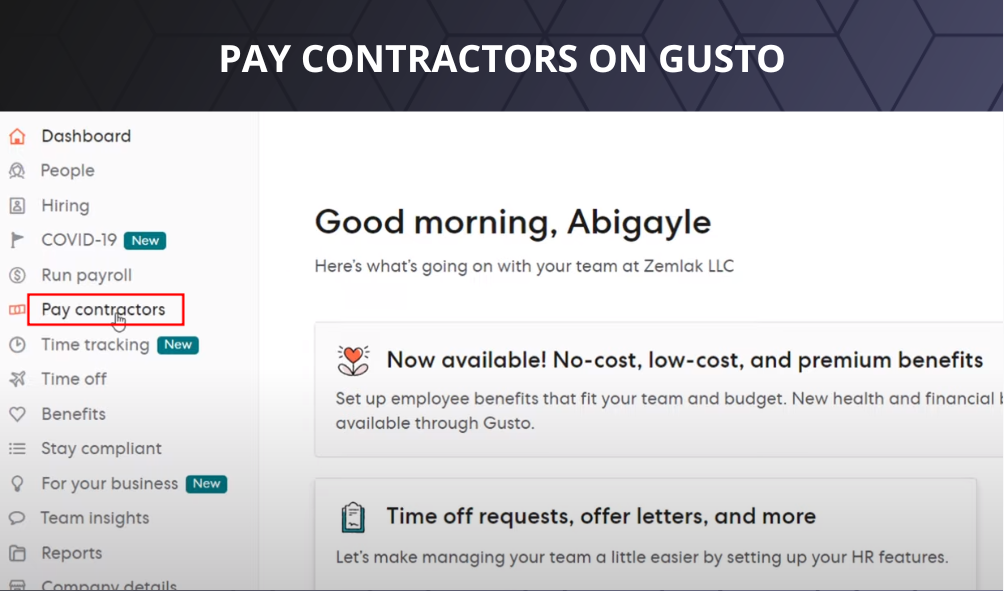
Within this tab, you can run several processes like:
The payroll system of the tool handles all the tax calculations, benefits withholdings, direct deposit and the summary of the payment to the contractors.
The best part is that if you are still not sure about the worker’s compensation insurance, Gusto handles it for you too. The company partner’s with AP Intego to provide worker’s compensation insurance, which you can apply through Gusto.
It offers flexibility to choose the payroll schedule such as Monthly, Weekly, Bi-Weekly or whatever suits your requirements.
Employees can even choose the method of payment like direct deposits, paychecks be it manually or through the Gusto software.
It helps to manage several employee benefits offered by the employer such as Health Insurance, Retirement Plans and others.
If you offer benefits Gusto takes care of Benefits management, providing informative resources to your employees about the packages available to them and bringing them to select the package from the self-service dashboard.
The competitive benefit packages help the employer to attract and retain high quality employees for a longer period of time.
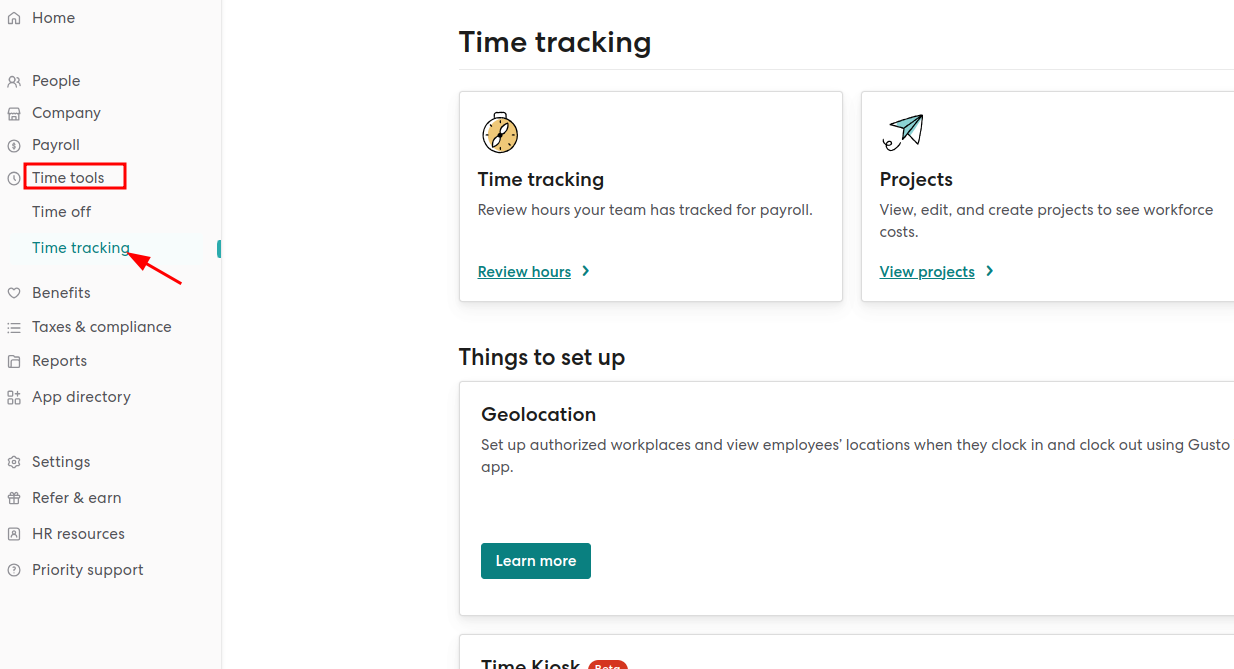
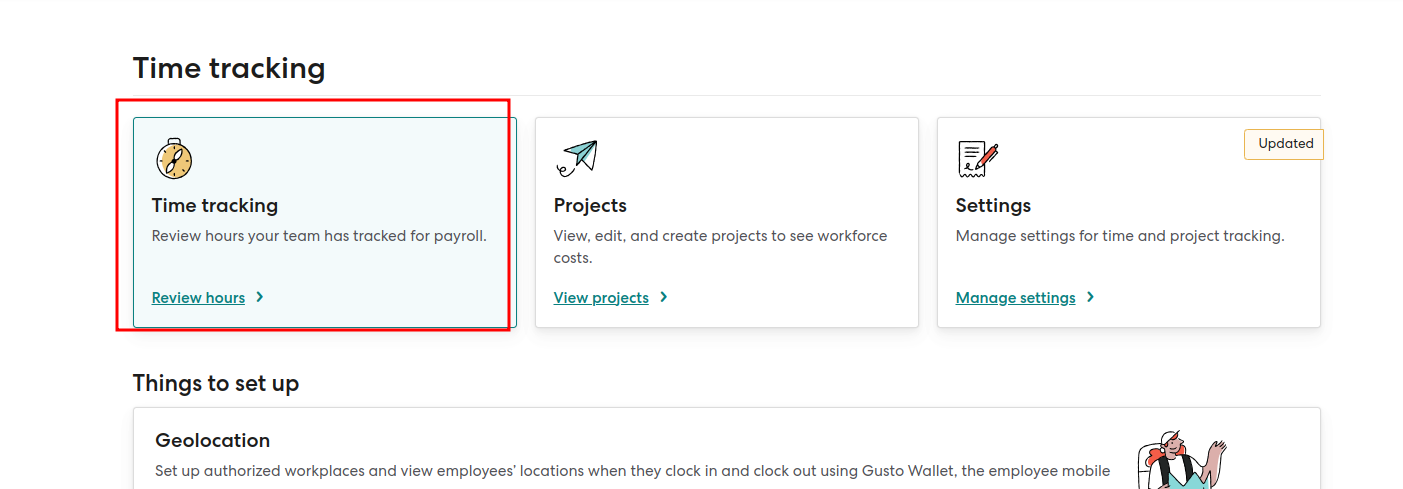
The time tracking feature offers a wide range of customization options – Set Overtime Rules, Track Sick & Vacation Time and General Employee Work Hours. It in short makes it easy to manage employee time and ensure compliance with labor laws and regulations.
The best thing to note is that the time tracking system is automatically connected to the payroll system, making it easy for the managers to review the hours. Once the hours are reviewed and checked out by the team managers, the report is further sent to the payroll manager.
Gusto uses advanced technology and automation systems that ensure that your payroll is always in compliance with all the taxes applied.
It automates the payroll, taxes and the tax filings of the employees –
All the payroll taxes – local, state and federal are calculated, filed and paid through automation.
Gusto issues and files the employees W-2s and 1099s and then sends it to the employees and the contractors.
Gusto automatically reports the government about the new employee in the organization.
We handle the filing of all federal, state, and local payroll tax forms for your company in a fully automated and paperless manner. This includes the following processes:
Submitting tax forms like (Form W-2, Form 940, Form 8974, Form 1099, Form 941, State and Local Tax) electronically to the respective authorities.
Utilizing electronic signatures for required documents.
Sending and receiving faxes electronically.
With these technologies, your payroll tax filing becomes seamless, efficient, and environmentally friendly.
Gusto’s reporting feature provides valuable insights for your business by offering a combination of powerful custom report building and a diverse range of pre-made reports. Here are the key highlights:
With Gusto’s reporting capabilities, you can gather crucial information and generate reports tailored to your specific requirements.
These reports provide valuable insights and information to help you effectively manage your business processes.
Gusto’s customer support team is available to assist you through phone and email. Phone support operates from 12pm to 5pm EST, Monday through Friday. Email responses typically require a few business days.
In addition to customer support, Gusto provides a range of valuable secondary resources. These include business calculators, checklists, a help center, and an accountant directory. These resources are designed to provide practical assistance and support your company’s growth.
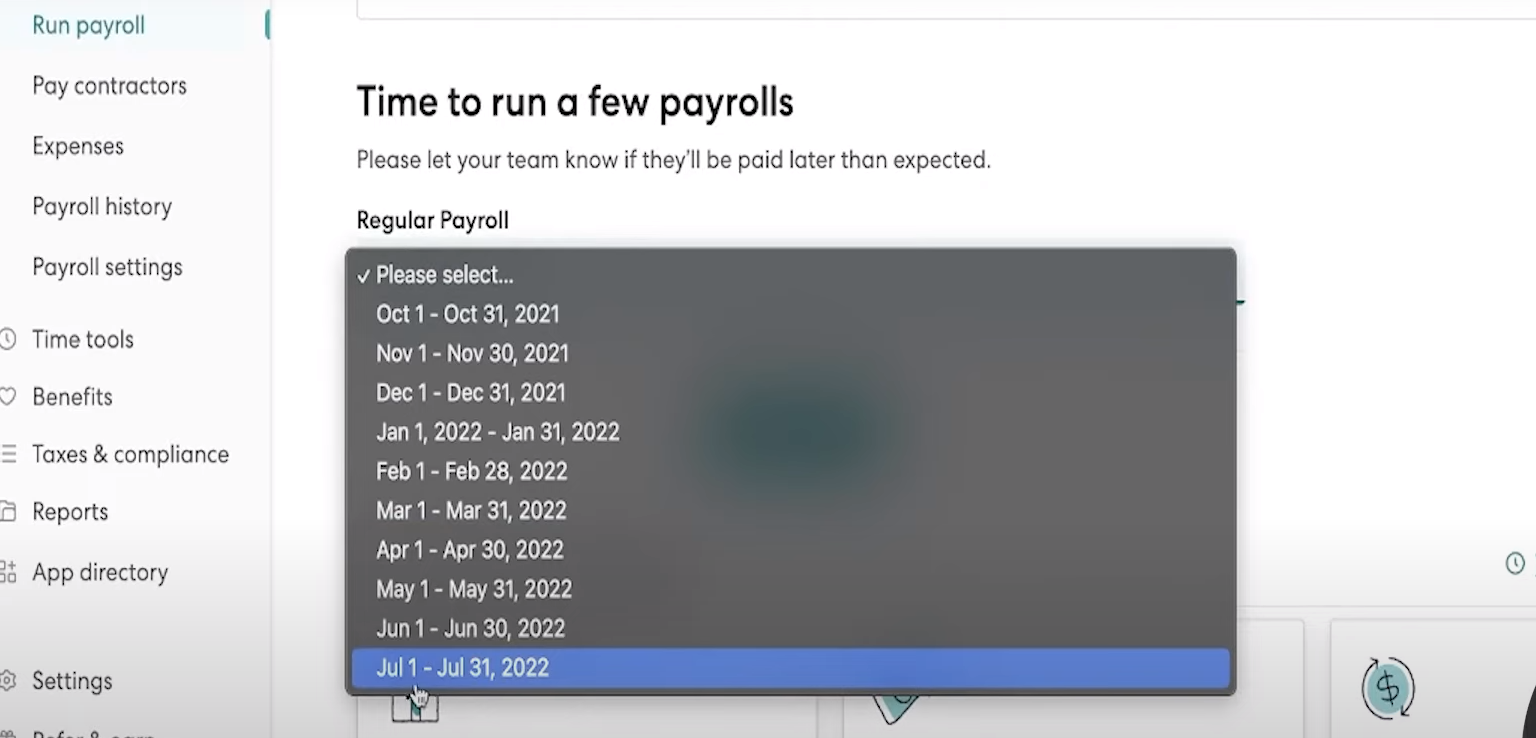
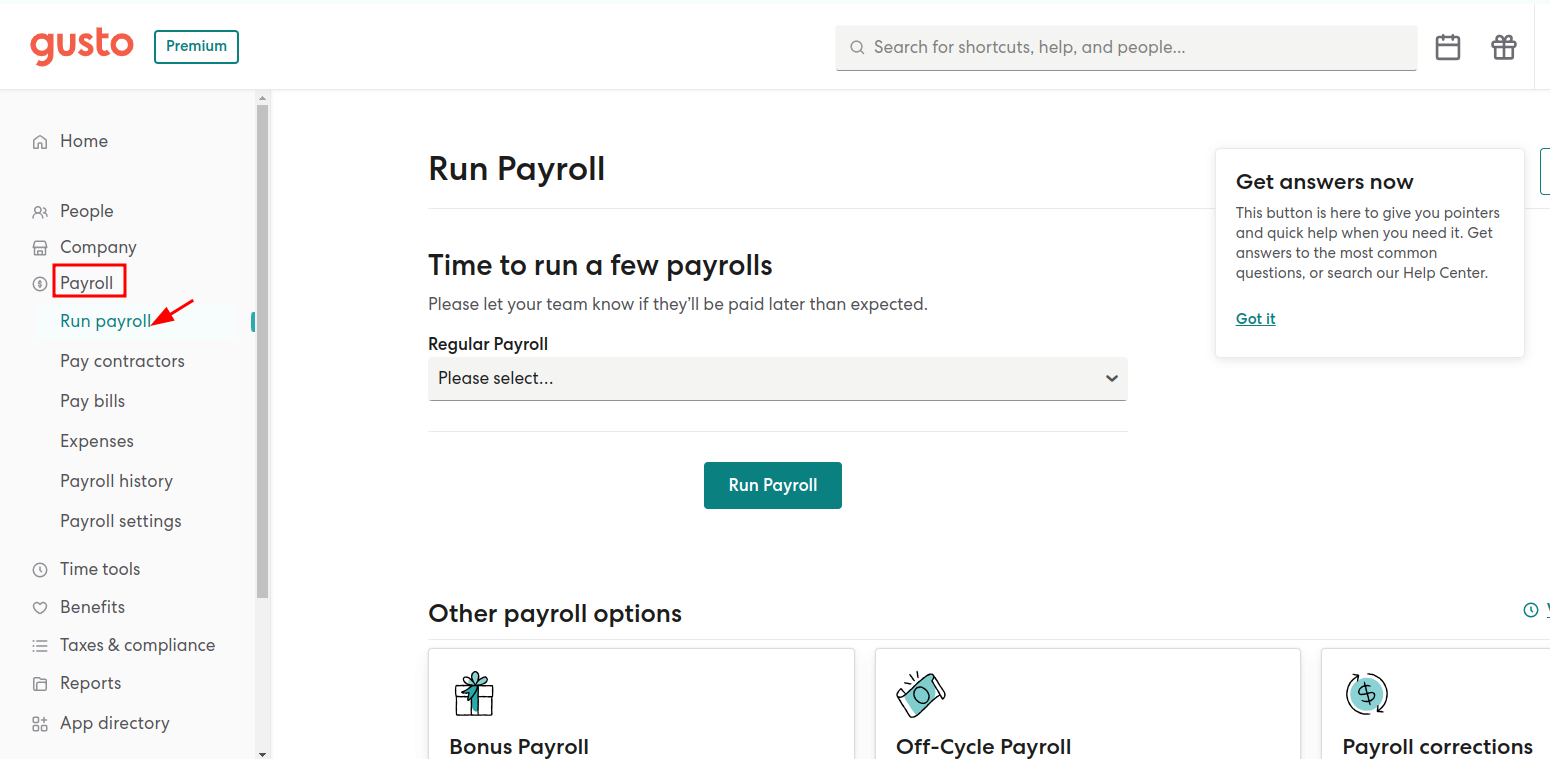
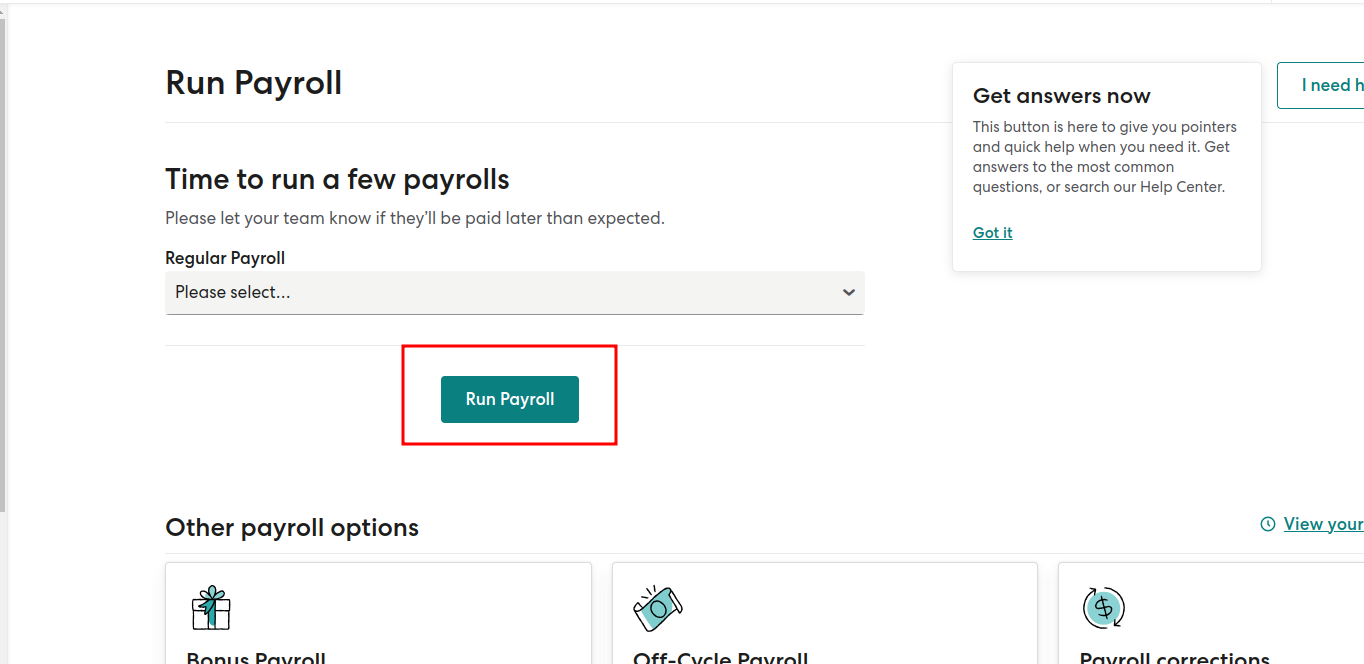
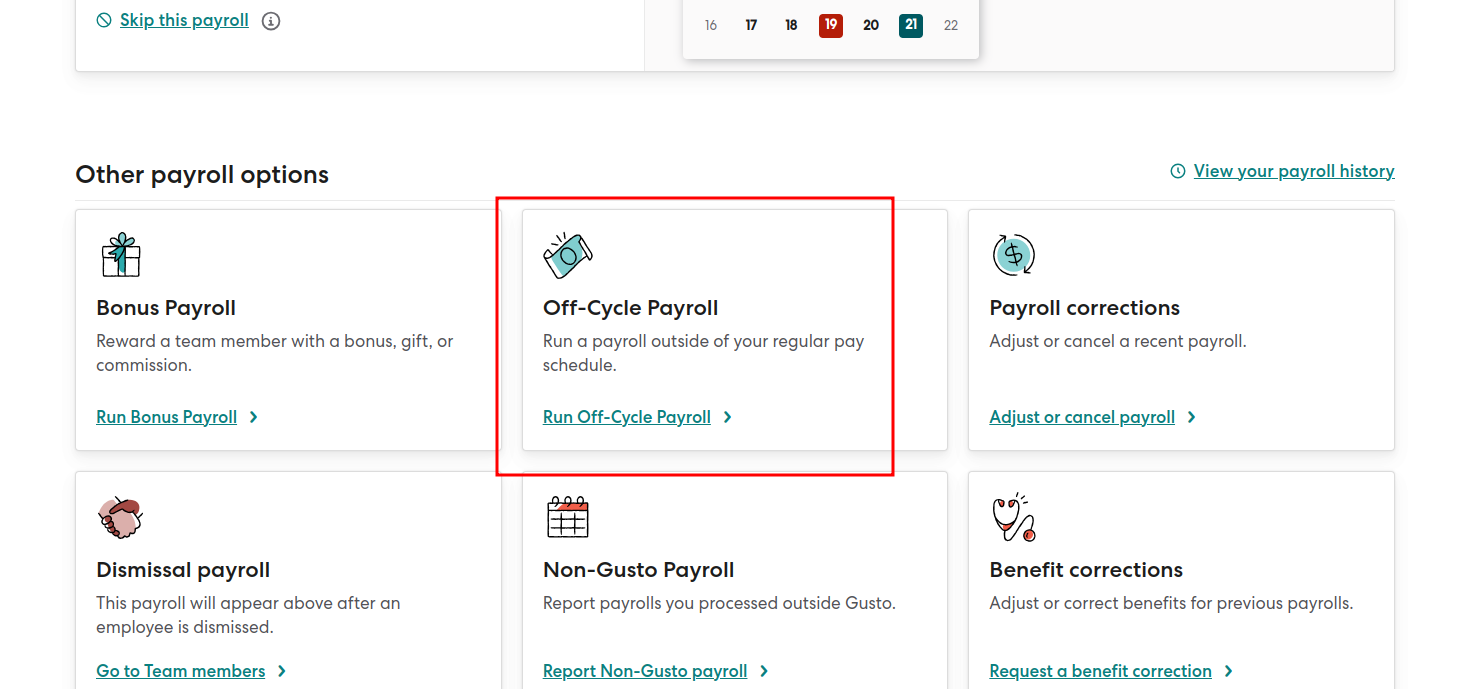
If you find yourself in a situation where you need to modify the dates of your company’s pay period or run multiple payrolls simultaneously with your regular payroll, the solution is to opt for an off-cycle payroll. This allows you to make the necessary adjustments without disrupting your regular payroll process. On the other hand, if you need to alter your pay schedule for the regular payroll, you can proceed in the blog to learn to make the necessary changes.
To automate your company’s payroll according to the established pay schedule, simply enable Autopilot. Follow these steps:

If a pay rate appears different in the Run Payroll flow compared to the employee’s account settings, it means that the pay rate is not set up as hourly but rather per week, month, or year. Ensure that the correct format (per hour, per week, etc.) is used for the pay rate in the employee’s profile.
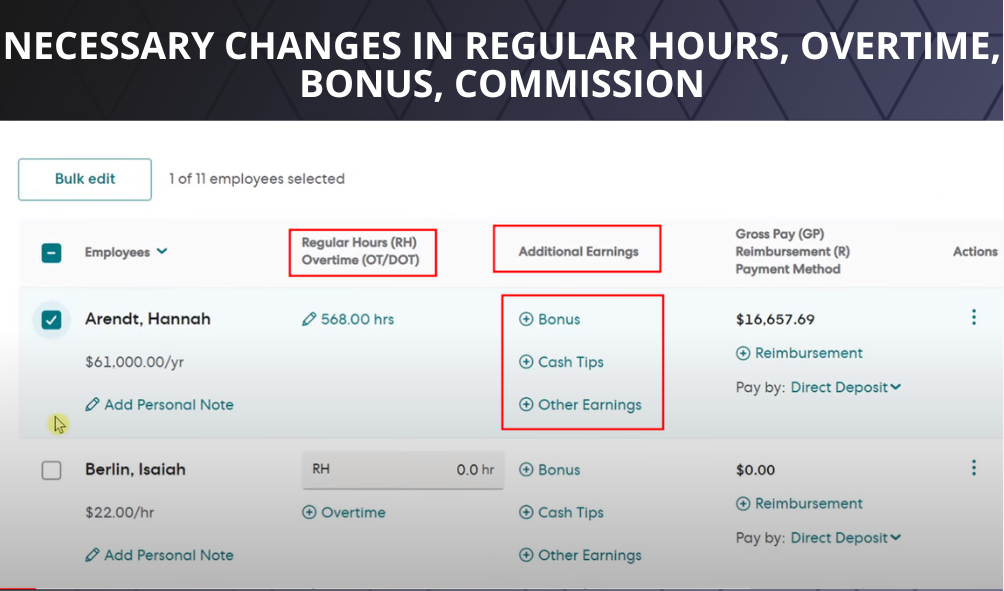
Adding a one-time commission amount for an employee in regular payroll is a straightforward process. However, please note that Gusto does not support commission draws. Let’s find out how to do it:

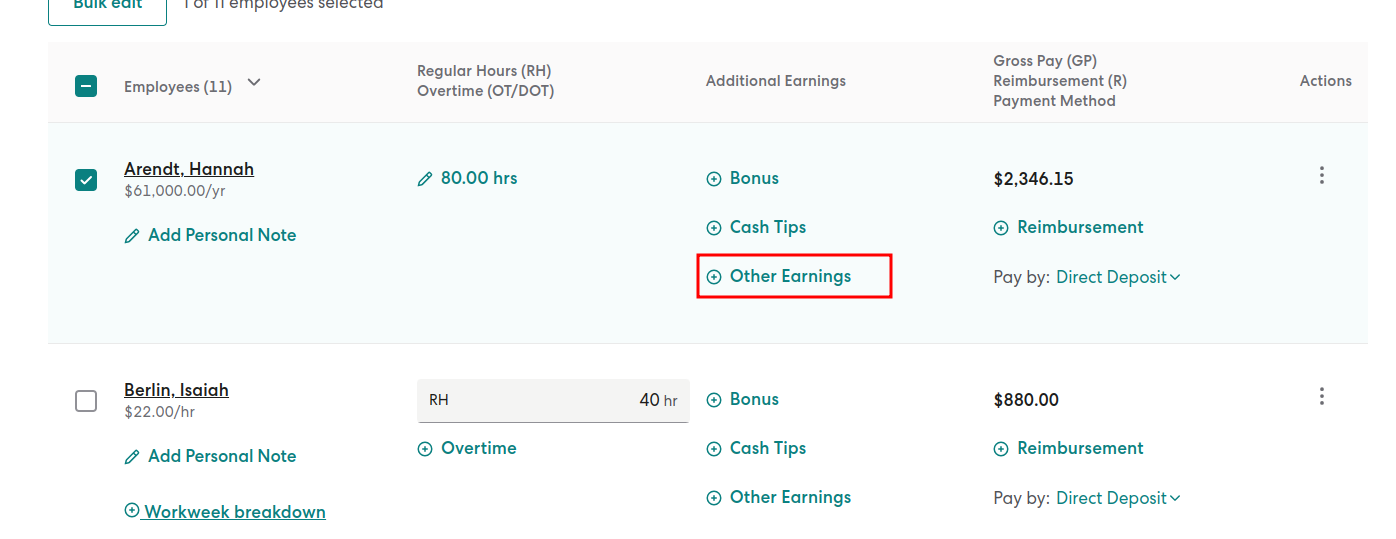
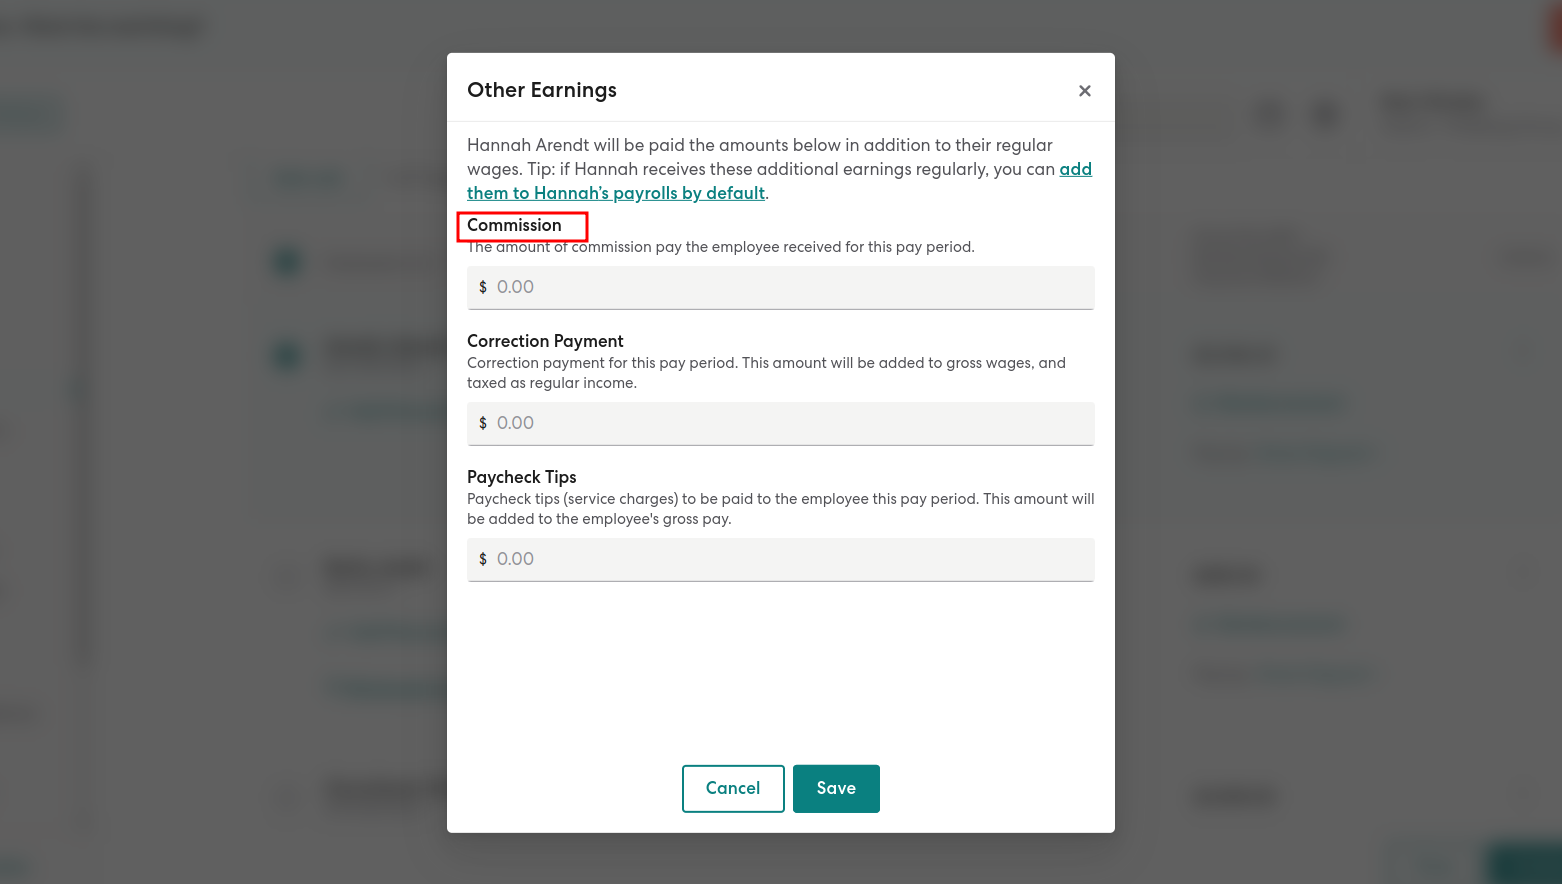
The commission amount will be taxed as regular wages and will appear as a separate line item for commission on the employee’s pay stub.
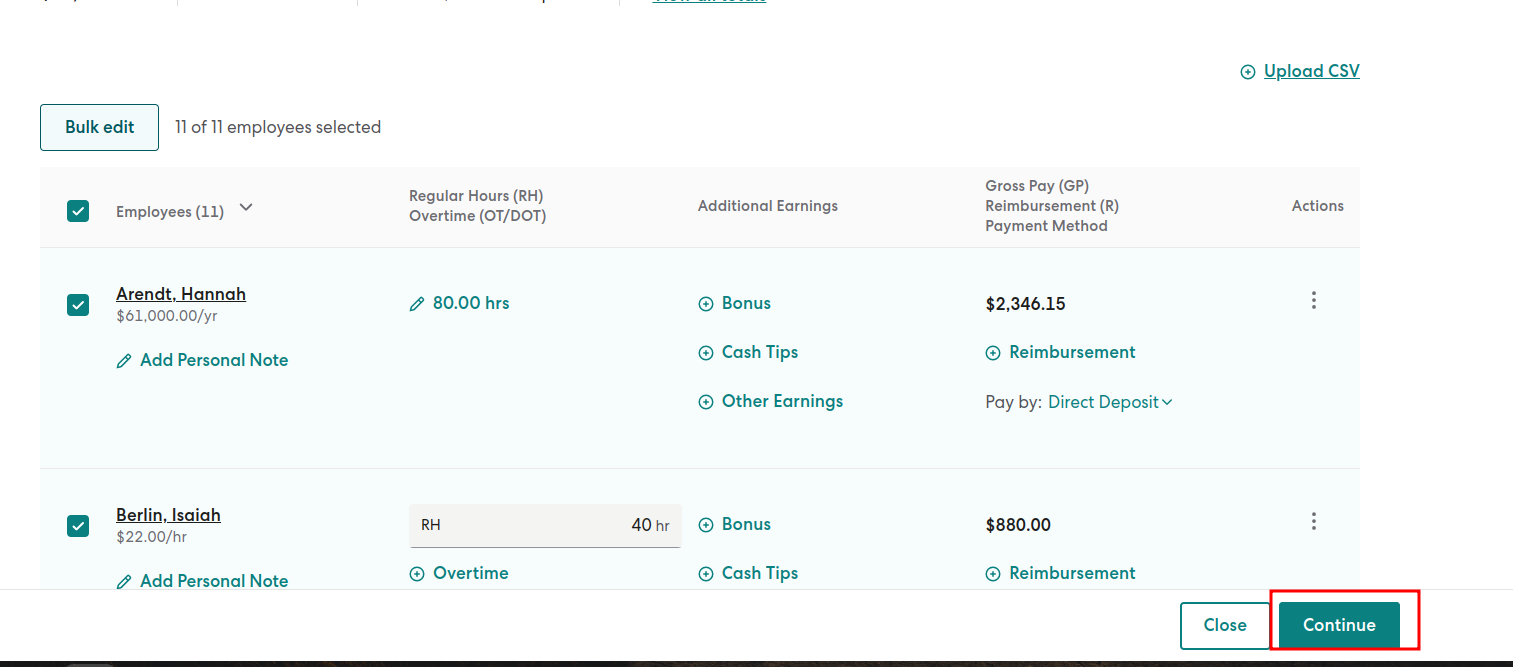
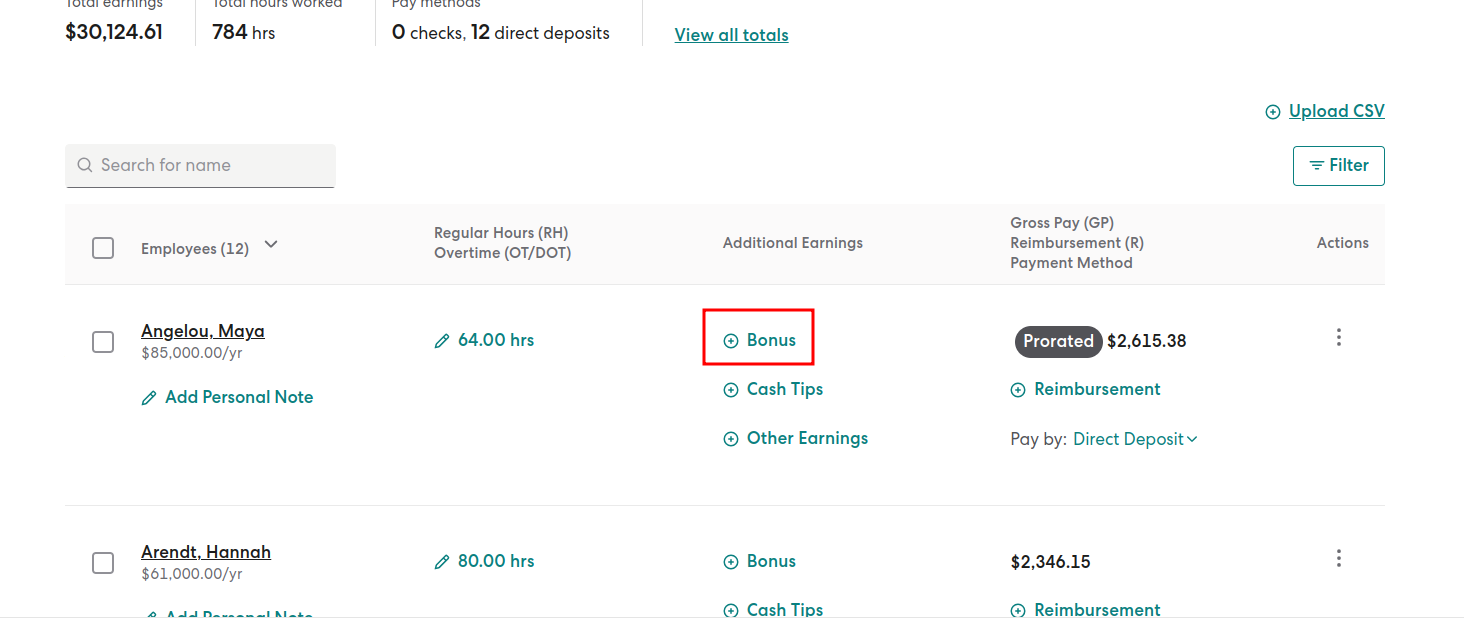
If you prefer to include the bonus amount within the regular wages, you can add it to the upcoming regular payroll. With the following, the bonus and other taxable wages will be combined for the calculation of Federal Income Tax. It’s important to note that higher gross pay results in higher taxes. Thus, depending on the bonus amount, the employee may end up paying more taxes on this particular payroll due to the bonus.
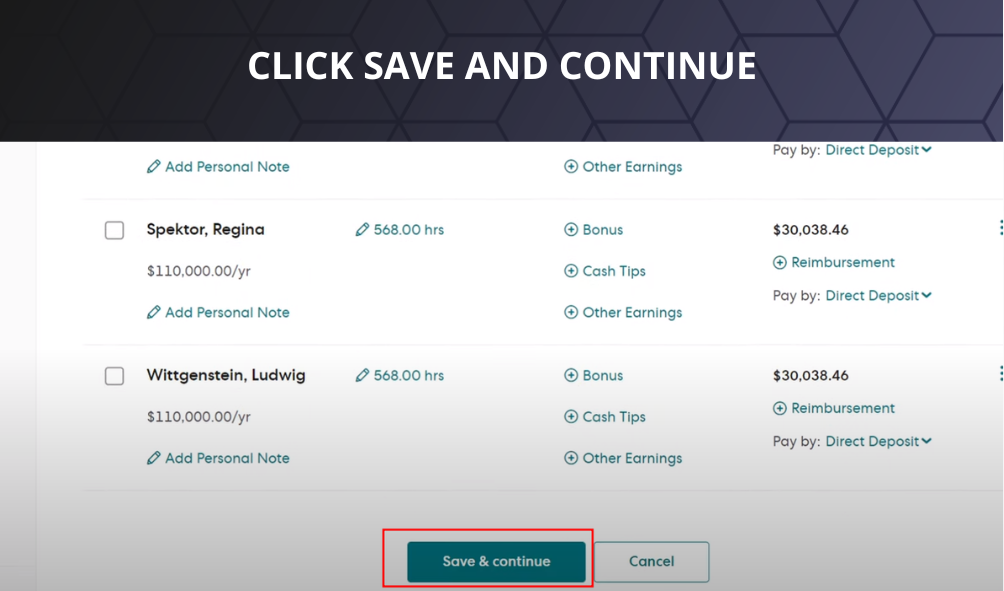
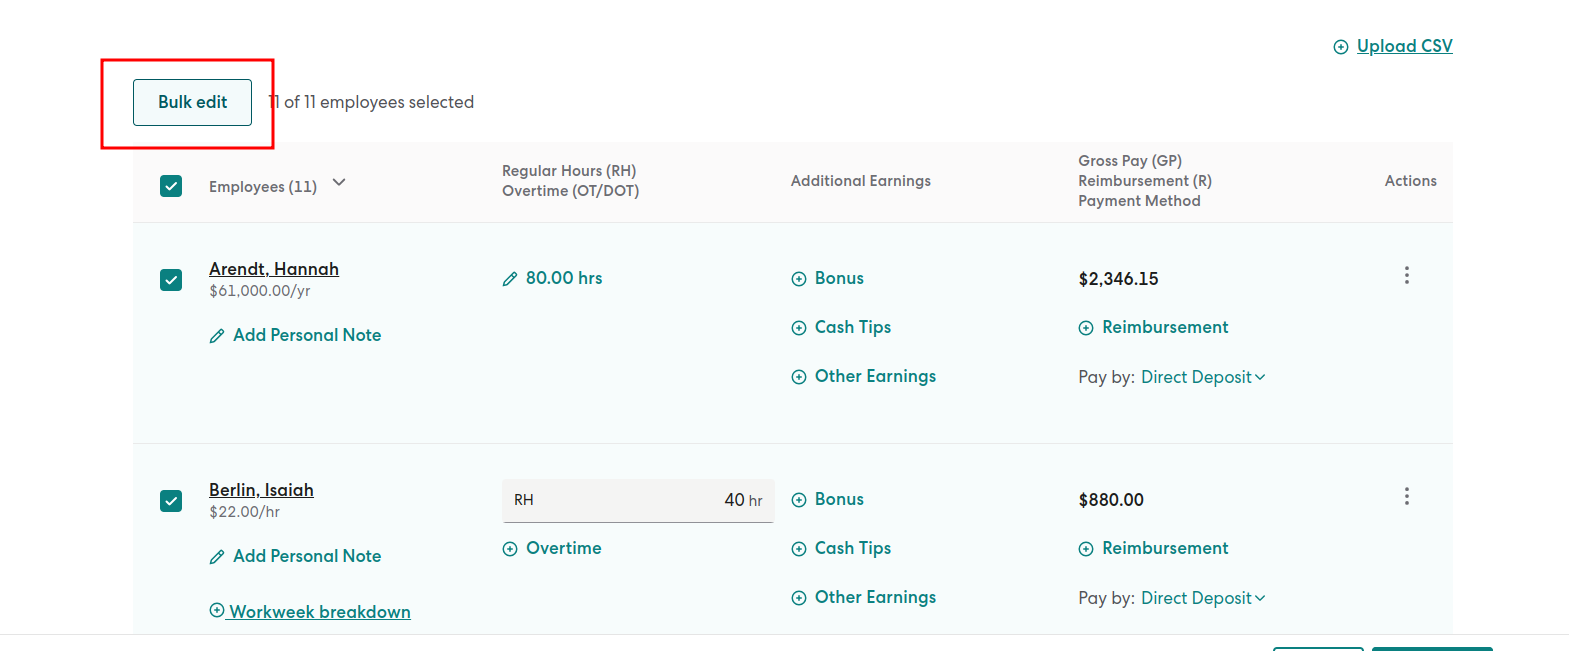
To aggregate the bonus amount with regular wages, follow these steps:


The bonus amount will be taxed as regular wages and will appear as a separate line item for the bonus on the employee’s pay stub.
Currently, Gusto payroll software does not support prepaid debit cards for paying contractors.
If you currently have a check payment method set up and would like to switch to direct deposit, you can easily make the change from your Gusto account. Here’s how:
Key Point : “Gusto verifies your bank account through a test transaction on their end, and no action is required from the user for this process. You can access the direct deposit authorization form at any time in your account under the “Documents” tab.”
If you currently have your payment method set to direct deposit and would like to switch to receiving checks, you can make this change directly from your personal Gusto account. Follow these steps:

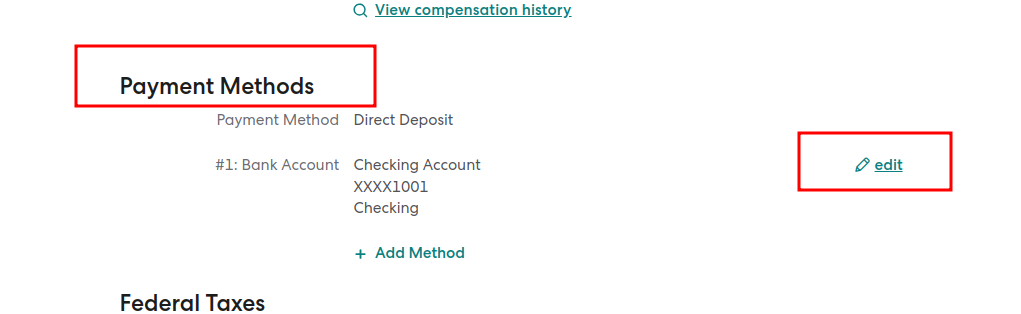
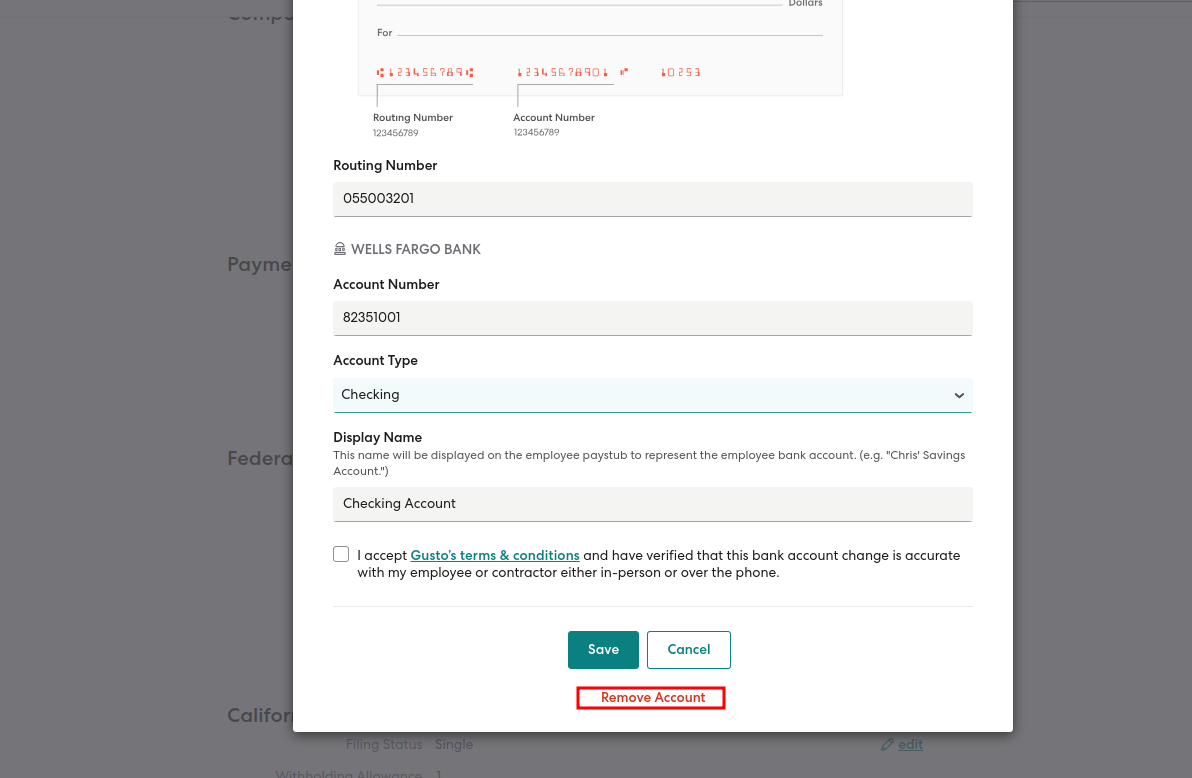
From now on, you will be paid by check for future payrolls. Your employer will be responsible for distributing the check to you.
Gusto partners (accountants) have the flexibility to choose from various billing options for their clients. Each client can be assigned a different billing option.
Bill To The Partner At A Discounted Rate:
Bill To The Client At A Normal Rate And Send Me A Revenue Share:
Bill To The Client At A Discounted Rate:
To access and modify your billing options for clients in Gusto, follow these steps:
Please note that if you switch a billing option in the middle of the month, the change will take effect on the 1st of the following month.
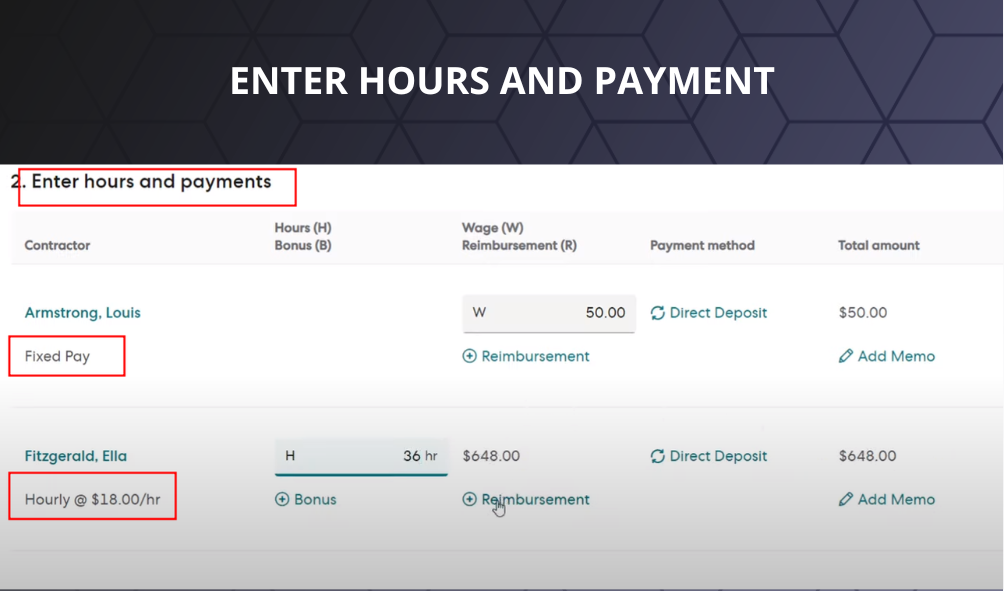
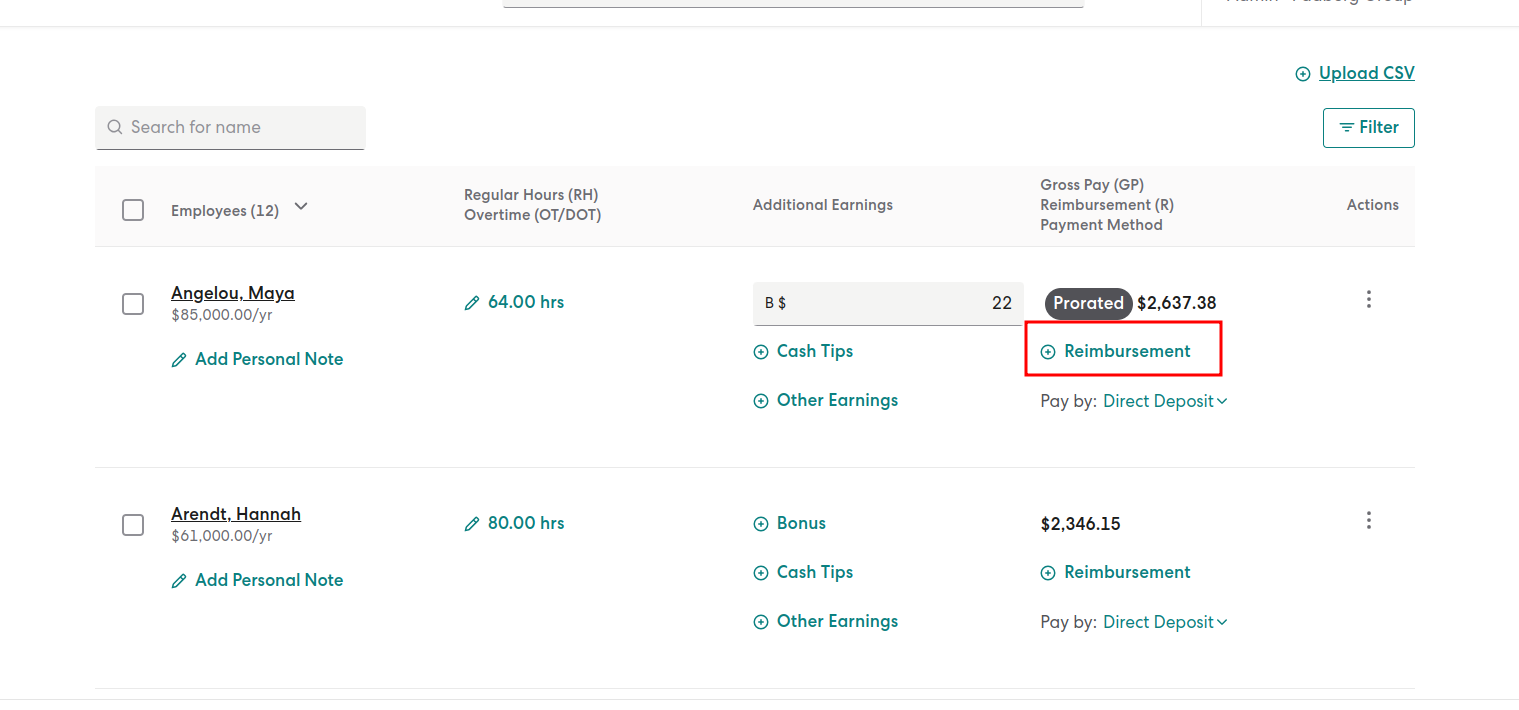
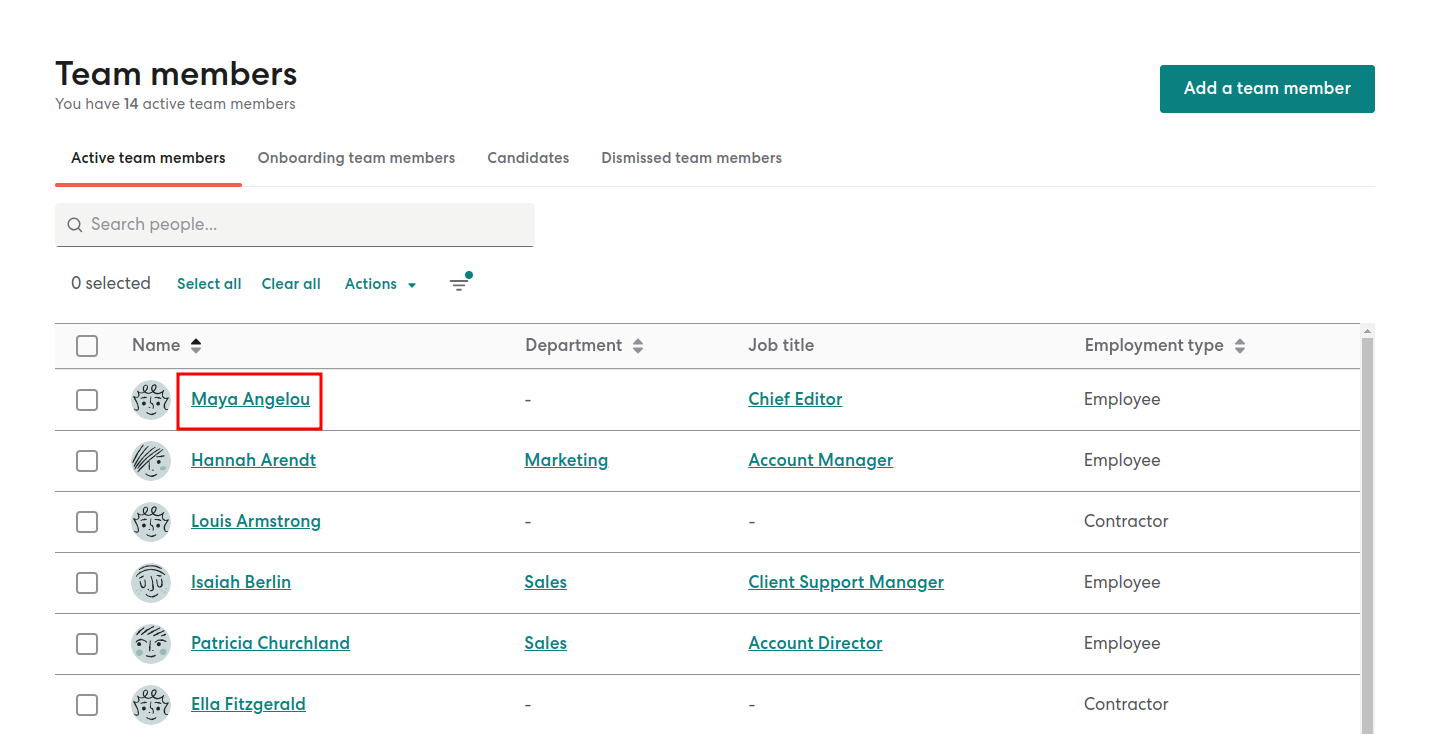
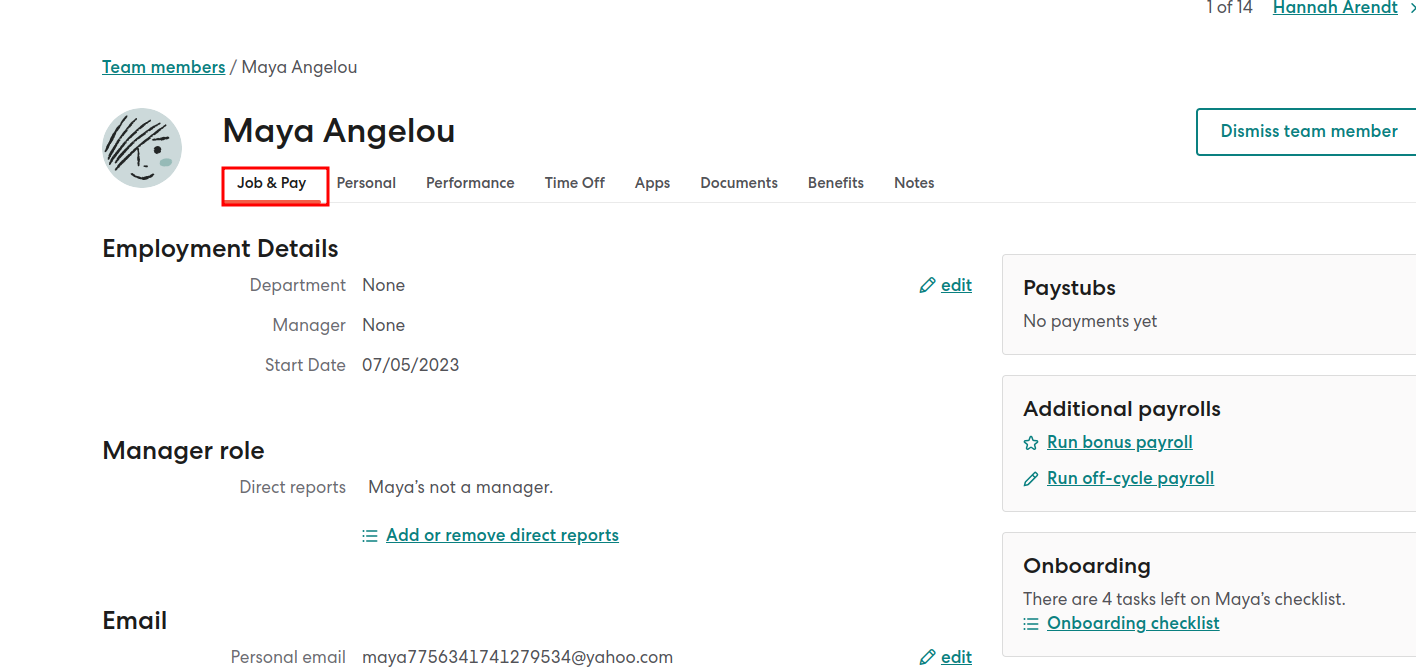
Within your Gusto admin profile, you have the ability to establish reimbursements for both employees and contractors. However, please note that expenses for contractors are currently not supported.
Key Point – “It’s important to remember that reimbursements and expense reimbursements are not subject to taxes and are not reported as regular wages.”
Let us move forward to get an in-depth explanation:
For Employees:
For Contractors:
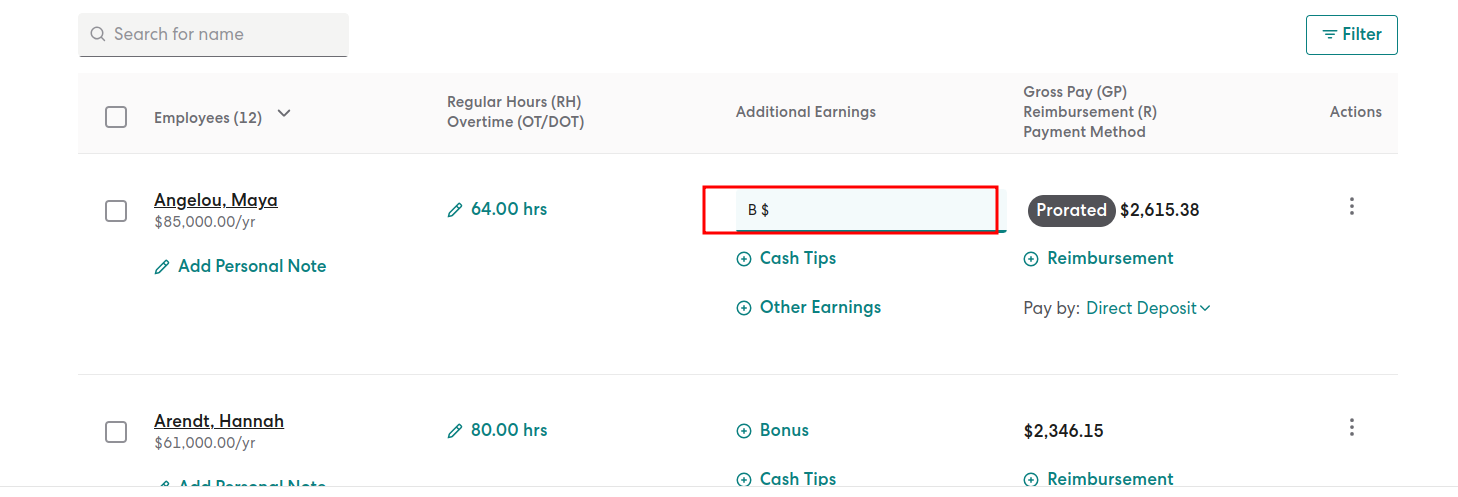
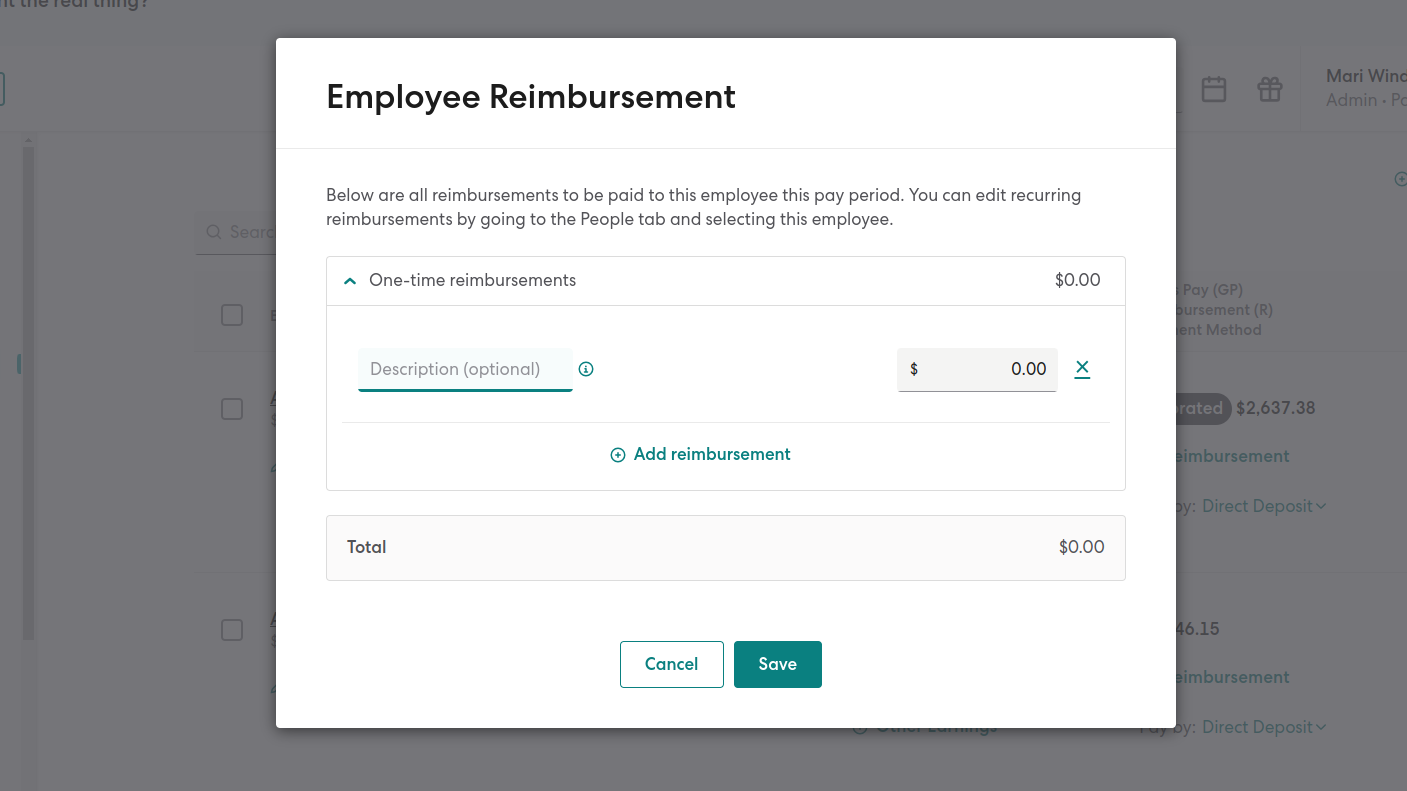
Once the reimbursement has been processed, it will be displayed as a separate line item on the employee’s or contractor’s paystub. If you wish to provide additional details about the reimbursement, you can add a personal note on the paystub.
Key Point: “If you have AutoPilot enabled for your payroll, you will need to run the payroll manually to add a one-time reimbursement by following the above instructions. Alternatively, you can approve all expenses before AutoPilot runs.”
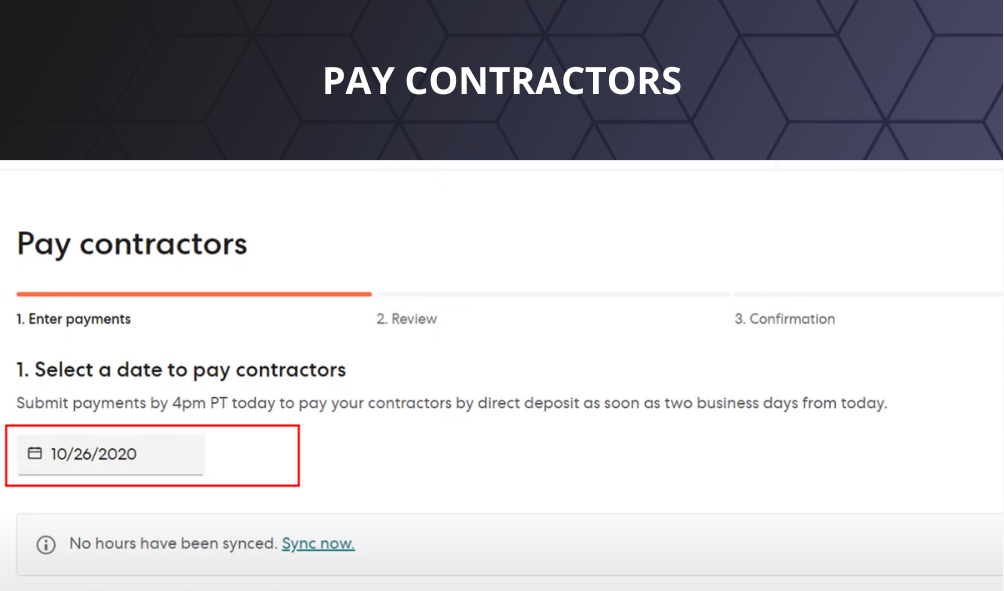
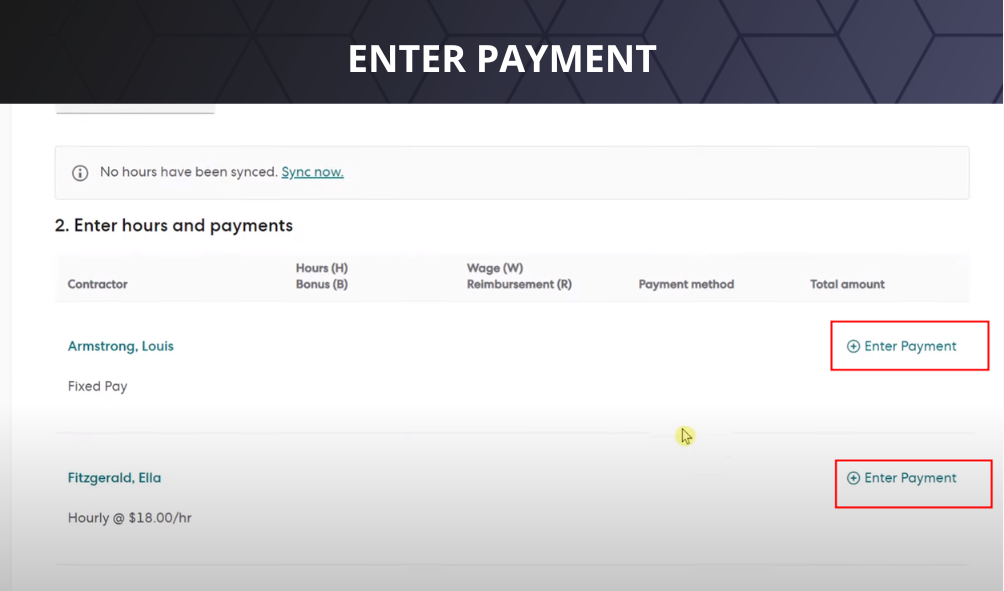
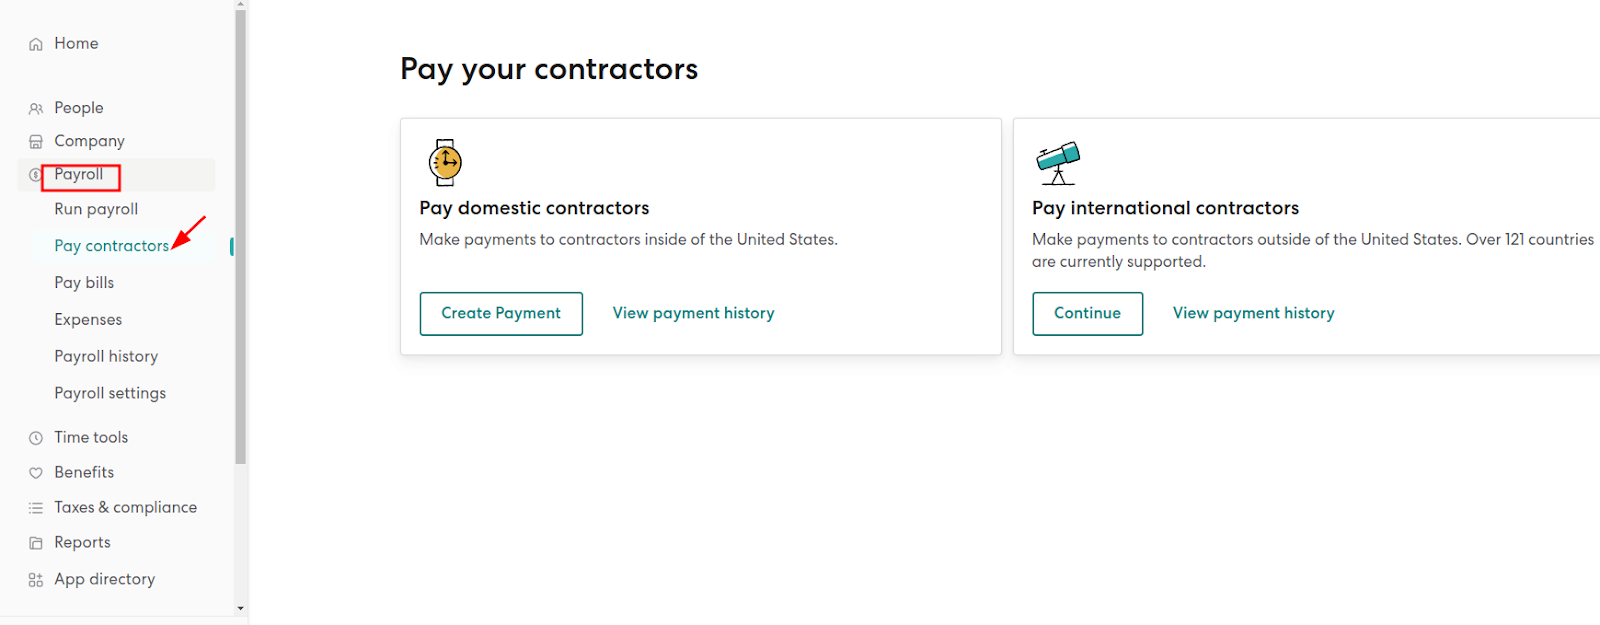
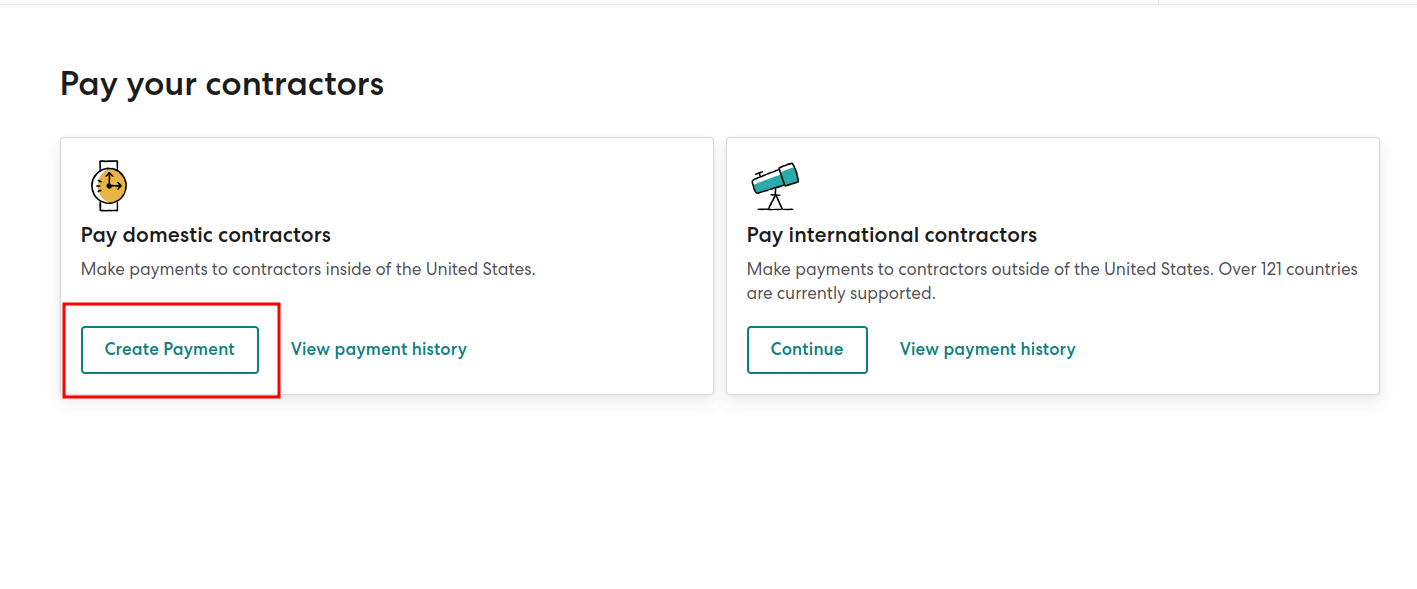
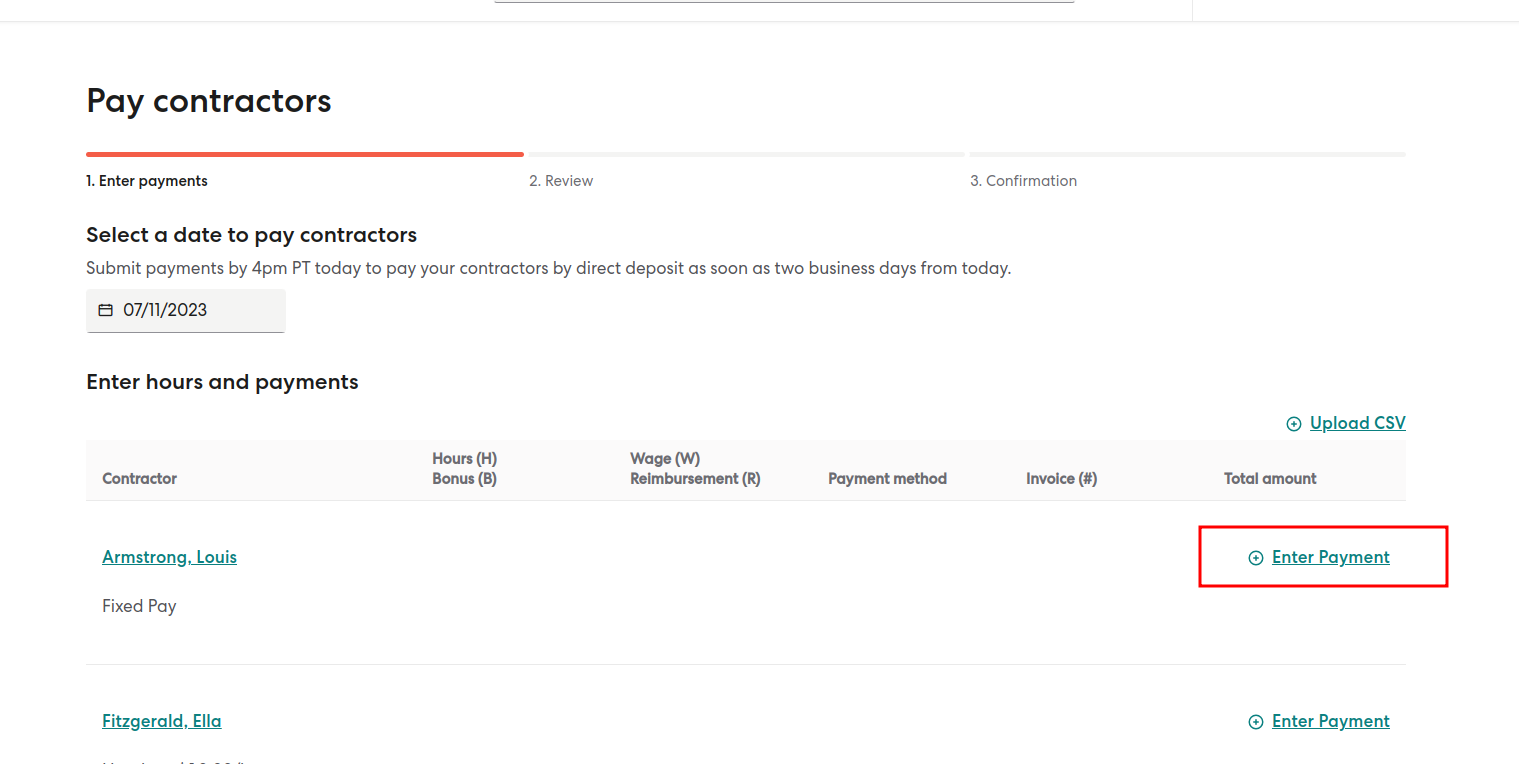
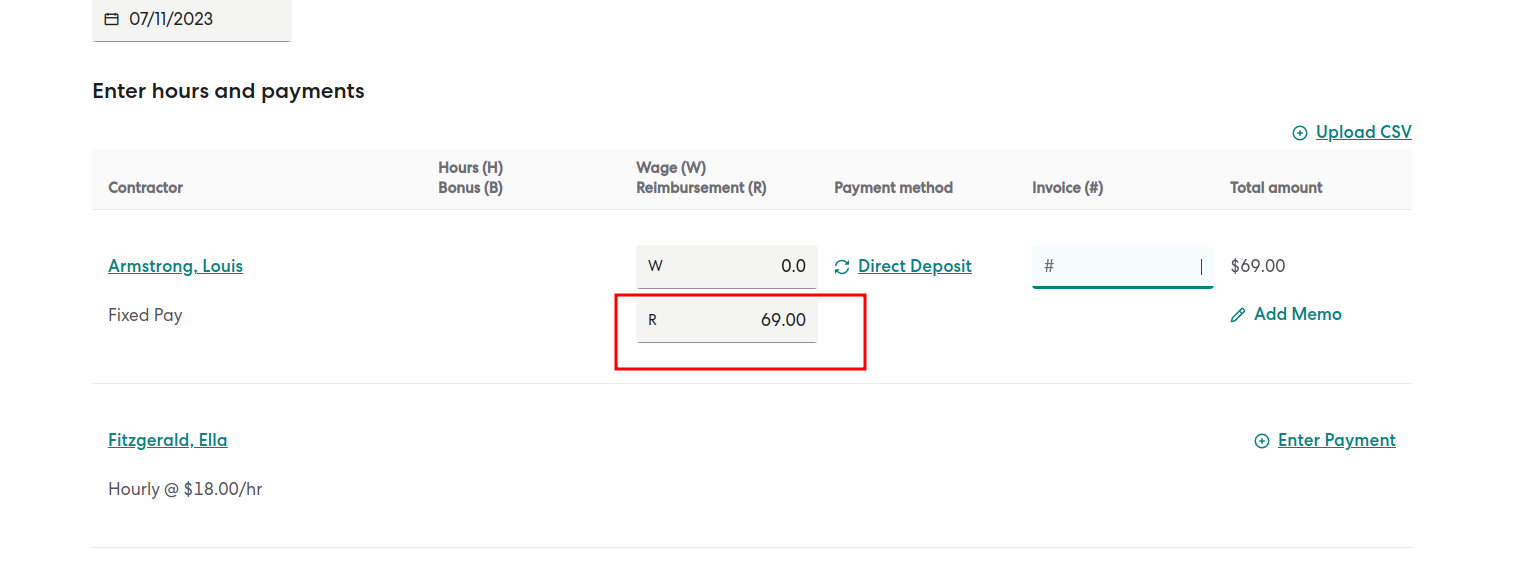
To provide reimbursements to contractors, follow the steps for giving a one-time reimbursement.
Key Point: “Recurring reimbursements for contractors are currently not supported.”
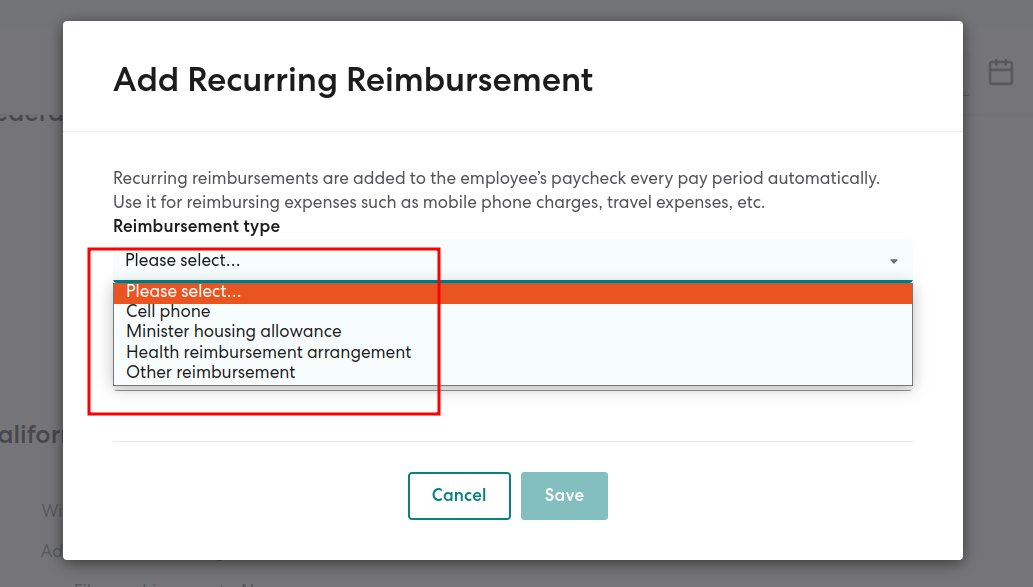
Setting Up A Recurring Reimbursement:

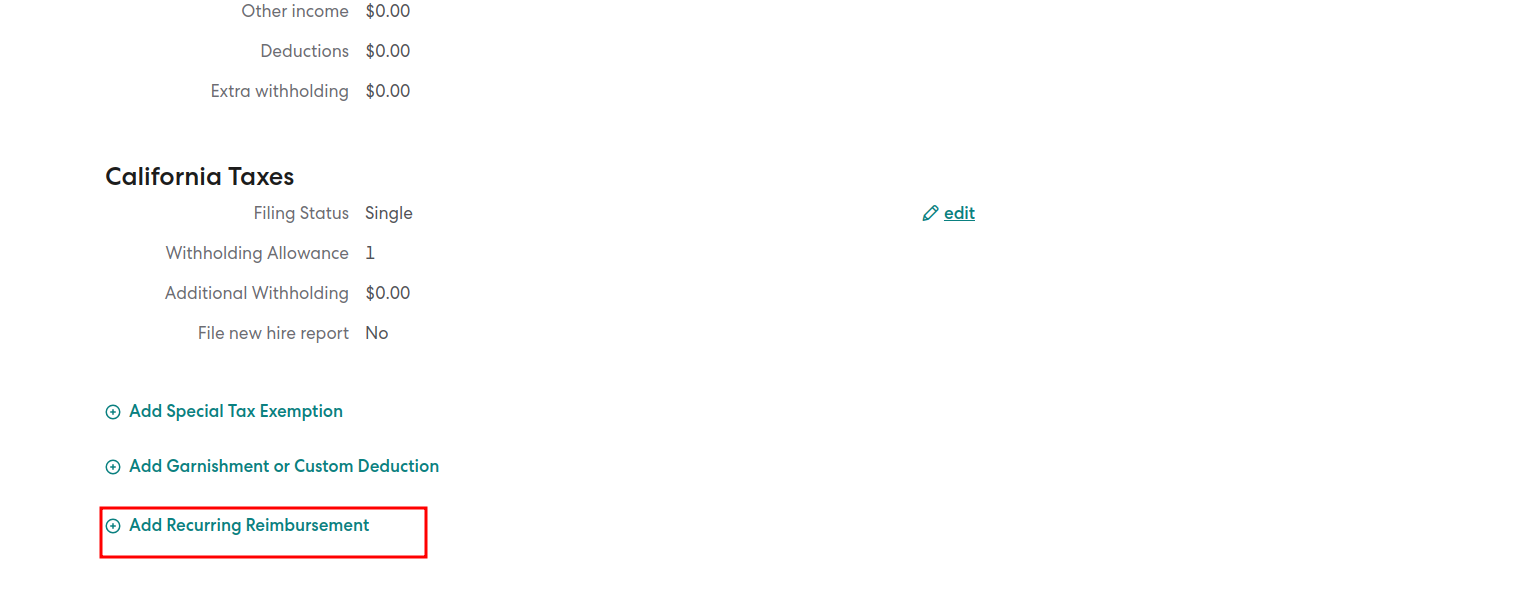
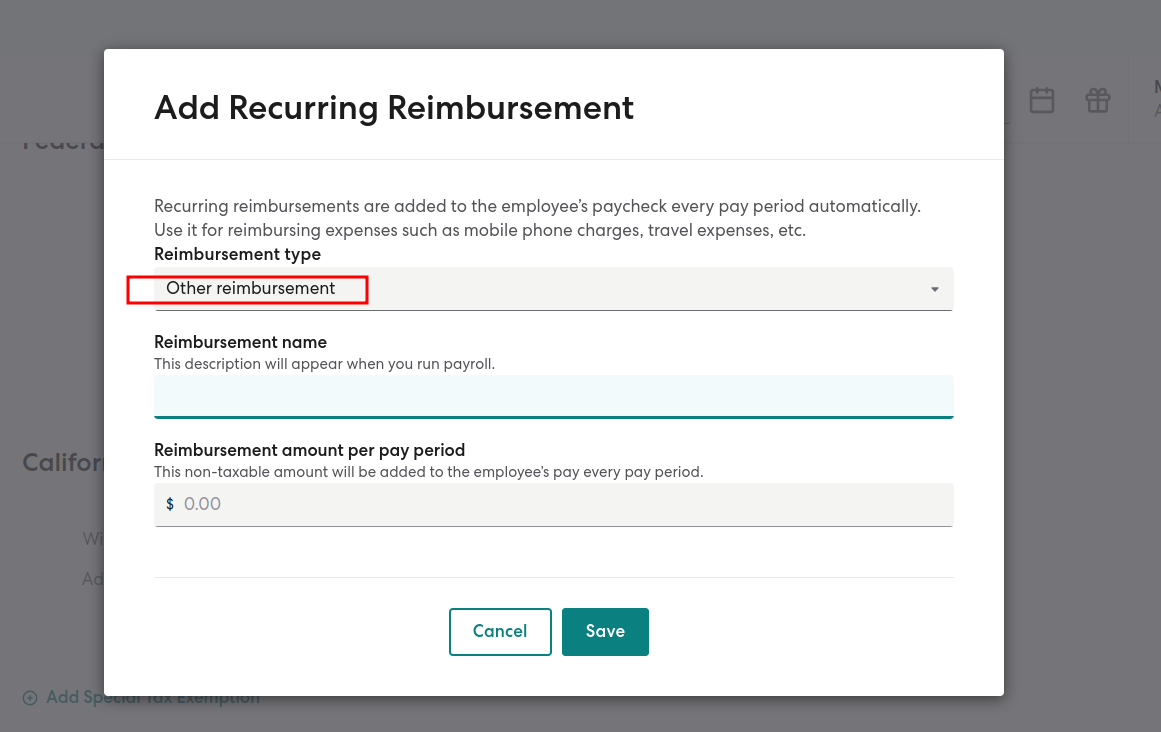

The updated reimbursement details will be reflected in the reimbursement field during the next payroll. You can adjust the amount if needed before processing the payroll.
Deleting A Recurring Reimbursement:
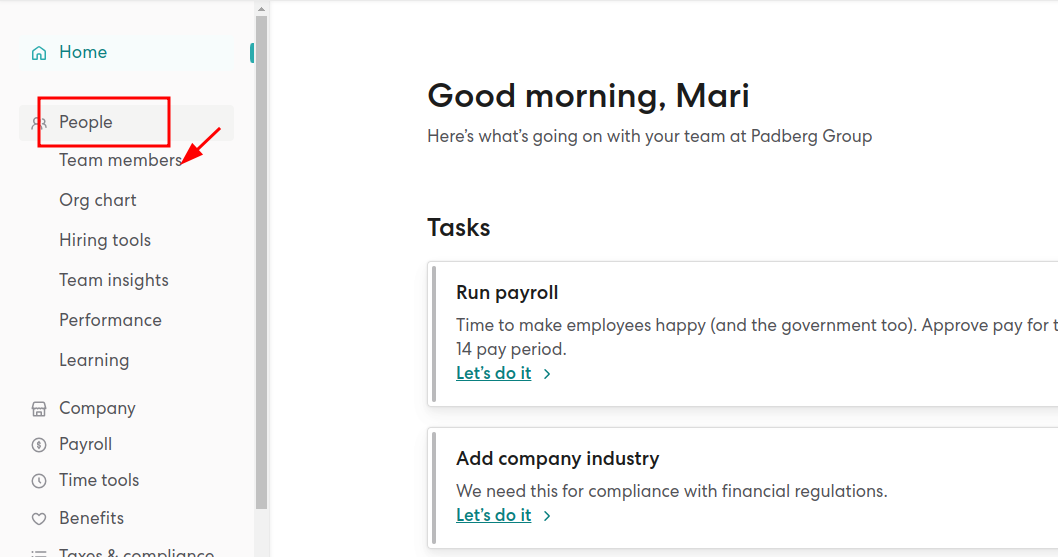

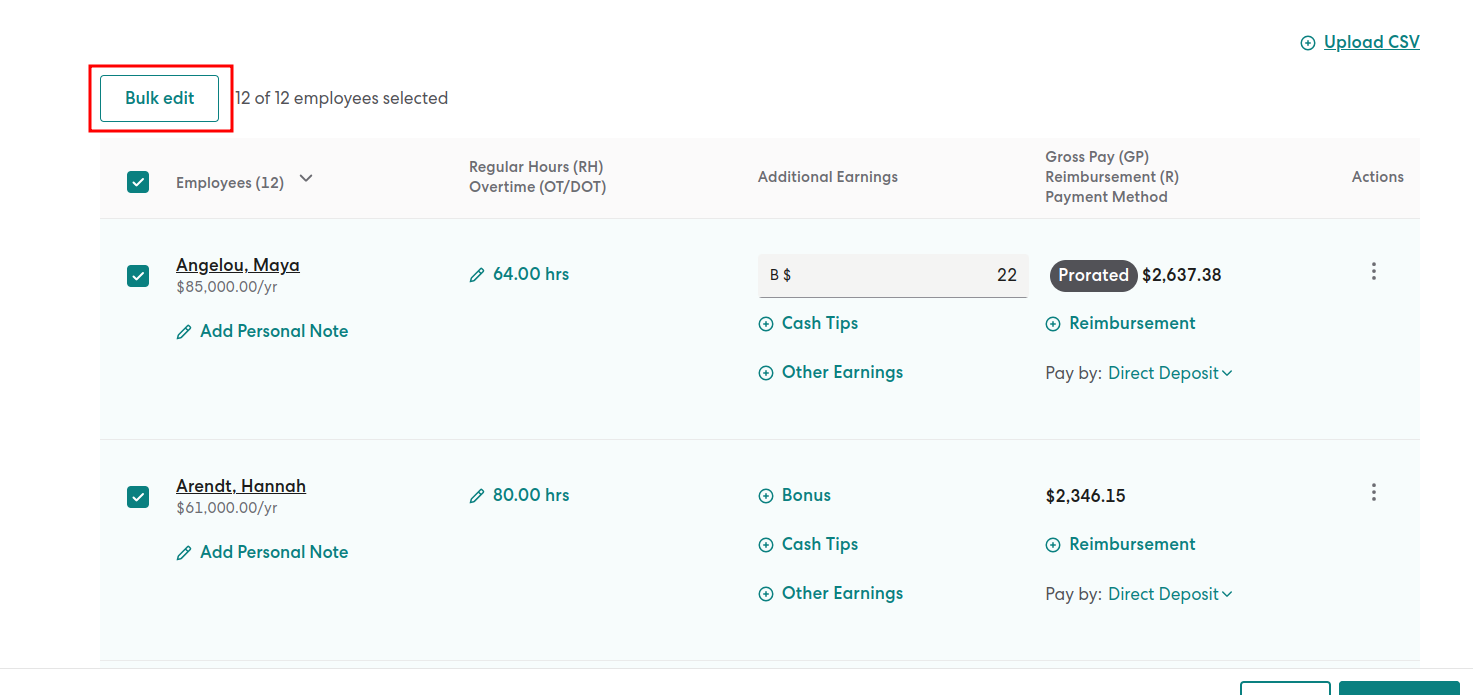
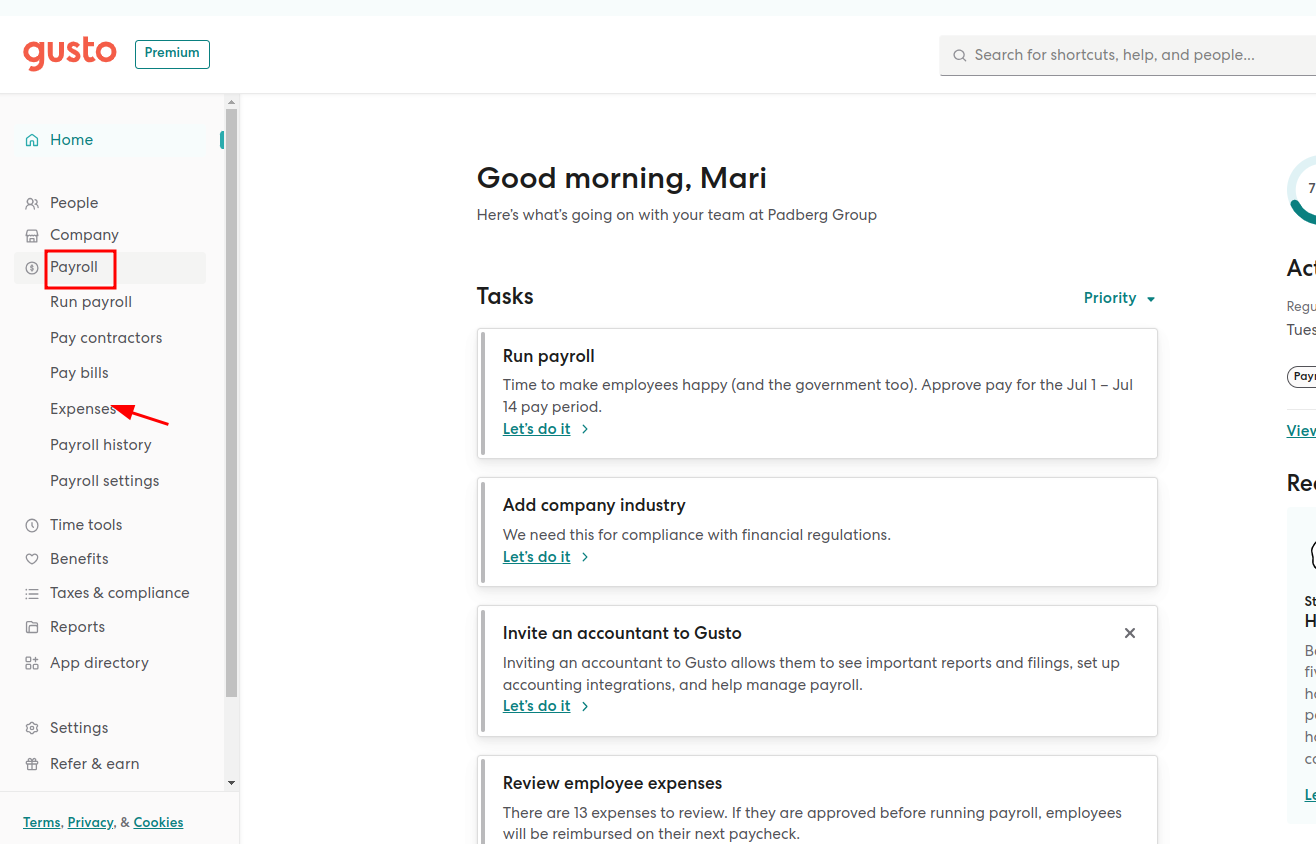
If you are a Plus or Premium customer of Gusto, you have the ability to reimburse employees for their expenses using the Expenses feature. However, if you don’t see this feature available, you have two options. You can upgrade your plan to either Plus or Premium to access the Expenses feature, or you can opt for a one-time reimbursement setup instead.
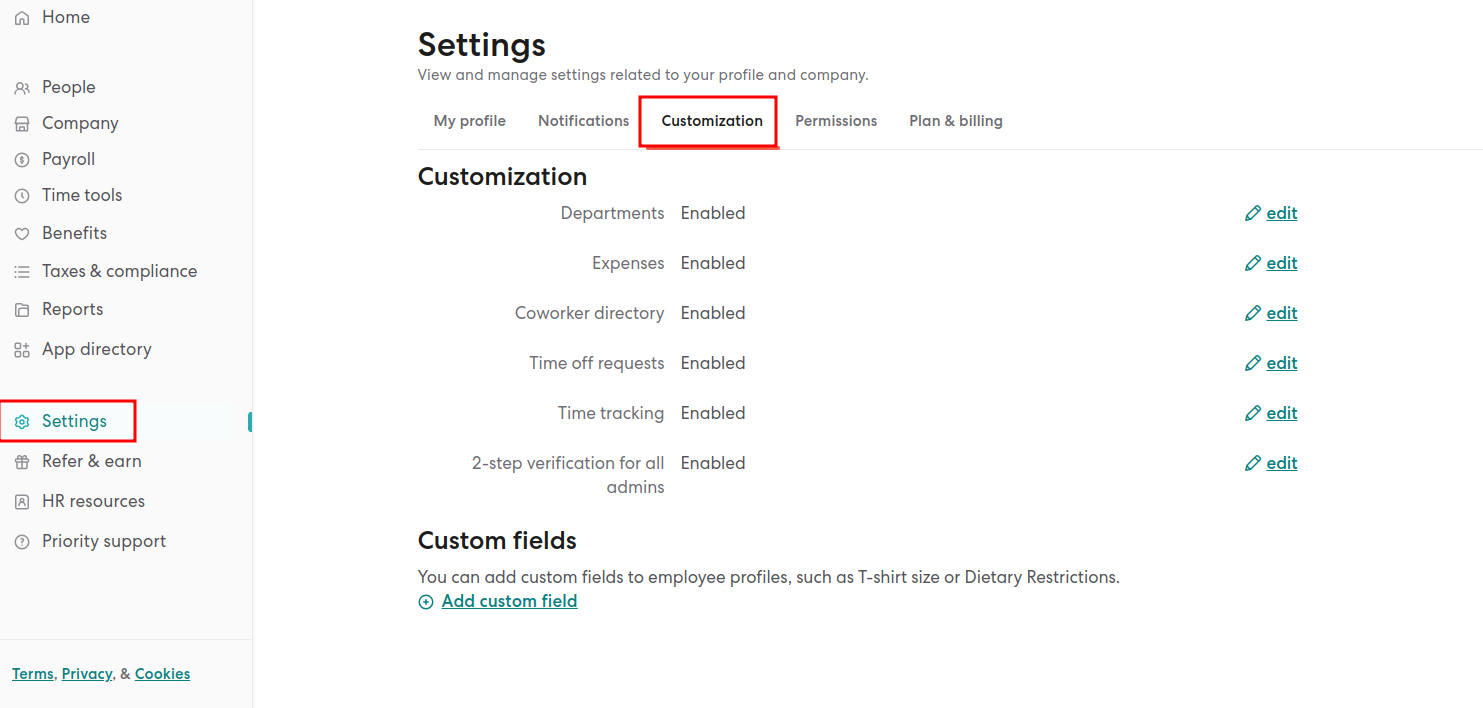
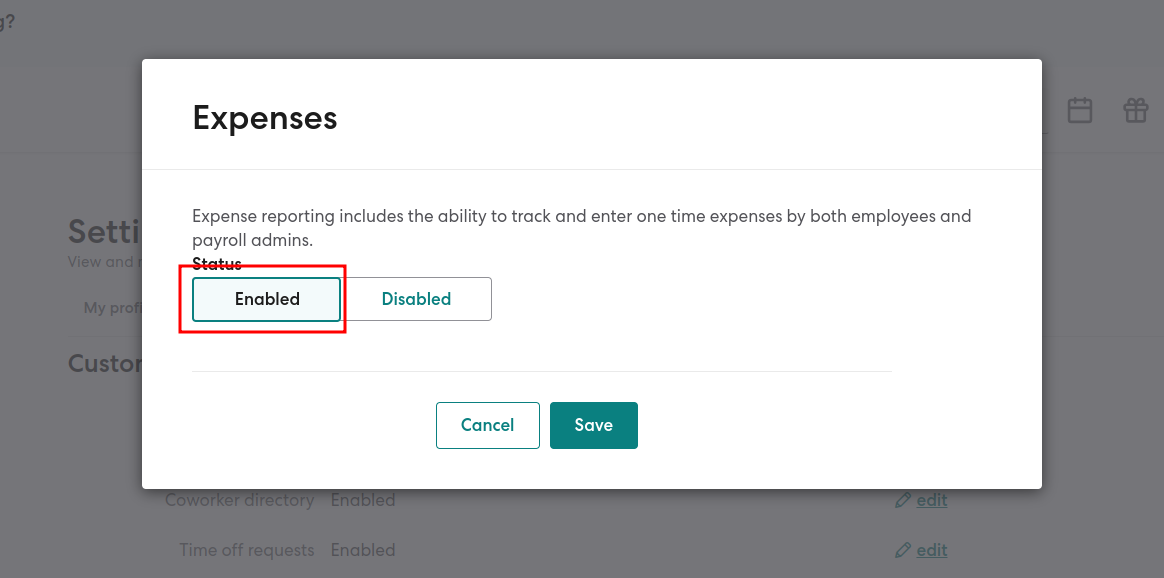
Enable Expenses:
Customize Expense Categories:

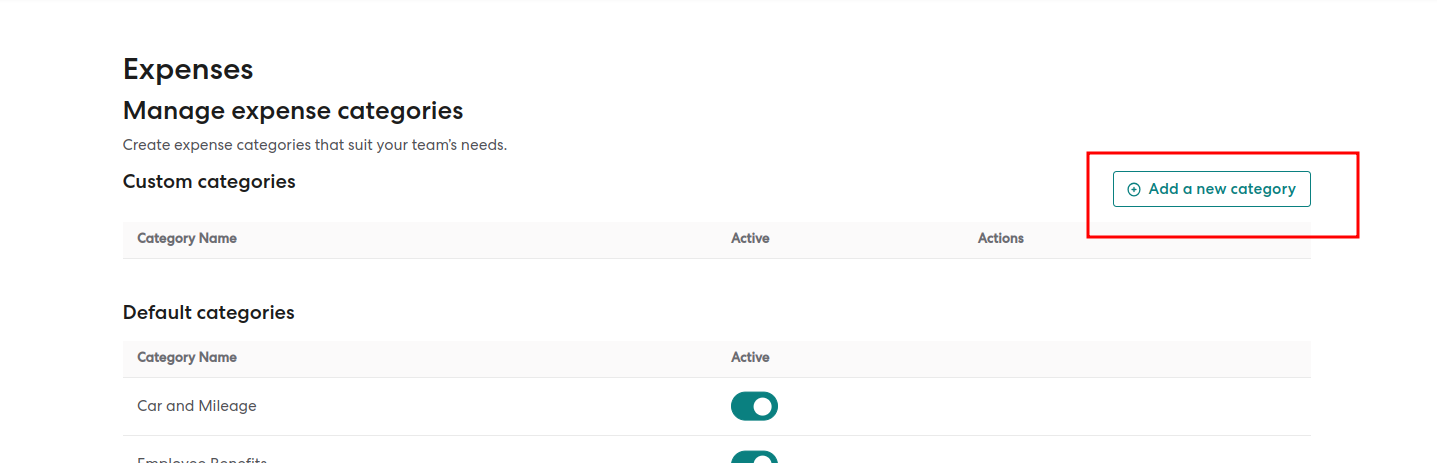
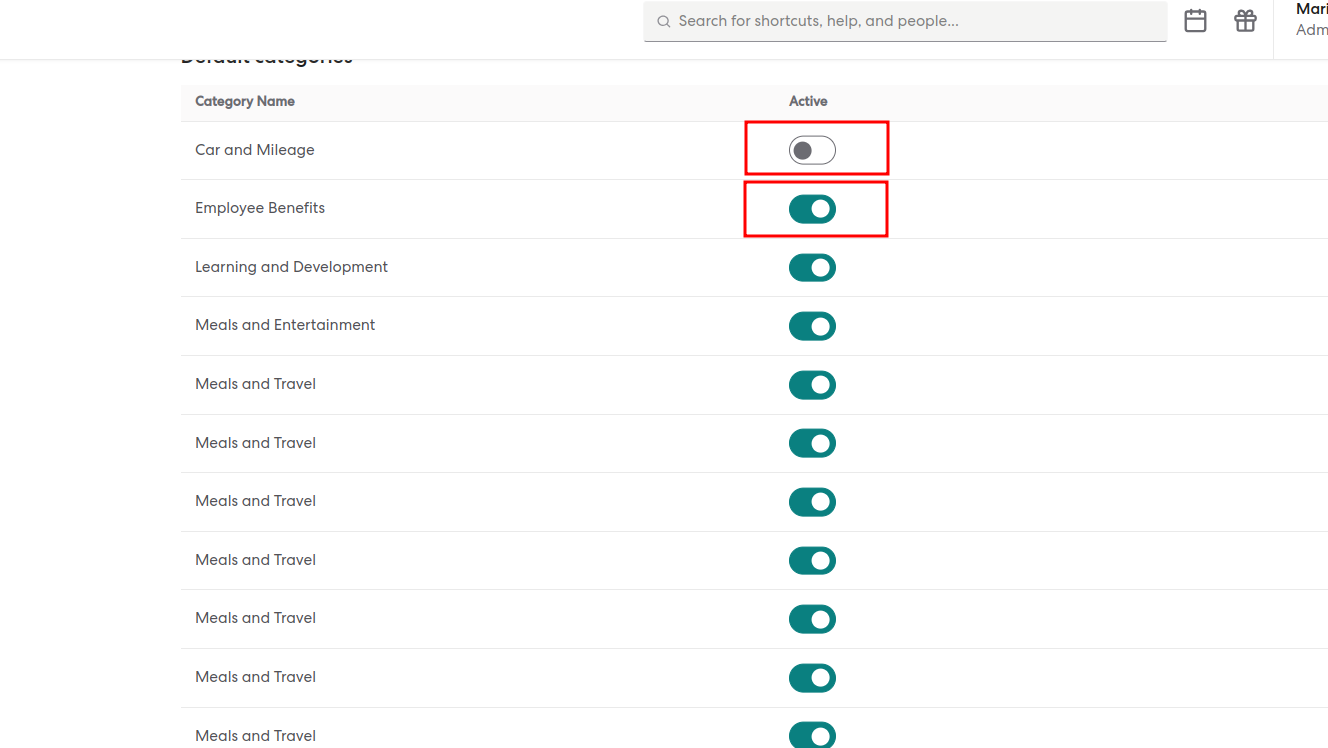
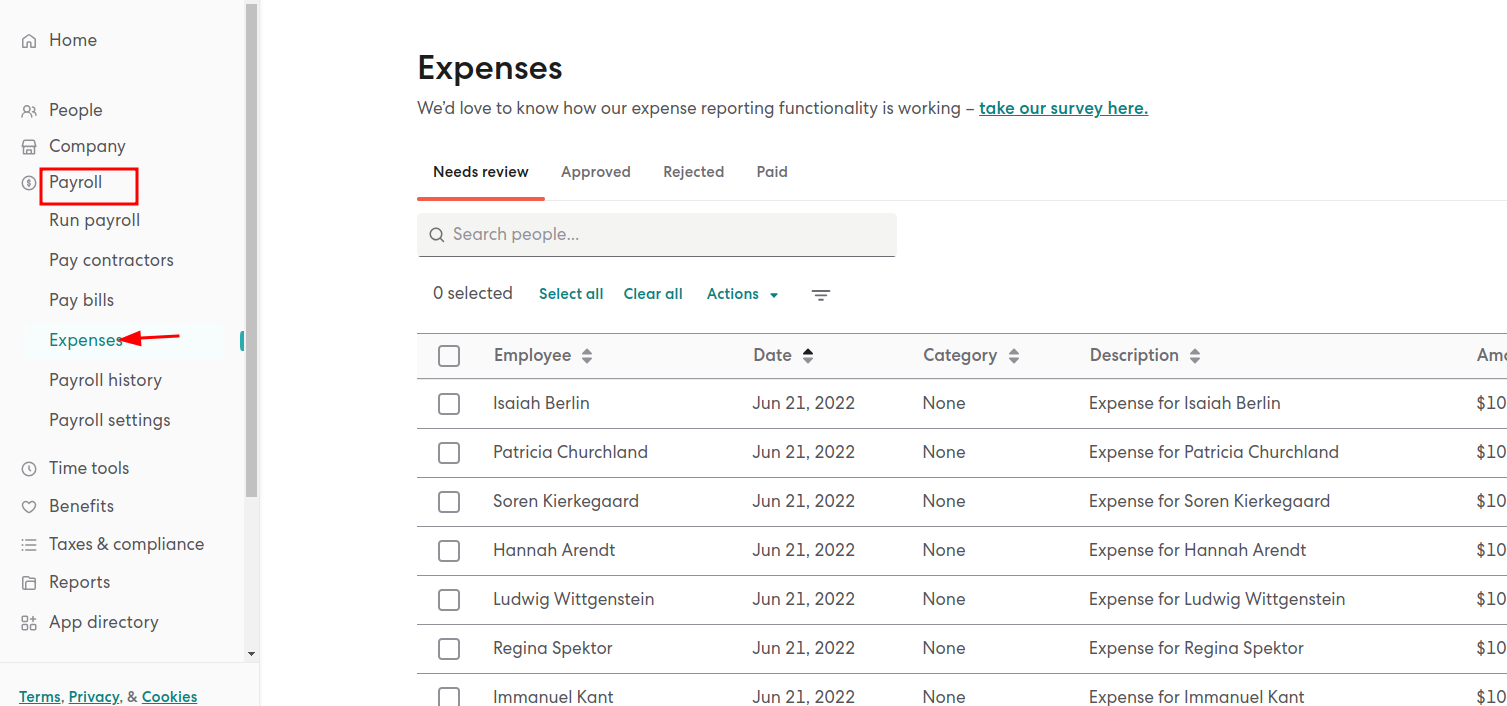
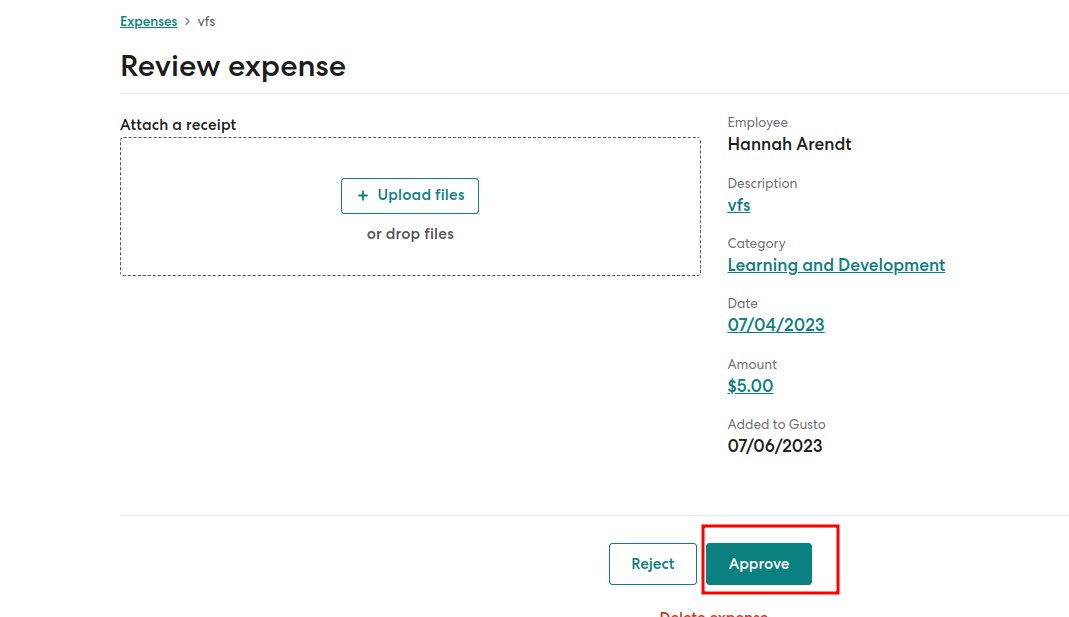
Filter Expenses:
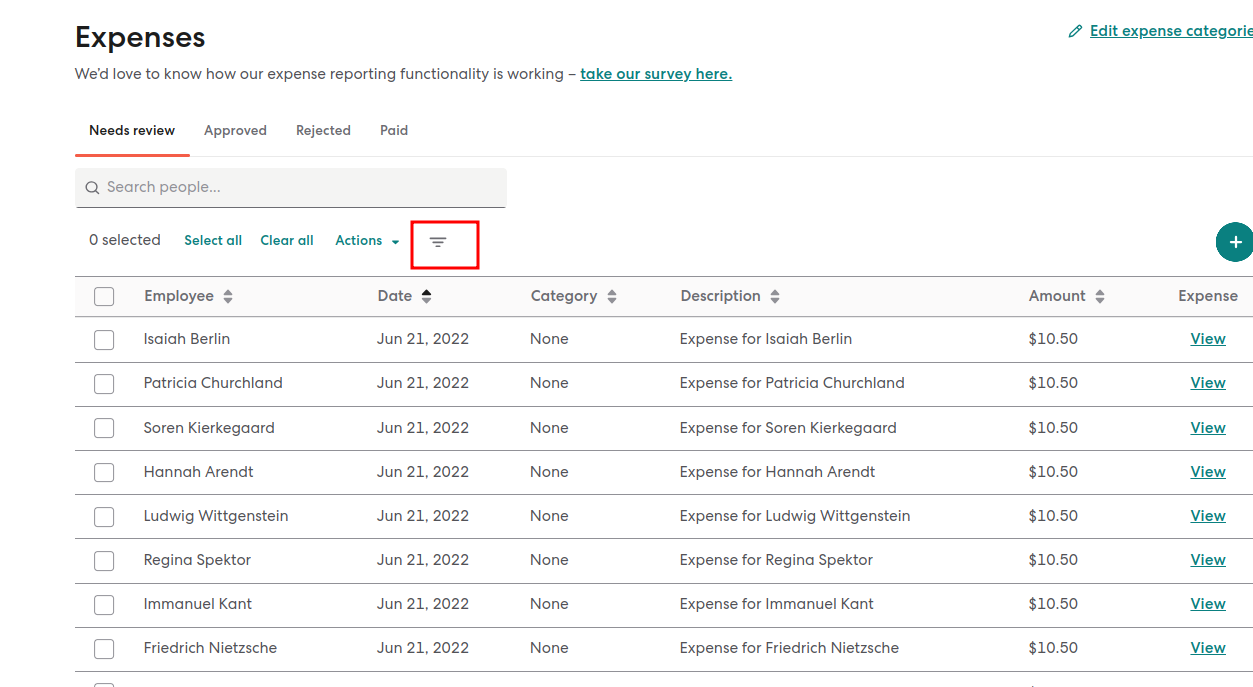

Perform Bulk Actions:
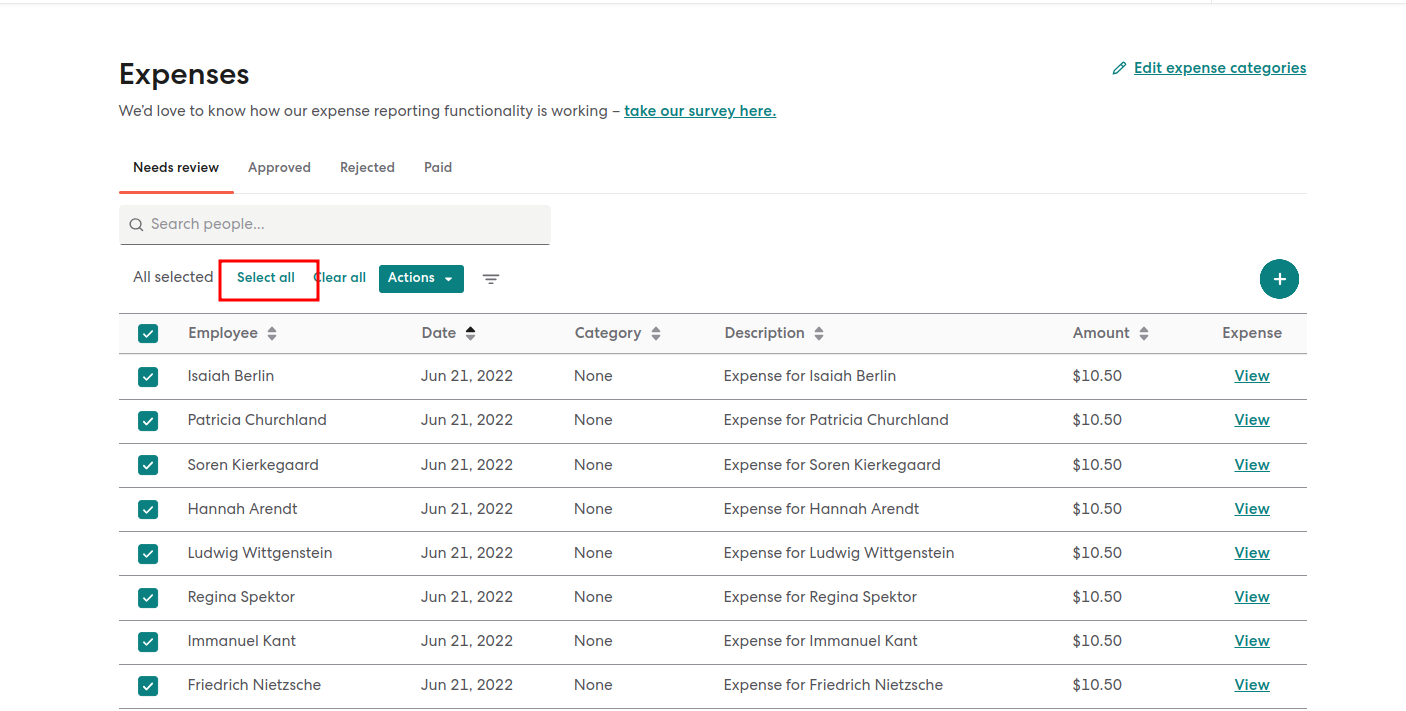
By following these steps, you can easily reimburse teams/groups for their expenses using Gusto Payroll Software. Remember to review and approve expenses before processing payroll to ensure accurate reimbursement.
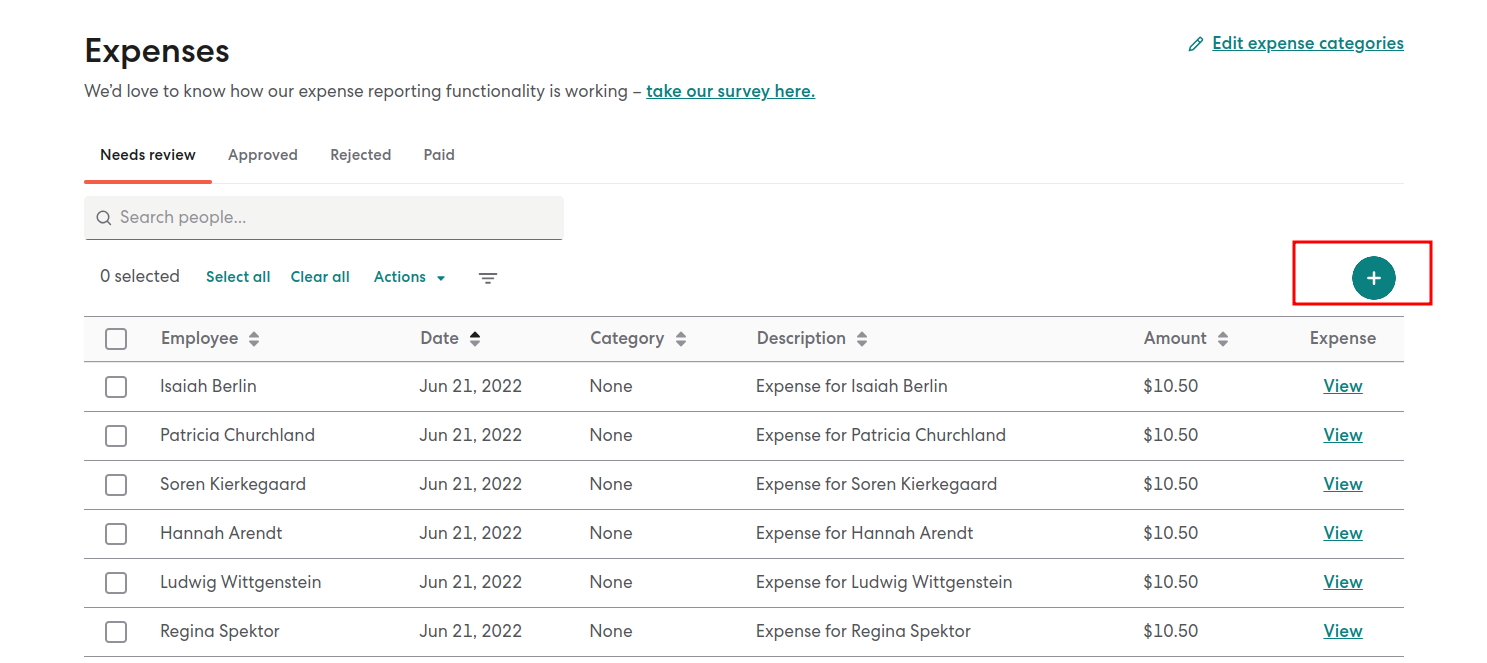
To submit expenses for reimbursement through Gusto, please follow the steps provided below. However, please note that if you cannot find the Expenses section, it means that your employer may not have enabled this feature in Gusto.
Key Point: “Gusto Wallet mobile app currently does not support expenses, so you’ll need to use the web platform for this feature. Also, the contractors do not have access to this feature.”
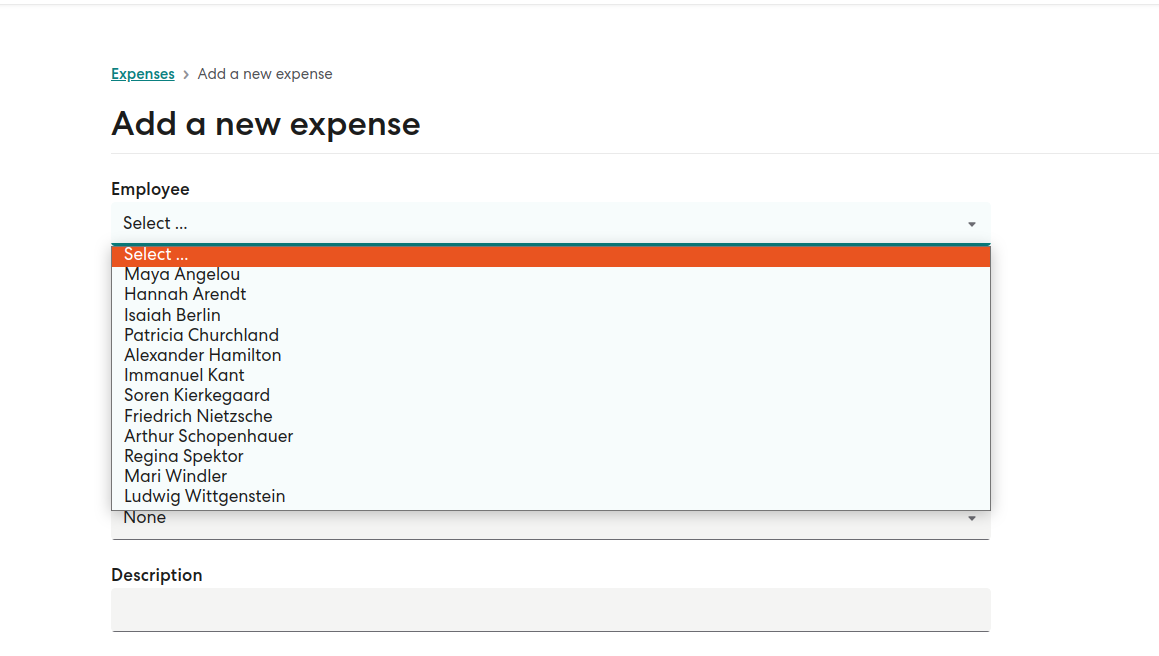
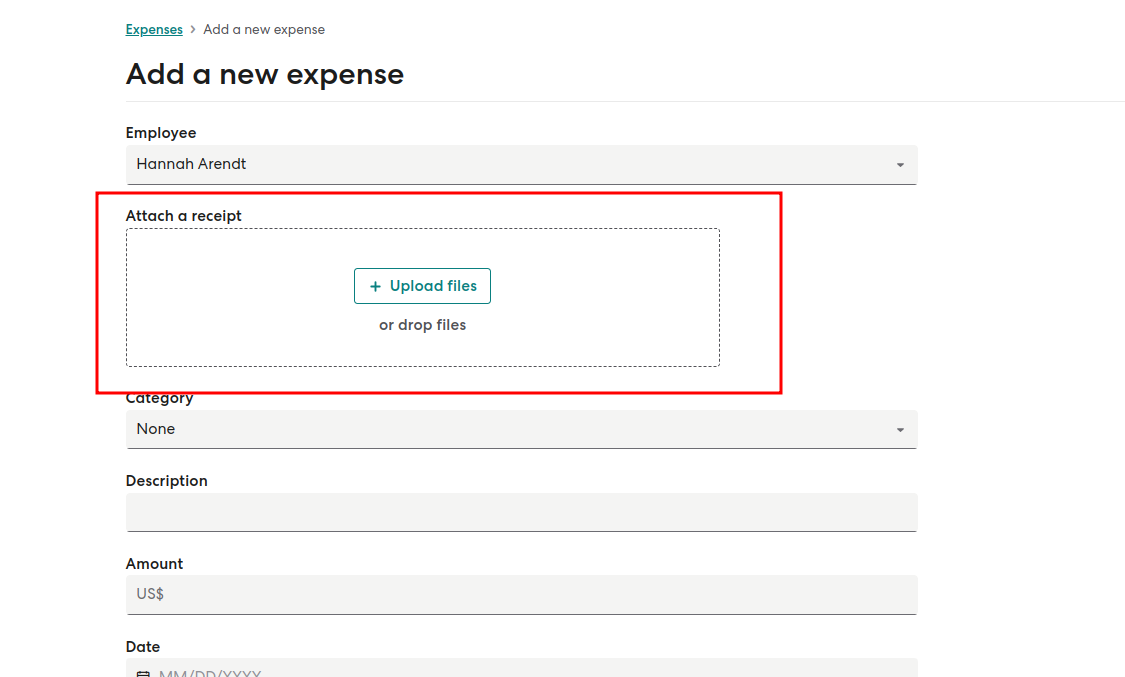
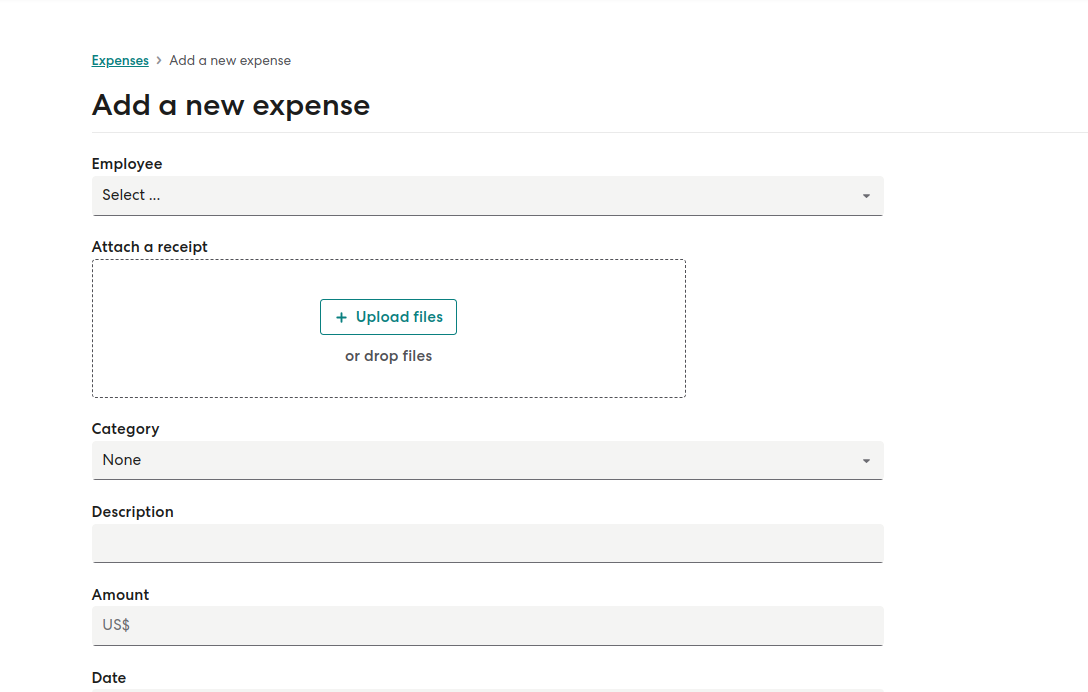
To Submit An Expense For Reimbursement, Please Follow These Steps:
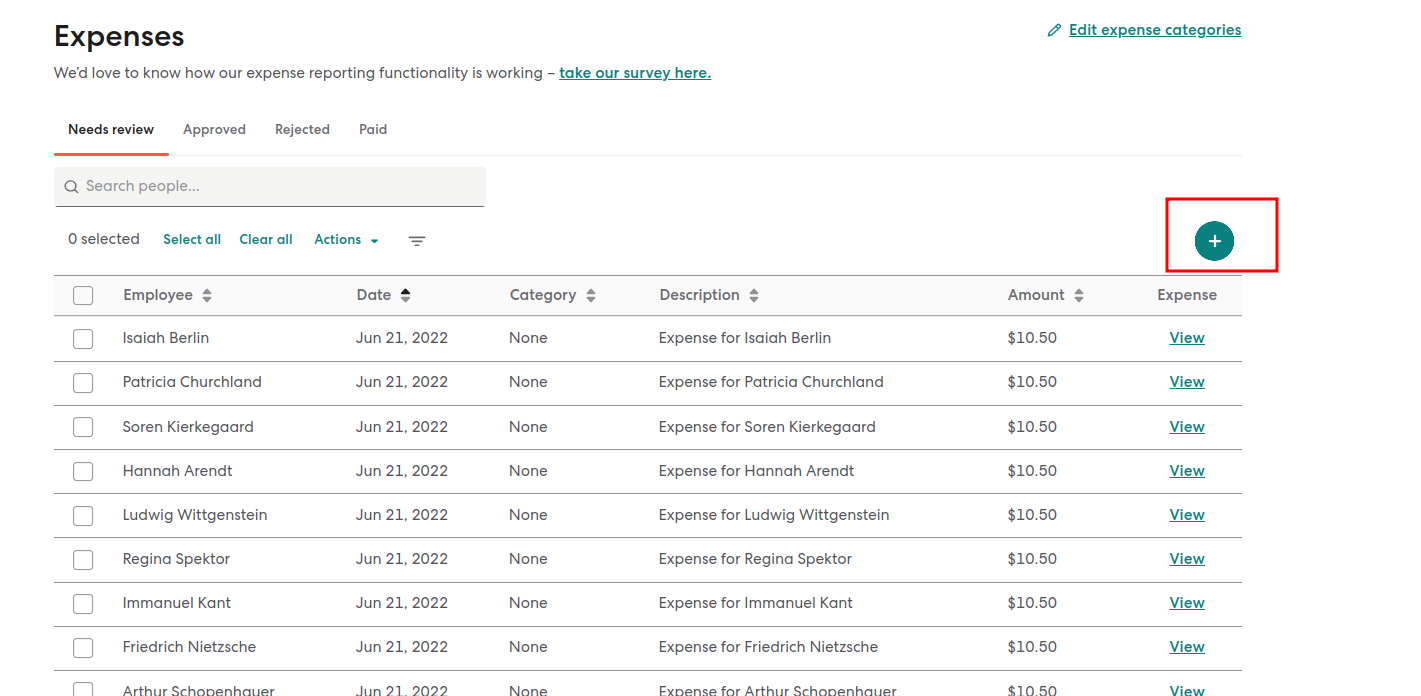
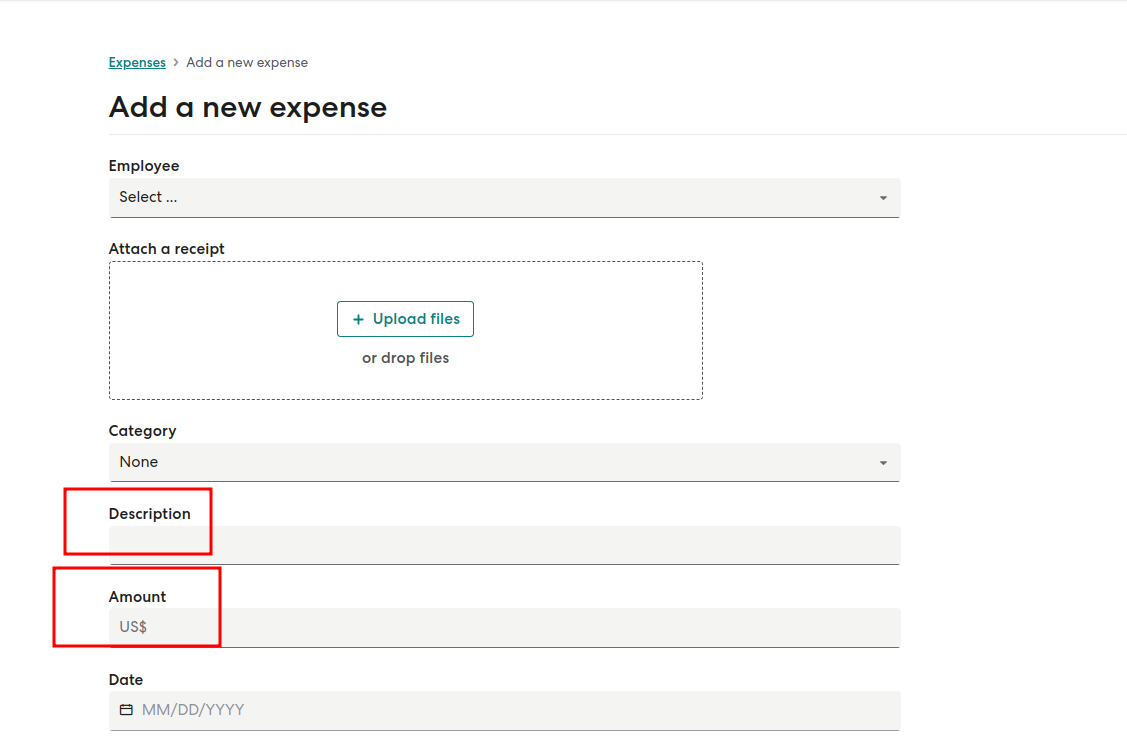
(The date displayed for the expense on the Expenses Page will reflect the transaction date, not the date of submission. You can view the submission date by clicking “View” under the Expense column.)
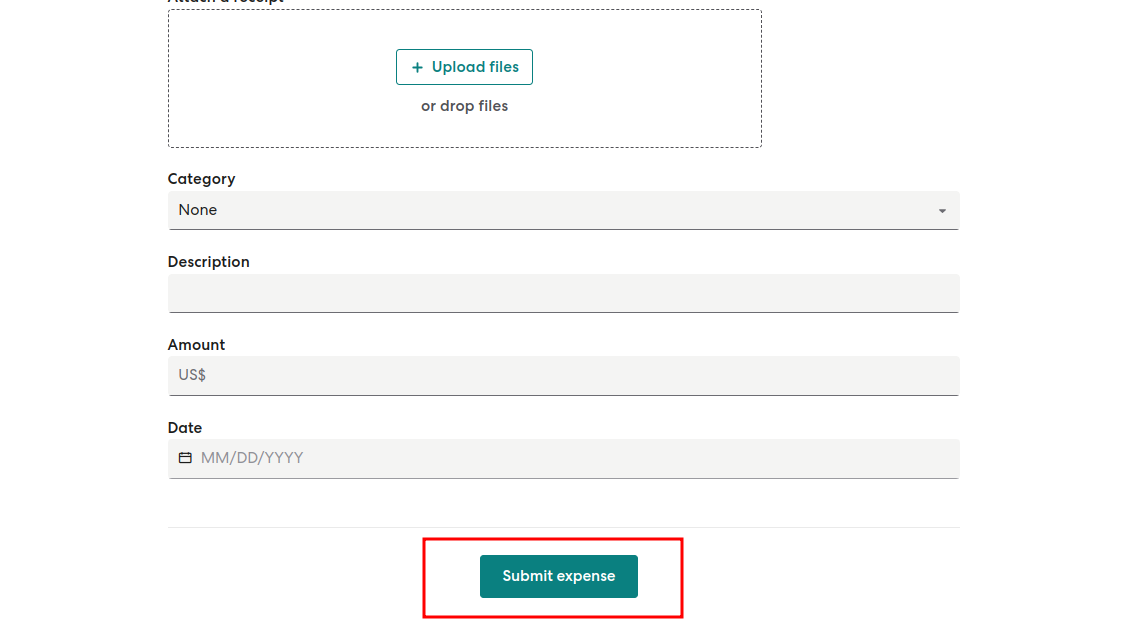
Once your employer processes payroll, the reimbursed amount will appear as a separate line item on your paystub as a one-time reimbursement.
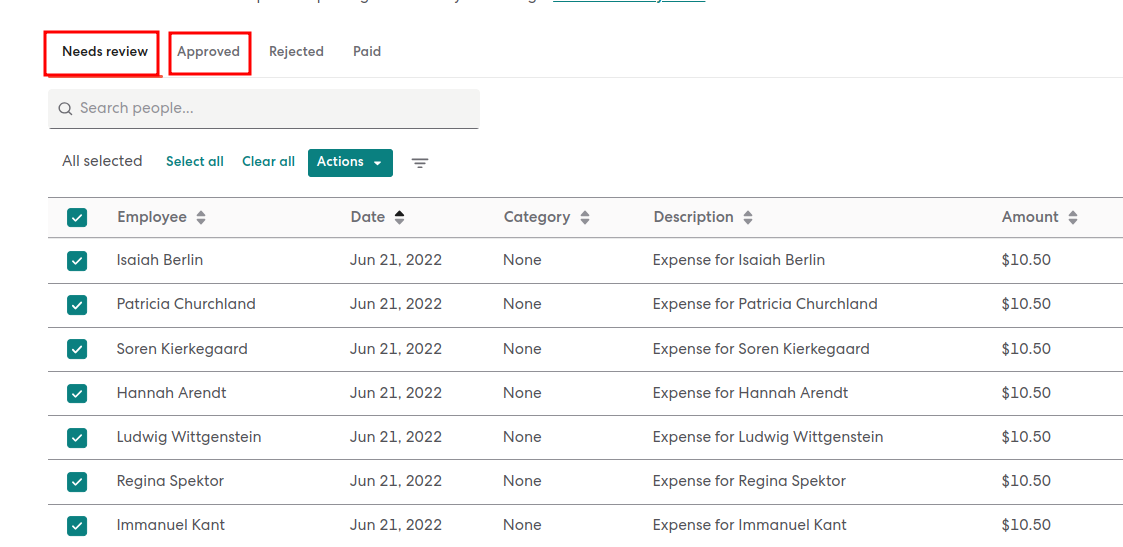
Key Point: “If you have additional expenses to add, simply repeat the same process. You can add as many items as needed. Your expenses awaiting review, approved, rejected, and paid will be displayed in their respective tabs on your Expenses home page.”
To Modify An Expense, Follow These Steps:

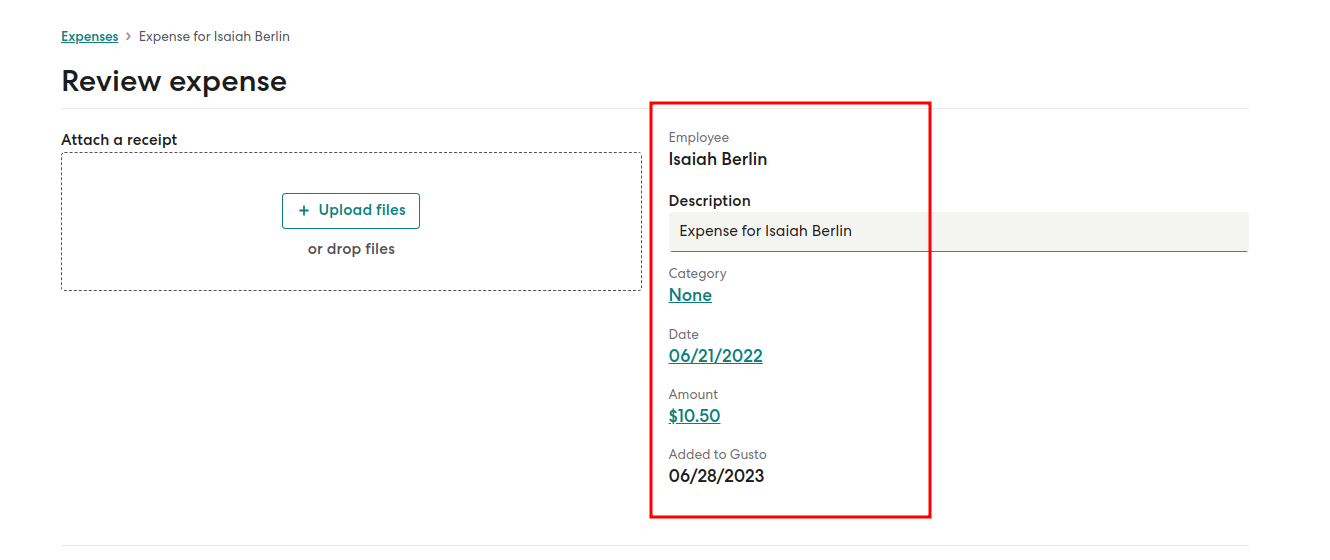
In case you need to update the receipt for an expense, you’ll have to delete the existing entry and create a new one, ensuring the correct receipt is attached.
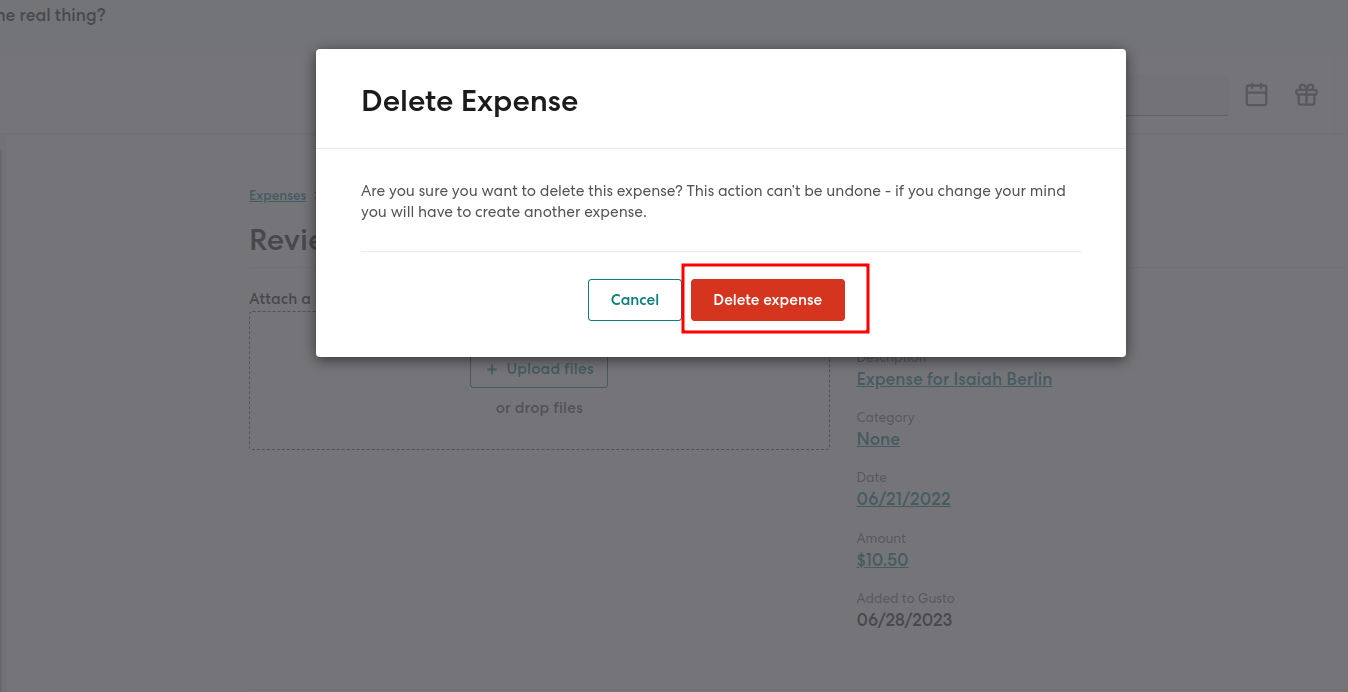
To Remove An Expense, Follow These Steps:
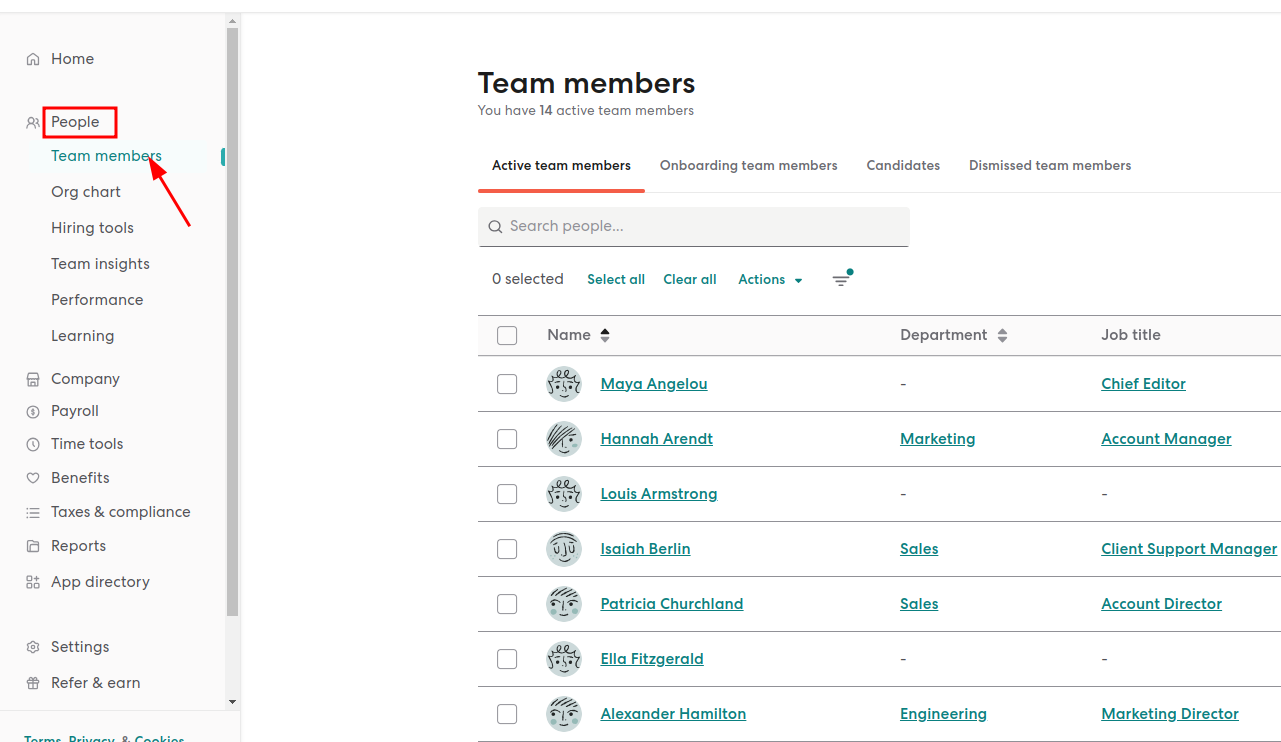
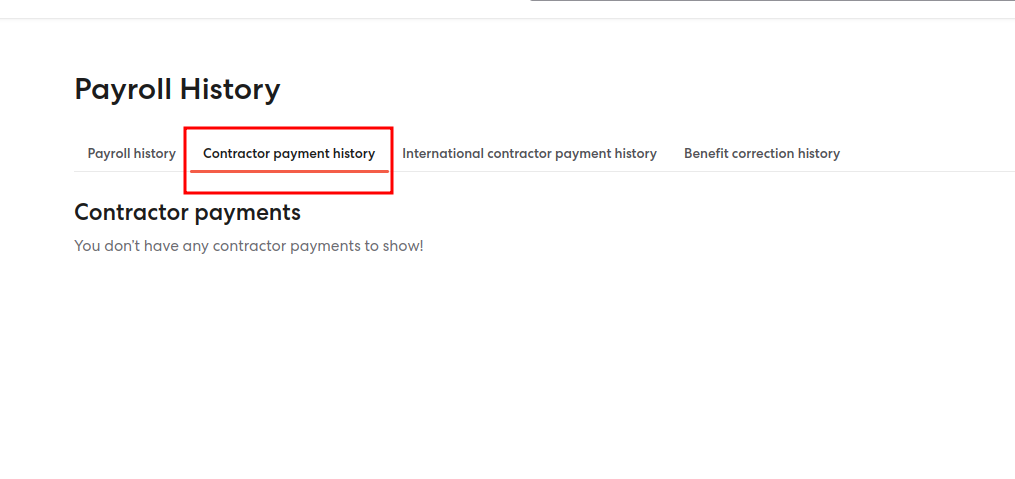
Administrators who possess the necessary permissions have the ability to access comprehensive information regarding all payrolls and contractor payments processed through Gusto. This includes various reports containing detailed data. On the other hand, employees and domestic contractors can view their individual pay stubs and specific payment details by logging into their Gusto accounts.
Let’s get into the detailed explanation:
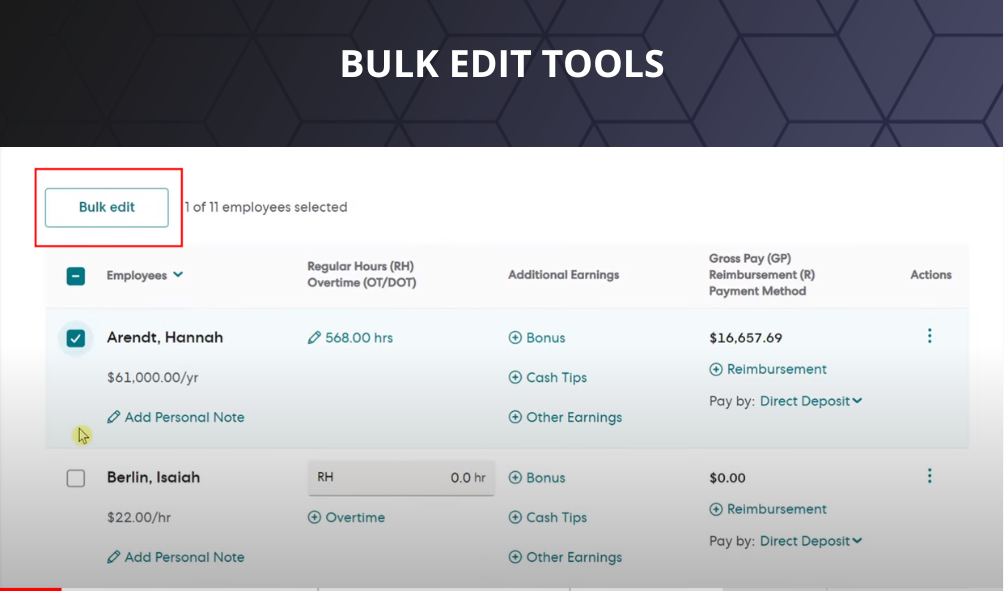
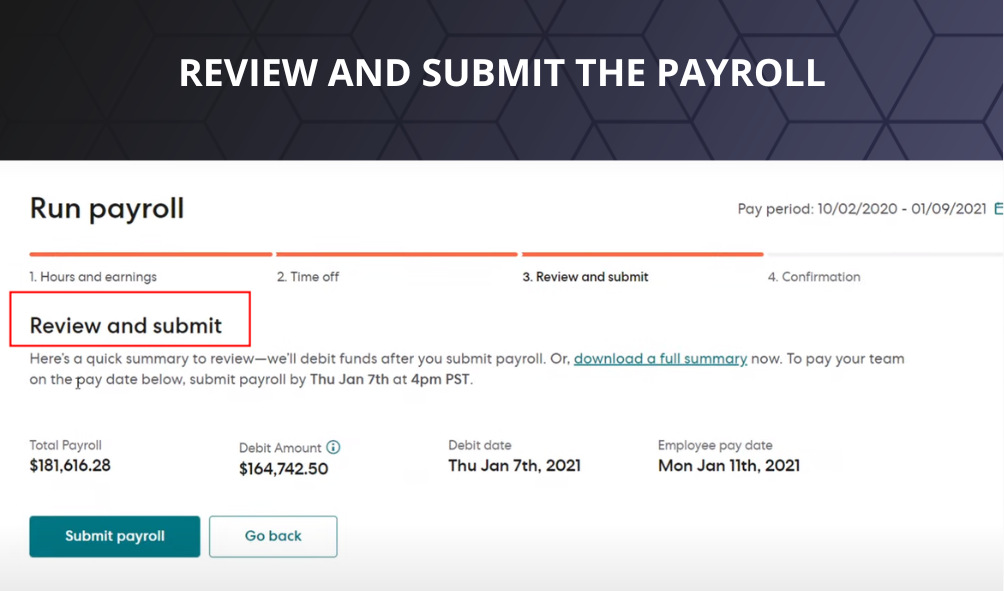
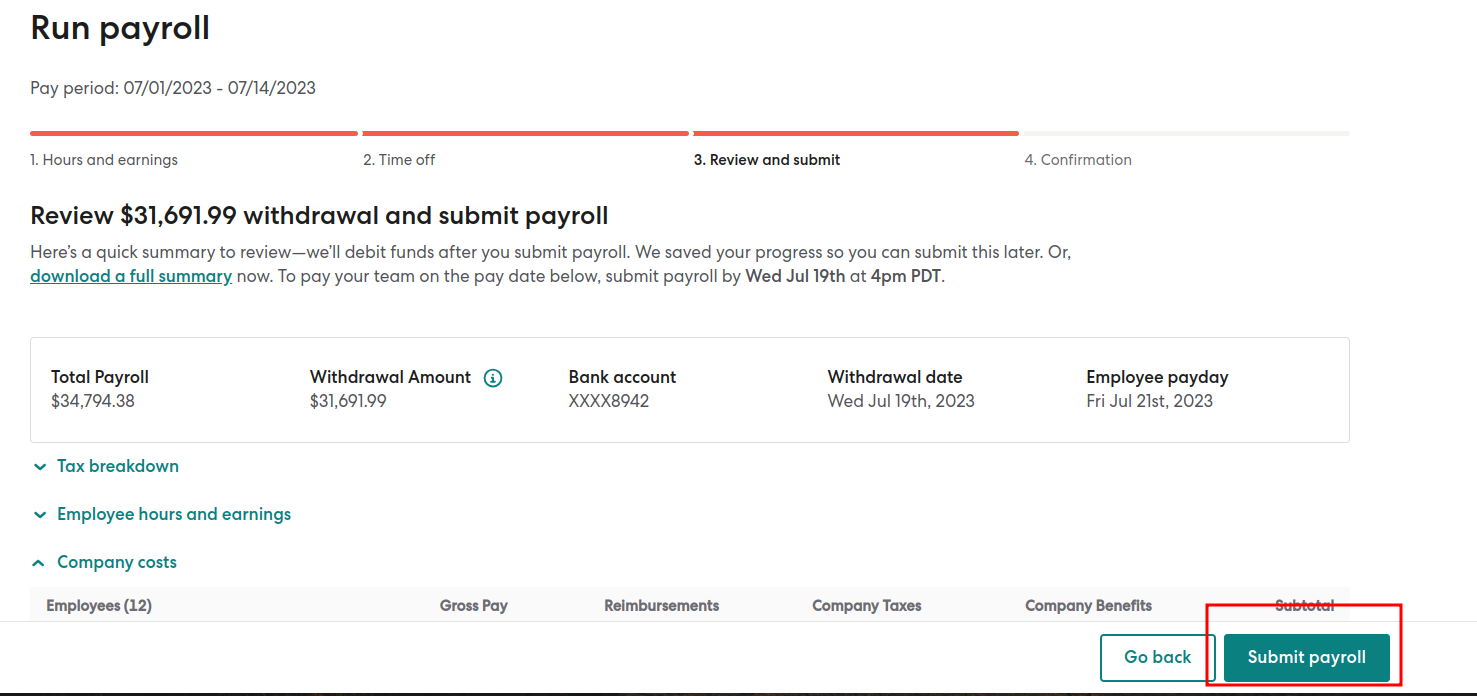
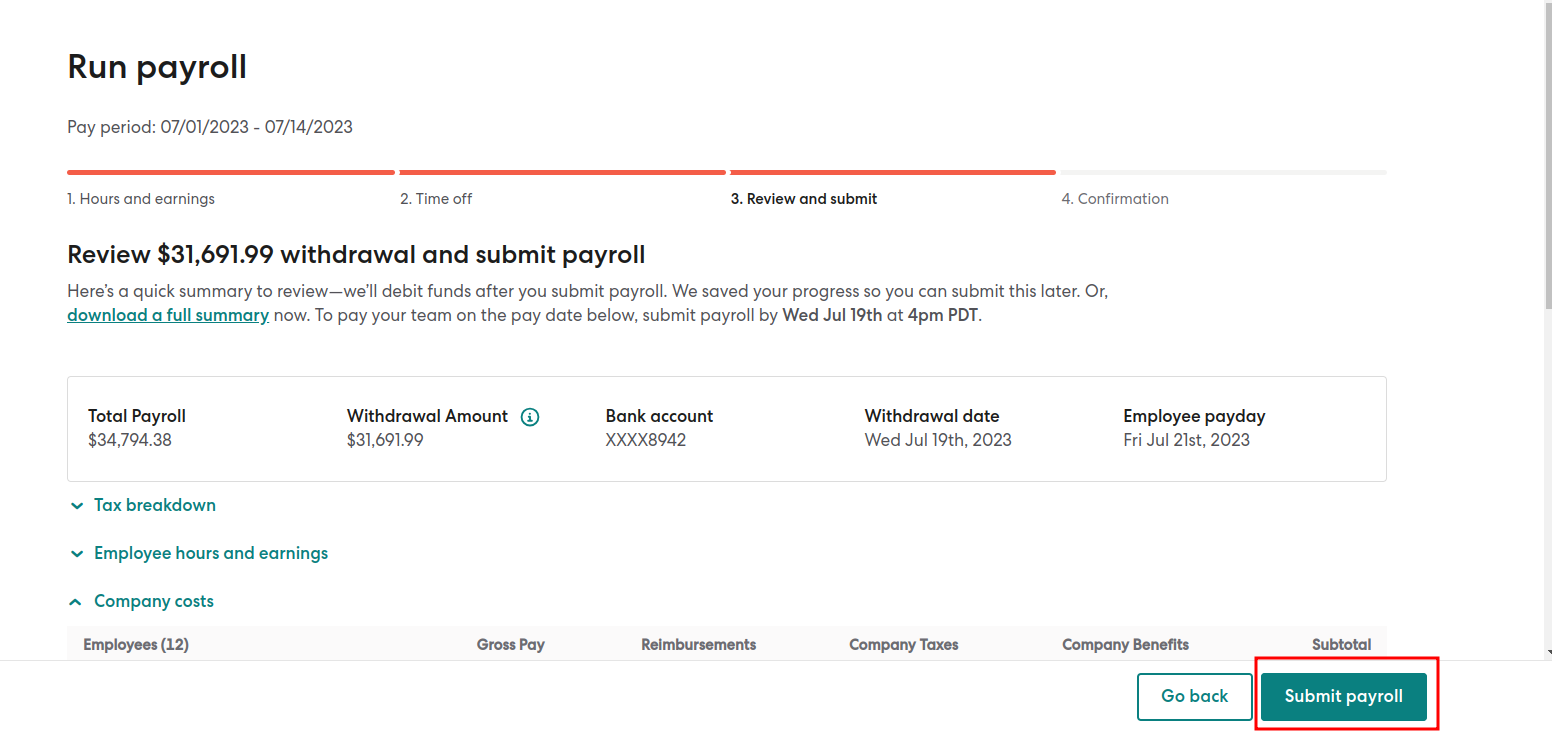
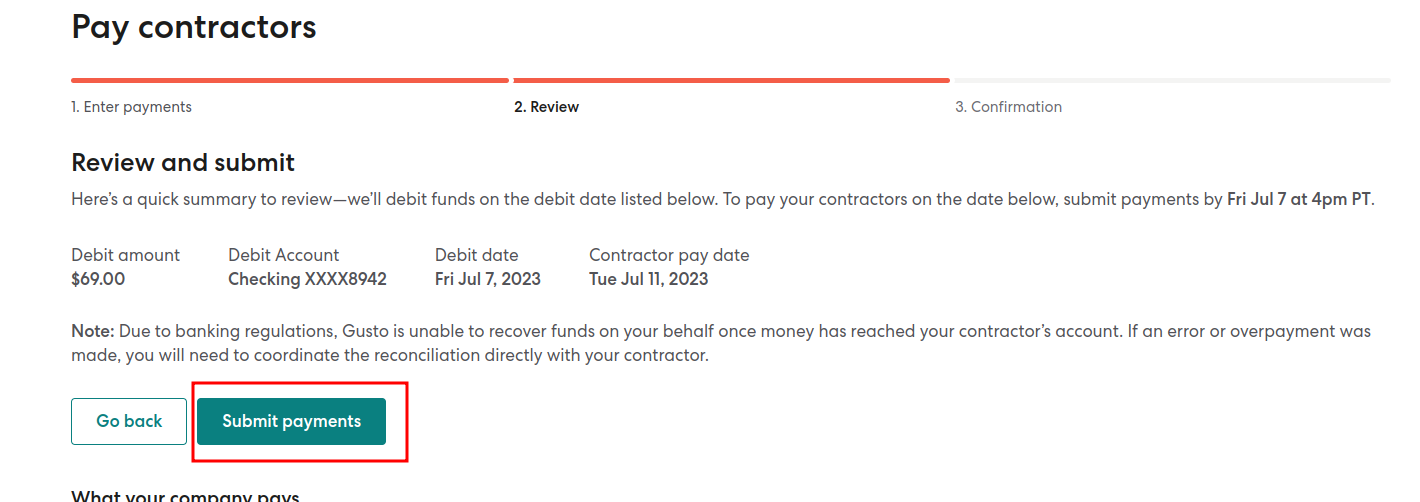
Prior to submitting the payroll in the final step, you will have the opportunity to preview it.
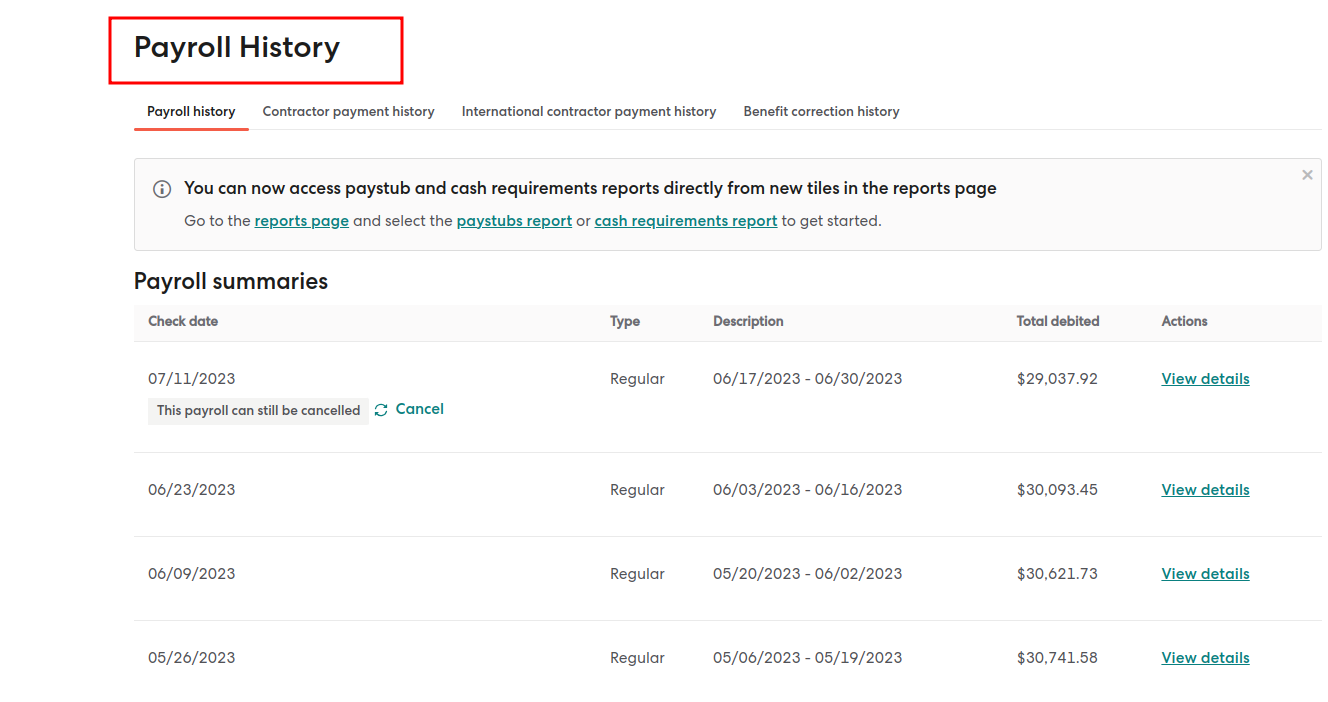
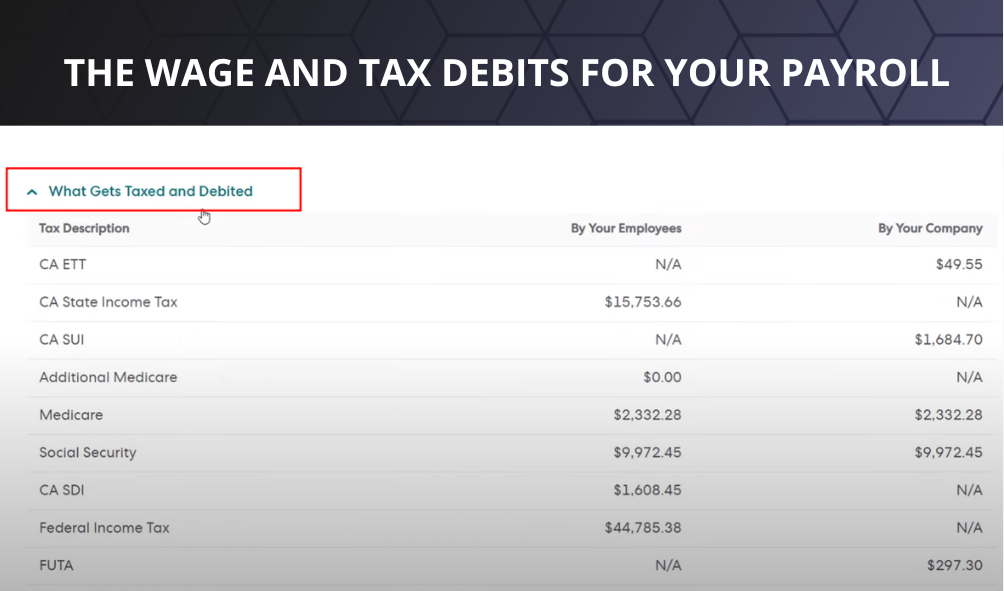
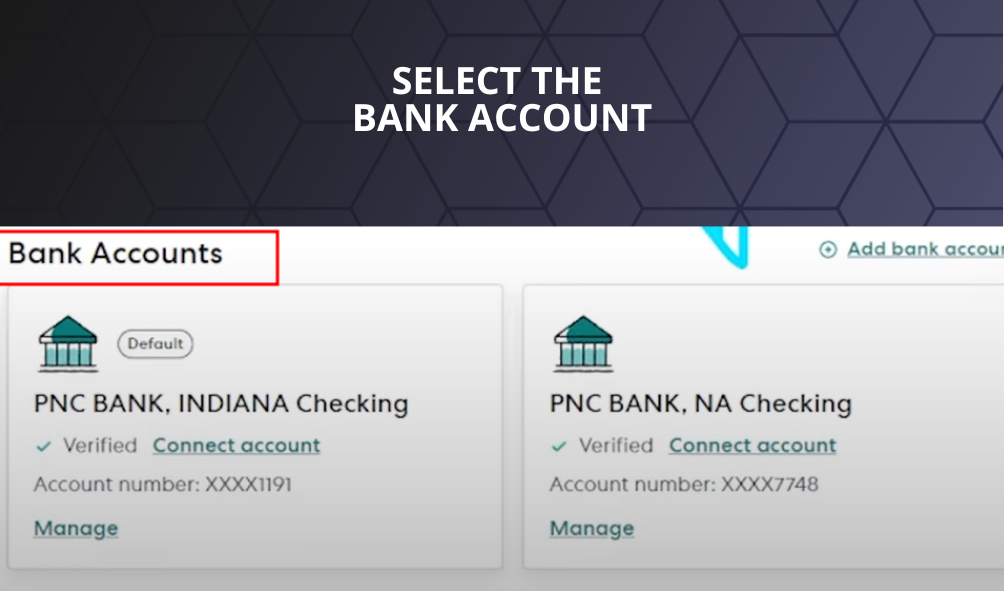
On the summary page, you will be able to see a comprehensive overview of taxes, payments, paystubs, and employees included in the payroll. The gray Payroll details box on the right-hand side will also indicate the bank account from which the payroll was processed.
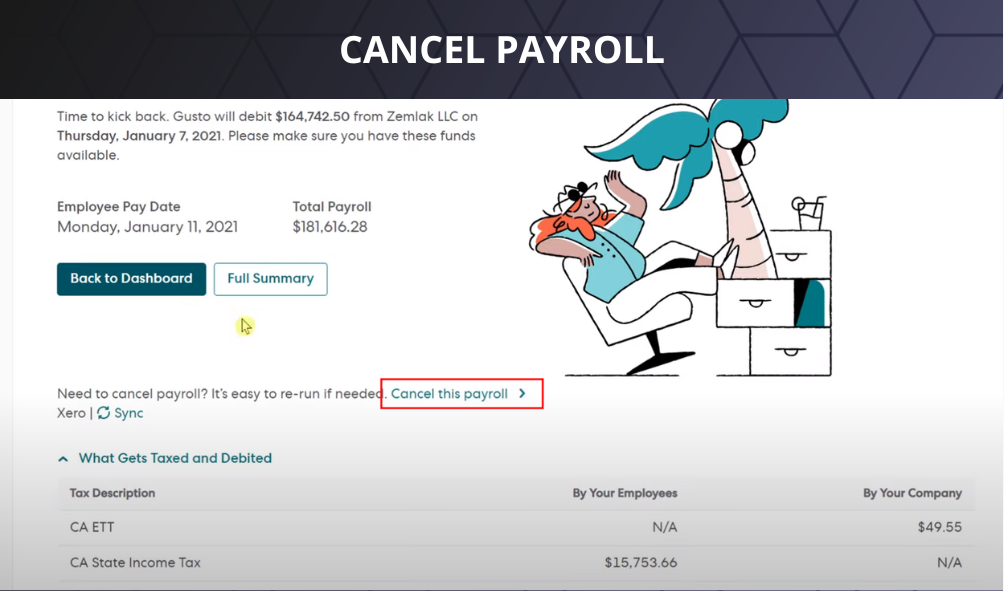
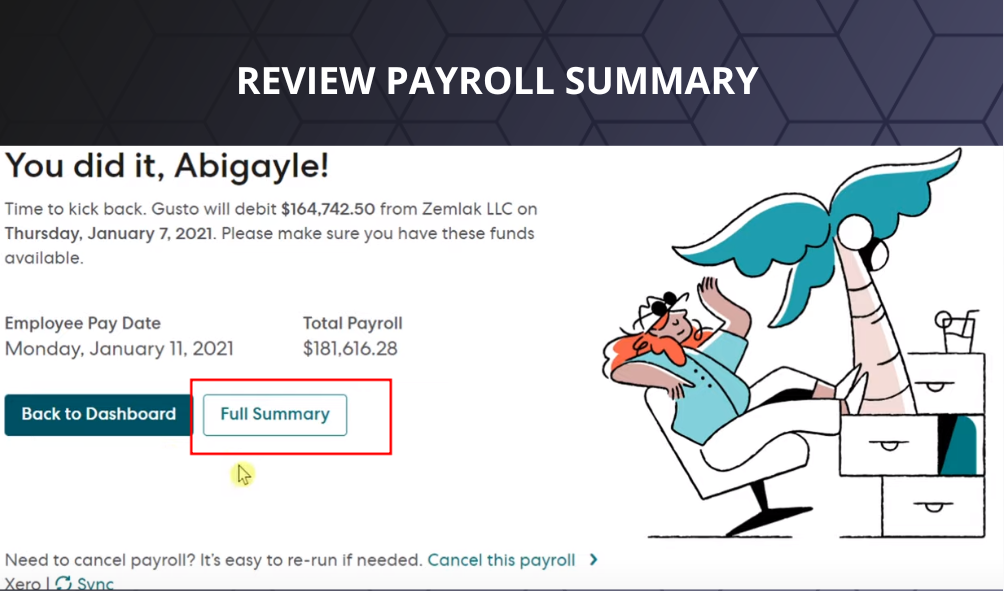
On the summary page, you can observe the payment amount and date. Additionally, the bank account from which the payment was processed will be displayed under the Paid From section, adjacent to the payment amount.
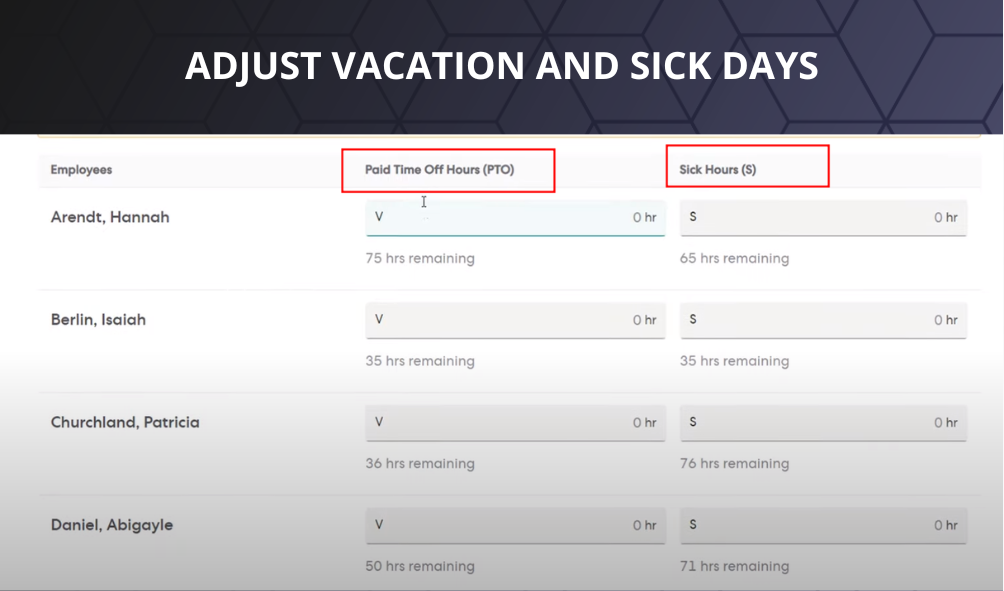
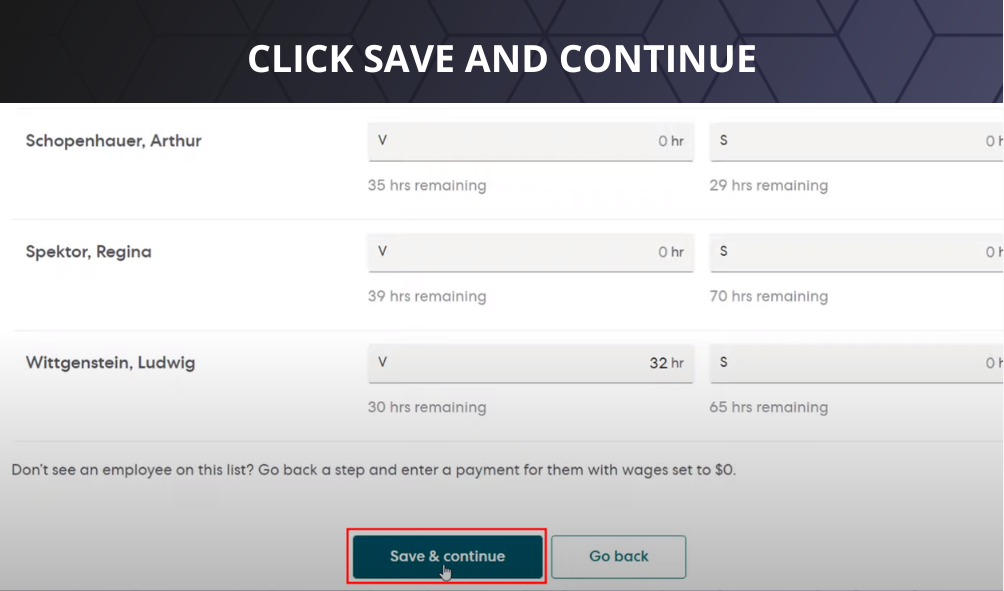
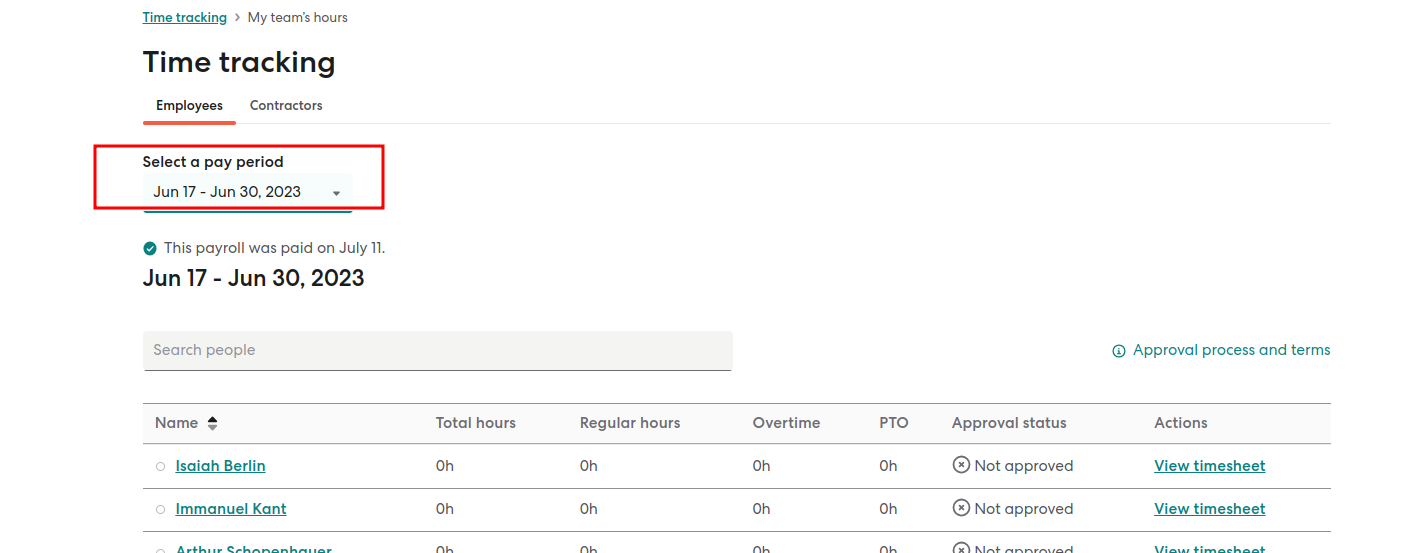
In order to access the Time Off section of your account, it is necessary for your payroll administrator to enable this feature. If you do not see this option, kindly contact your employer for assistance.
Key Point: “Hourly W-2 employees who have a Gusto account can utilize the feature to clock in and out for each shift or manually record and modify hours worked on a daily basis.”
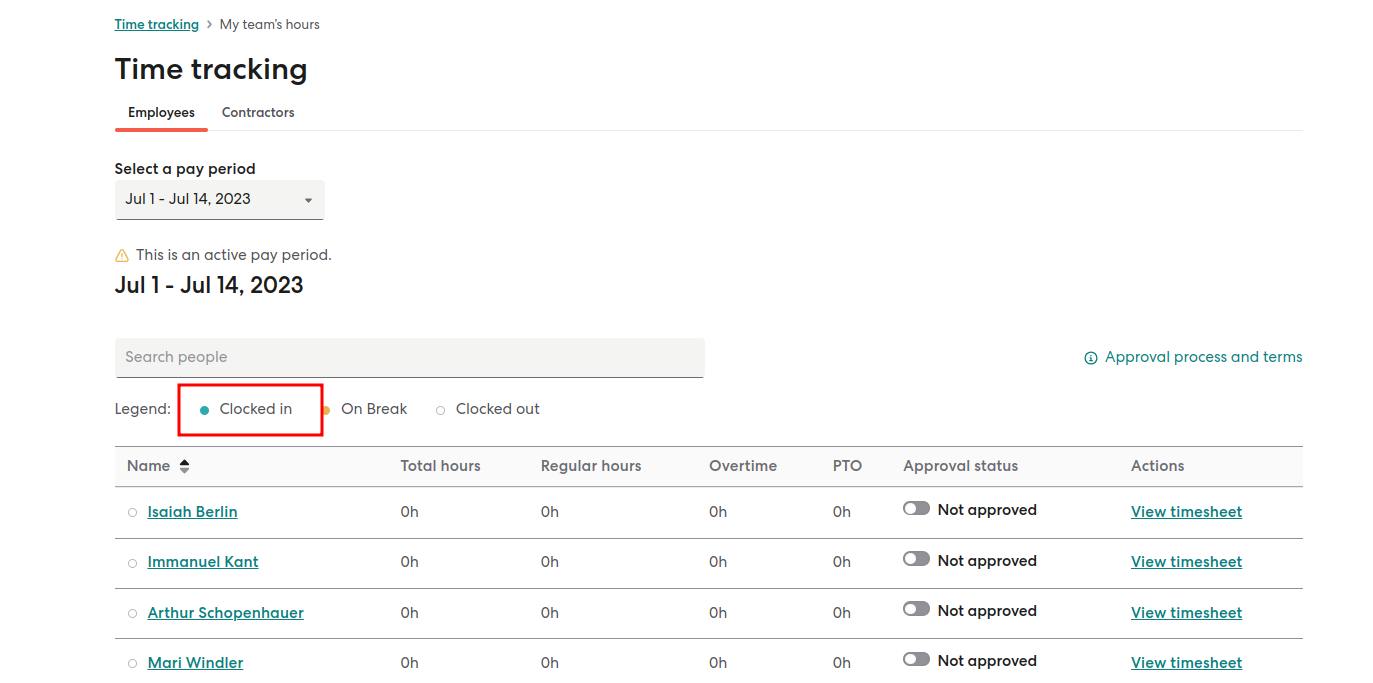
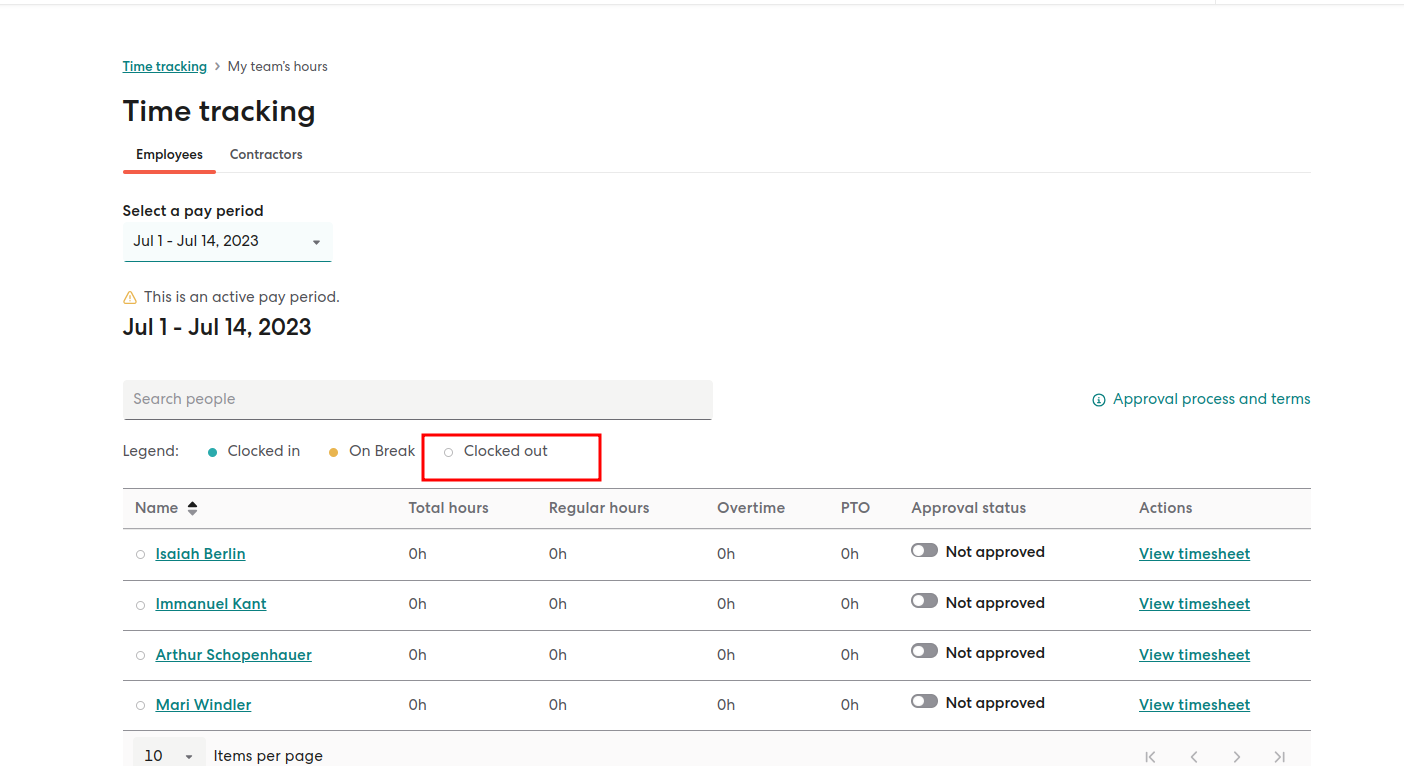

Gusto will automatically calculate your total hours worked for the day and record them in the Time Tracking tab.
Key Point: “You can track your hours until they are approved or until the payroll administrator processes the payroll for the corresponding pay period. If you need to track hours for a past pay period, kindly reach out to your payroll administrator for assistance.”
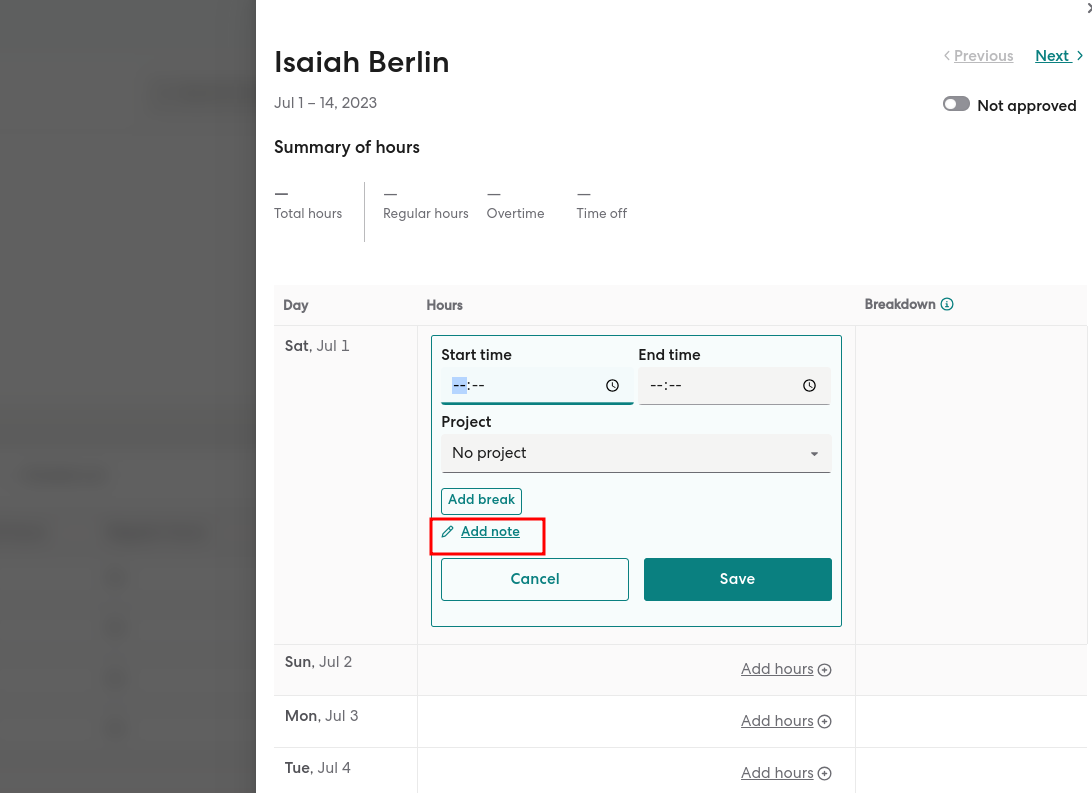
To manually adjust your worked hours, follow these simple steps without the need to clock in or out. Your employer will be notified of the changes made.

If required by your employer, you may need to provide a note when modifying your hours and/or indicate if you took a break.
To update the time zone for your tracked hours, follow these steps:

To record a meal or rest break using Gusto Time Tracking, simply follow these steps:
To add a break to your worked hours –
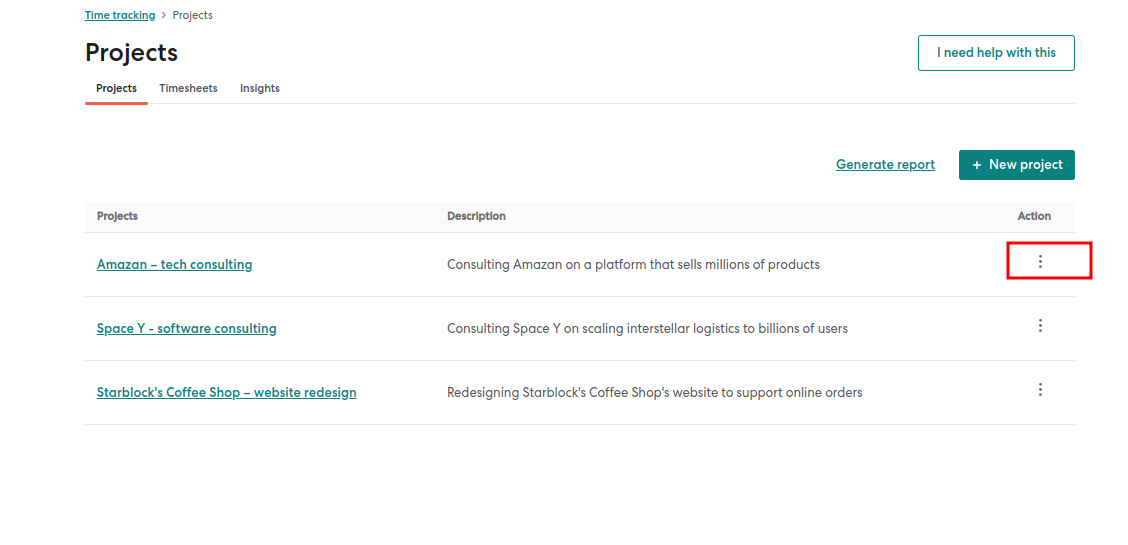
Gusto Project Tracking allows you to monitor and create projects to track workforce costs. Employees can log their hours for specific projects and tasks, while you can generate detailed reports showcasing the expenses associated with your team’s time, including wages, benefits, taxes, and more.
Key Point: “Project Tracking is available for our Plus and Premium customers. If you don’t currently have access to this feature, you can upgrade your plan to take advantage of it. Gusto Project Tracking is not compatible with pay schedules based on “employee type” or applicable to contractors at this time.”
To begin tracking time for projects in your Gusto account, follow these steps:

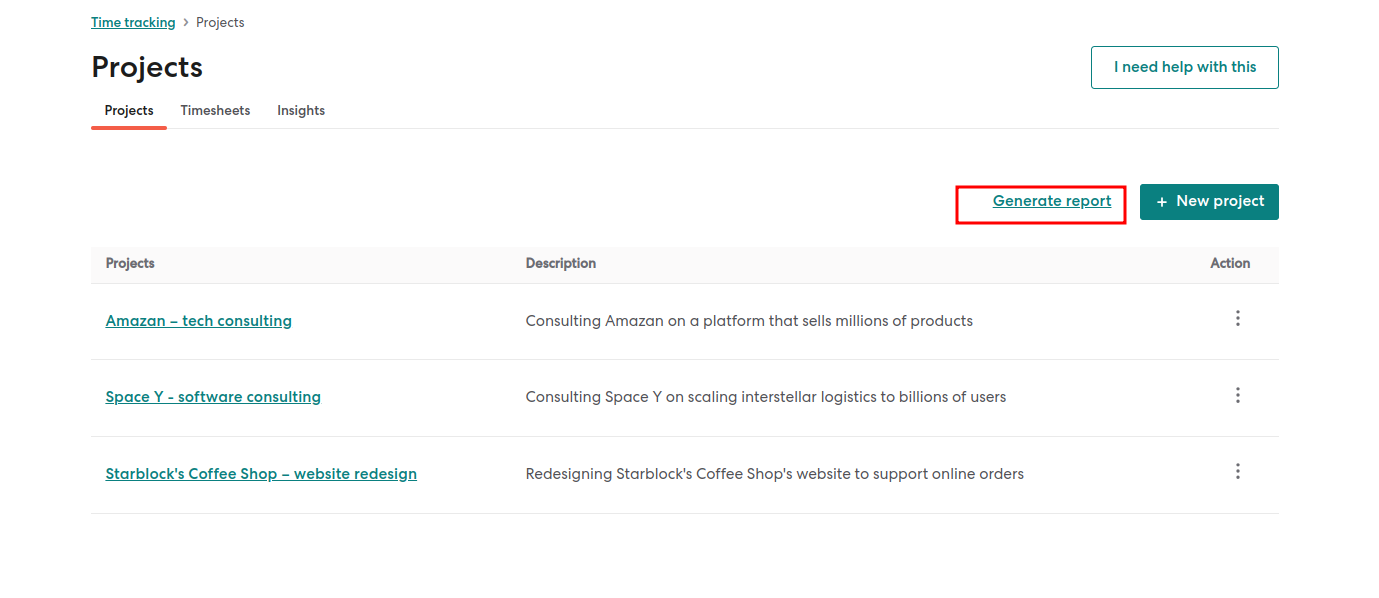

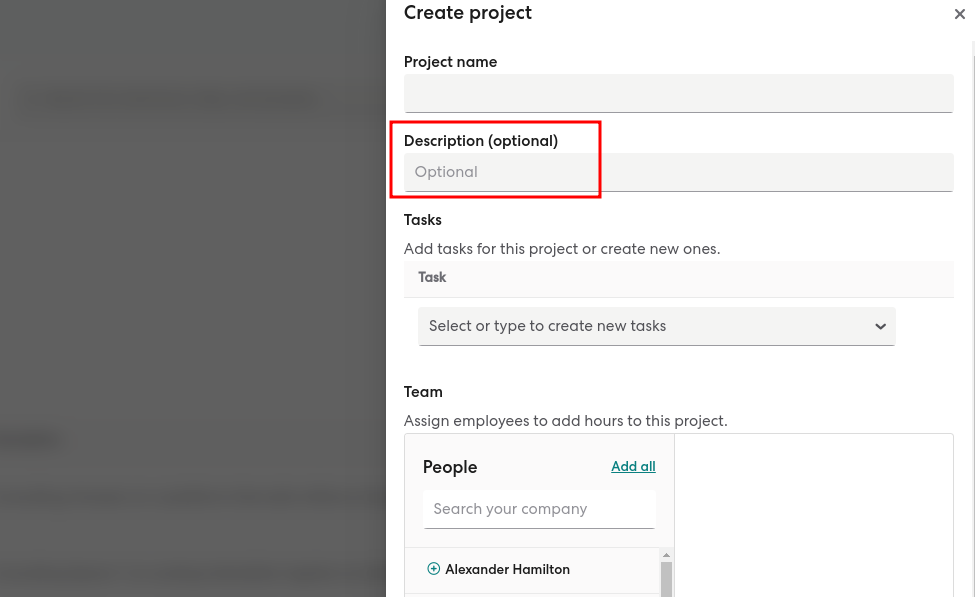
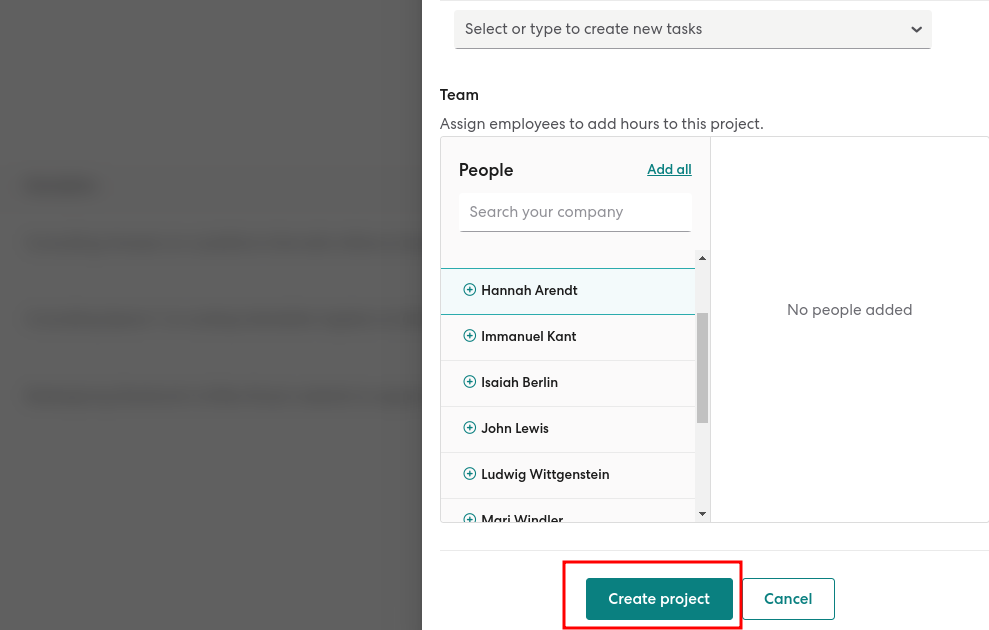
Once the project is created, employees can begin tracking their hours against it.
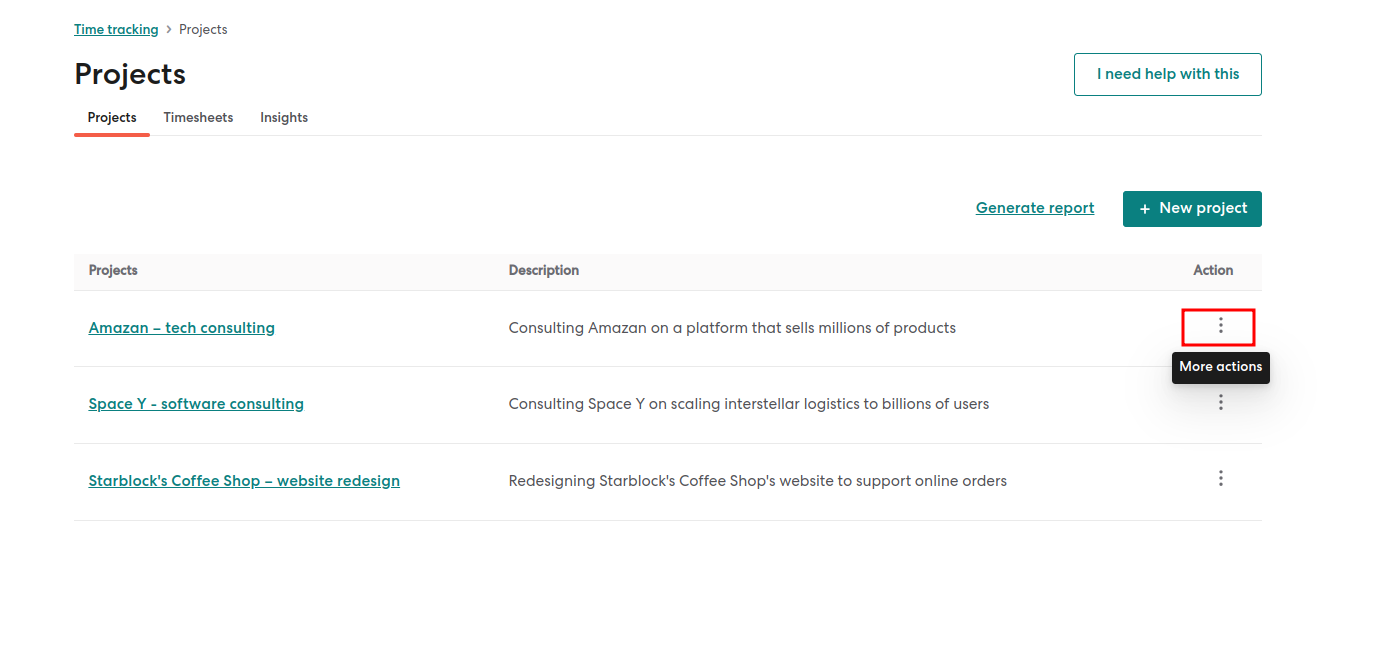
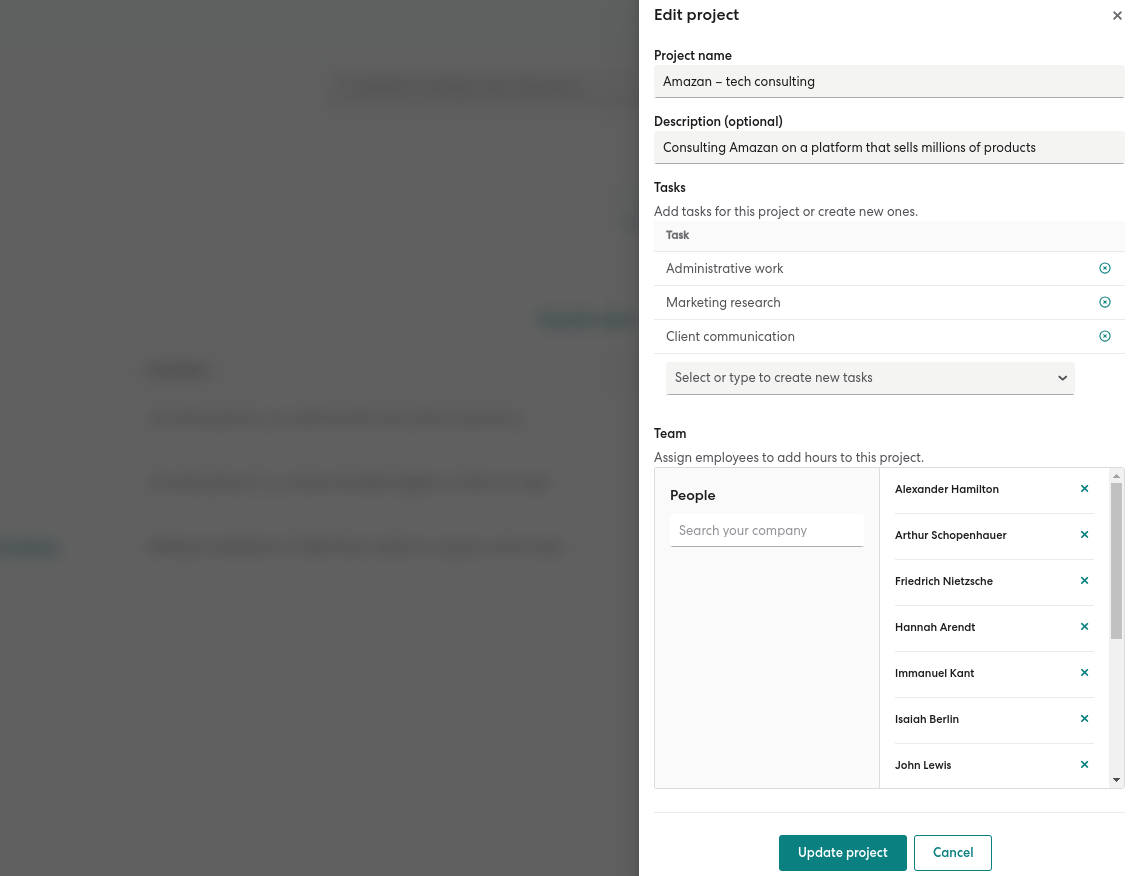
Steps To Edit A Project

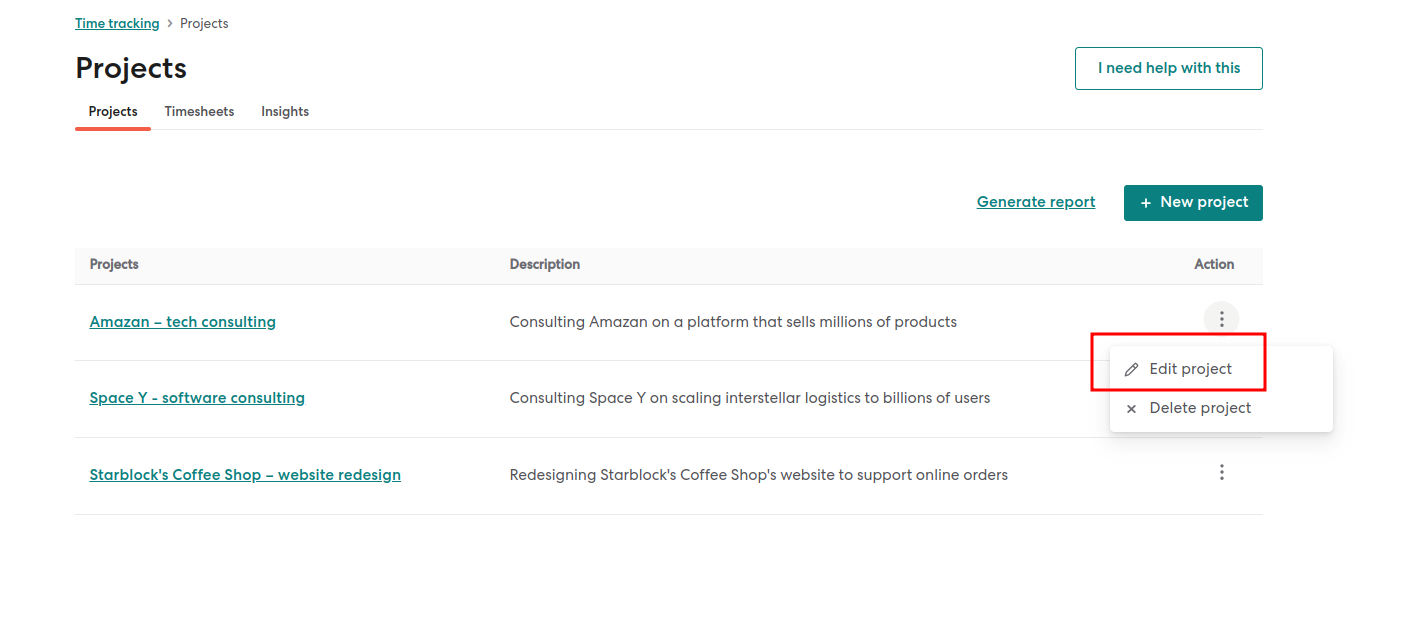
Steps To Delete A Project
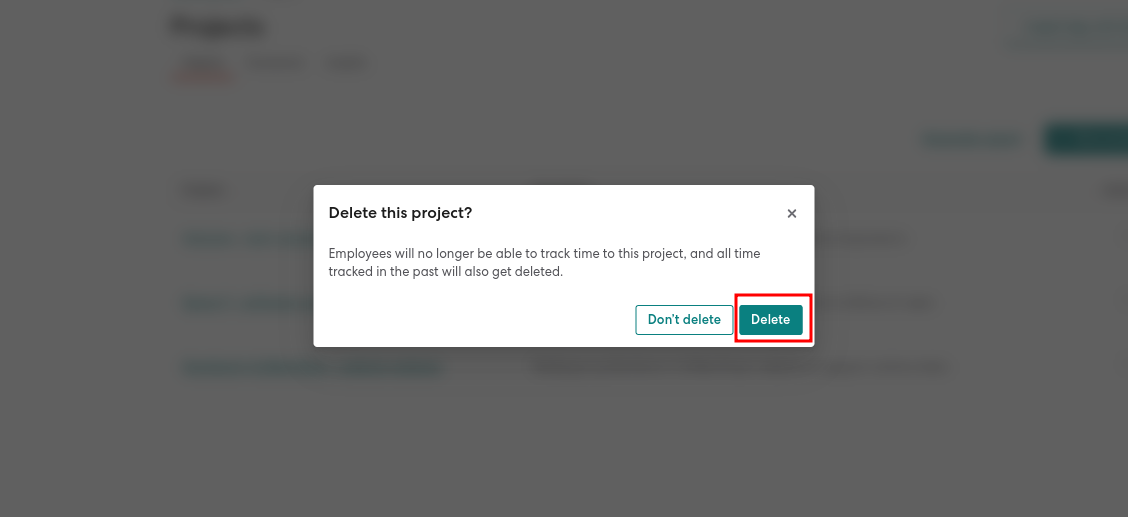
Key Point: “Deleting a project will also remove all associated historical data.”
The “Benefit Tab” in Gusto Payroll Software is a feature that allows users, both employees and administrators, to access and manage various benefits offered by the company. This tab provides a centralized location to view and update enrollment status, coverage details, Summary of Benefits, and carrier contact information. Overall, the Benefit Tab streamlines the process of accessing and managing benefits within Gusto Payroll Software.
For Employees:
If your employer uses Gusto for providing benefits (including broker integration), you can access important information regarding your enrollment status, coverage details, Summary of Benefits, and contact information for carriers. Simply navigate to the Benefits section of your account to view these details.
For Admins:
To view and manage your company’s benefits, it is necessary to have either Full Access or benefits permissions. Please ensure that you have the appropriate level of access to access and handle your company’s benefits effectively.
Finding the right candidate for a new team member can be challenging. The process involves searching for the perfect fit and considering the associated expenses. However, you don’t have to navigate this alone. We are here to provide the solutions you need. Our employer tax calculator is designed to swiftly provide you with a comprehensive overview of the payroll taxes you can anticipate when hiring a new employee. By using our calculator, you can gain a clearer understanding of the financial implications involved in the process.
Running a payroll can feel overwhelming, especially when you have to pull out the calculator. It’s likely the last thing you want to deal with. However, it’s important to get it right for the sake of your employees and your taxes. To simplify things, we’ve divided the process into a few straightforward steps.
There are three main categories of payroll taxes:
These are the taxes you, as an employer, are responsible for paying. They include federal and state-level unemployment taxes.
These are the taxes you deduct from your employee’s wages on their behalf. They are used to cover federal and state income tax obligations.
These are the taxes that both you and your employees are responsible for. They include contributions to Medicare and Social Security.
The specific taxes you need to pay will vary depending on factors such as your business type, size, and location. It is advisable to consult with a tax professional who can provide guidance on the relevant taxes for your specific business.
Unless your organization is exempt, such as a charitable organization, you are required to contribute to federal and state unemployment insurance in addition to paying your employees.
Unemployment insurance is designed to provide financial support to workers who are unemployed due to circumstances beyond their control (i.e., they didn’t voluntarily leave their job). Eligibility for unemployment benefits is determined by meeting specific requirements set by each state, such as minimum work hours or earnings.
The Federal Unemployment Tax Act (FUTA) governs contributions at the federal level, while each state operates its own unemployment insurance program (SUI). Your location can impact your SUI rate and potential tax credits. Here’s how it works:
“FUTA sets a maximum taxable earnings limit, known as the “wage base,” which is $7,000. Any earnings beyond this amount are not subject to taxation. The standard FUTA tax rate is 6%, so your maximum contribution per employee could be $420. However, you can claim a tax credit of up to 5.4% (a maximum of $378). As long as you pay your unemployment taxes on time and in full, you can usually claim the full credit.”
With the full credit, your net FUTA tax rate would be only 0.6% ($42), in addition to any state unemployment taxes you owe.
However, your location can also impact your tax rate. If your state lacks sufficient funds to cover unemployment insurance benefits and needs to borrow from the Unemployment Trust Fund, it becomes a “credit reduction state.” If the loan remains unpaid, your FUTA tax credit may gradually decrease by 0.3% each year.
Income taxes are amounts that individuals need to pay based on their earnings. As an employer, it’s your responsibility to collect and remit these taxes throughout the year. Income taxes are imposed at the federal and state levels, and in some cases, at the city or county level as well.
To ensure accurate tax withholding, your employees need to provide you with the necessary information. They can do this by filling out Form W-4 when they are hired and updating it as needed. By using the IRS withholding calculator, you can determine the appropriate tax rate to apply for each employee.
The income tax rates vary from state to state. Some states have a flat tax rate, like 3.07% in Pennsylvania, while others have progressive tax rates that increase with higher income levels. For example, California has rates as high as 13.3%. Additionally, there are nine states that do not collect individual income tax, although there might be other taxes that employees need to consider.
By the time your employees file their tax returns in April, around 90% of the taxes owed on their salaries or wages should have already been deducted and paid by you. If you have deducted too much, they may be eligible for an income tax refund. On the other hand, if too little has been collected, they might be subject to penalties or fines.
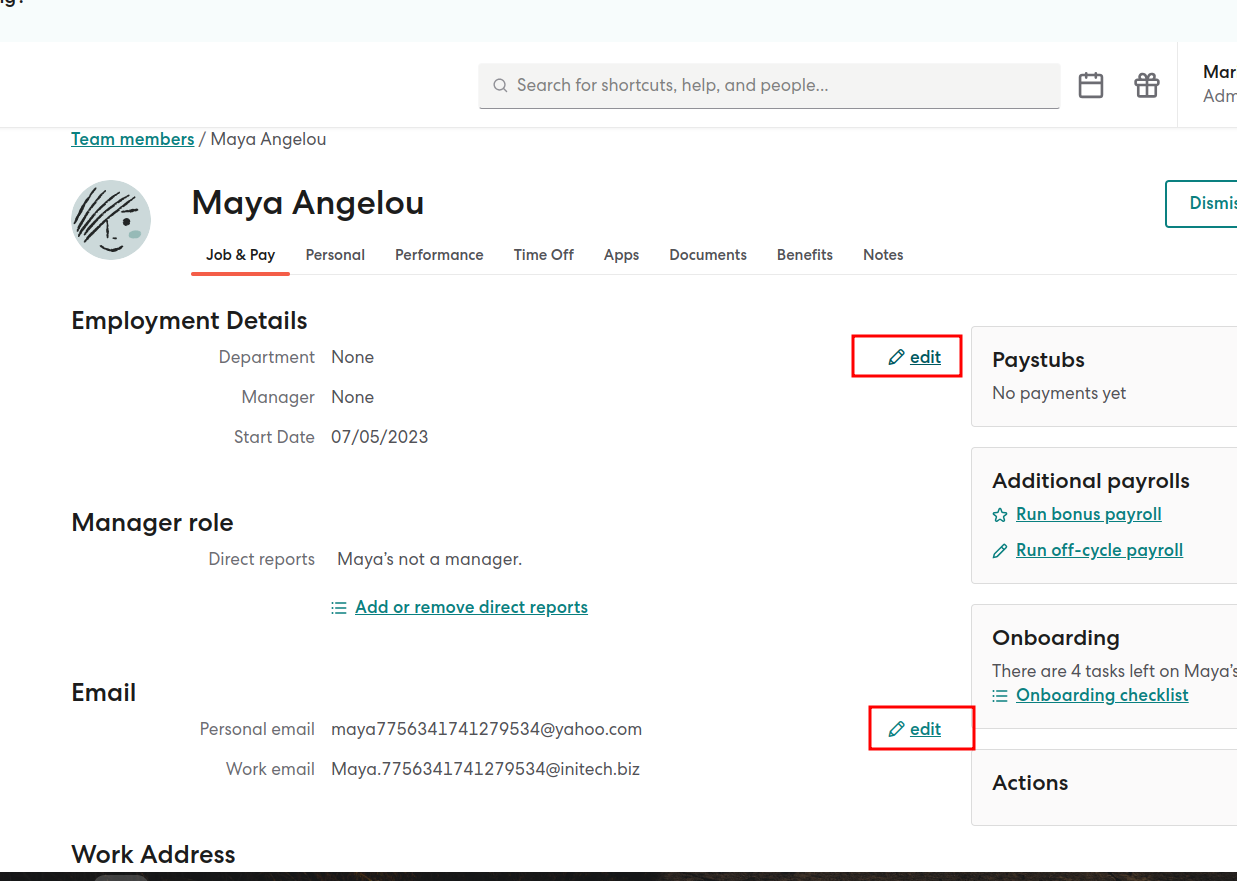
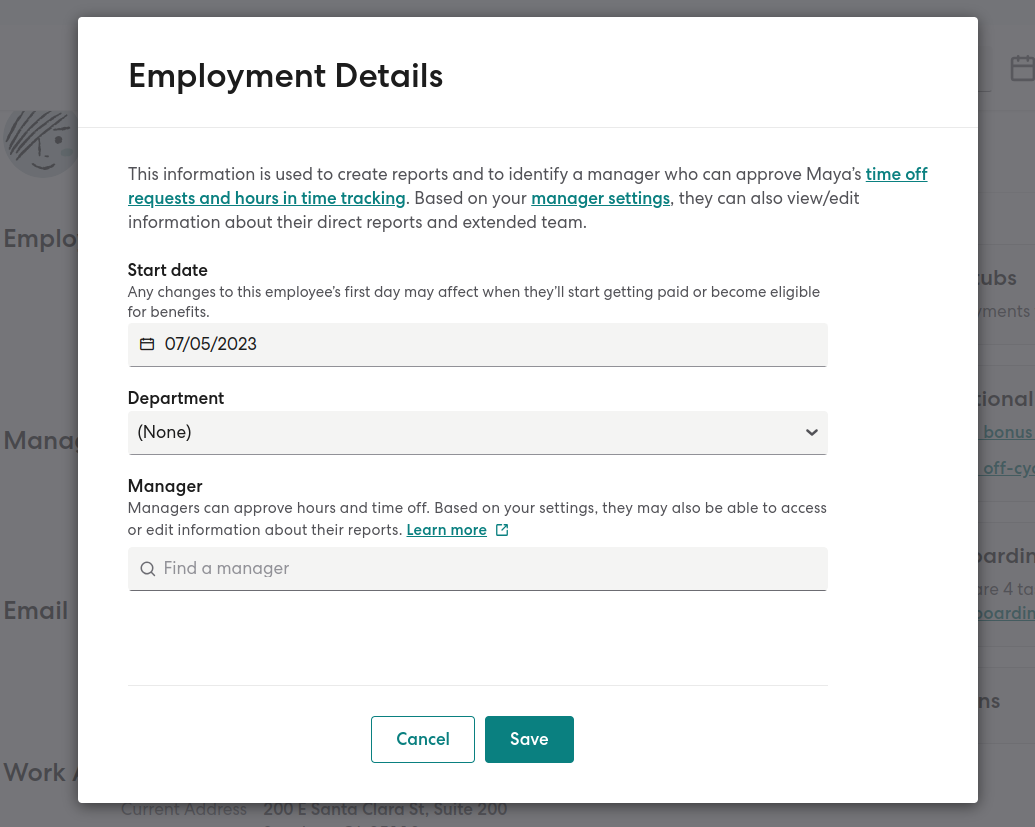
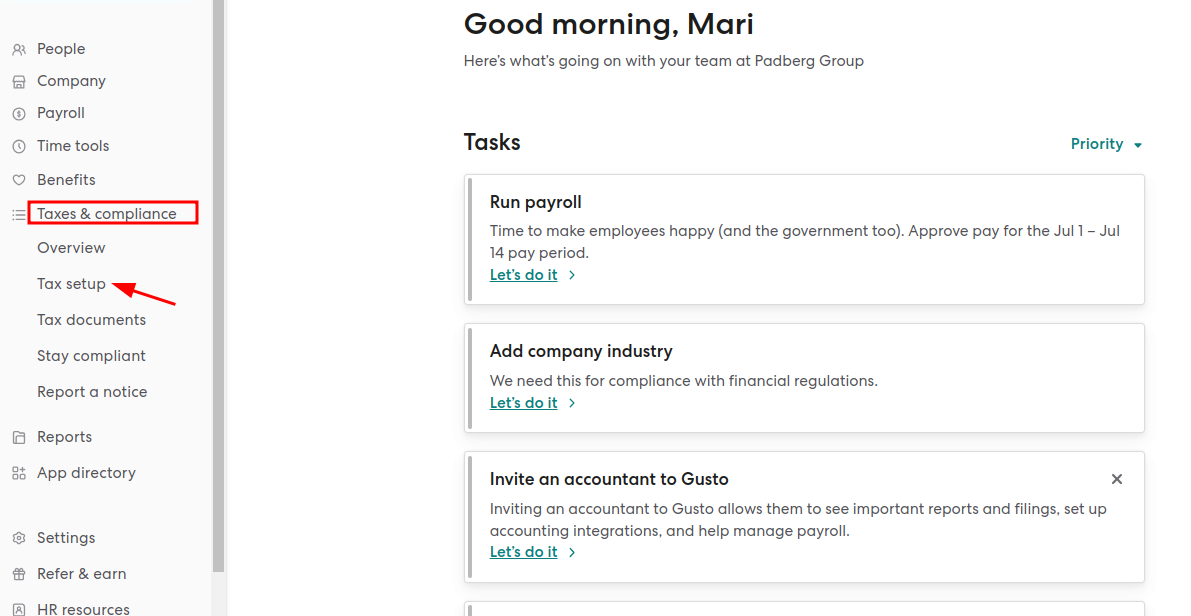
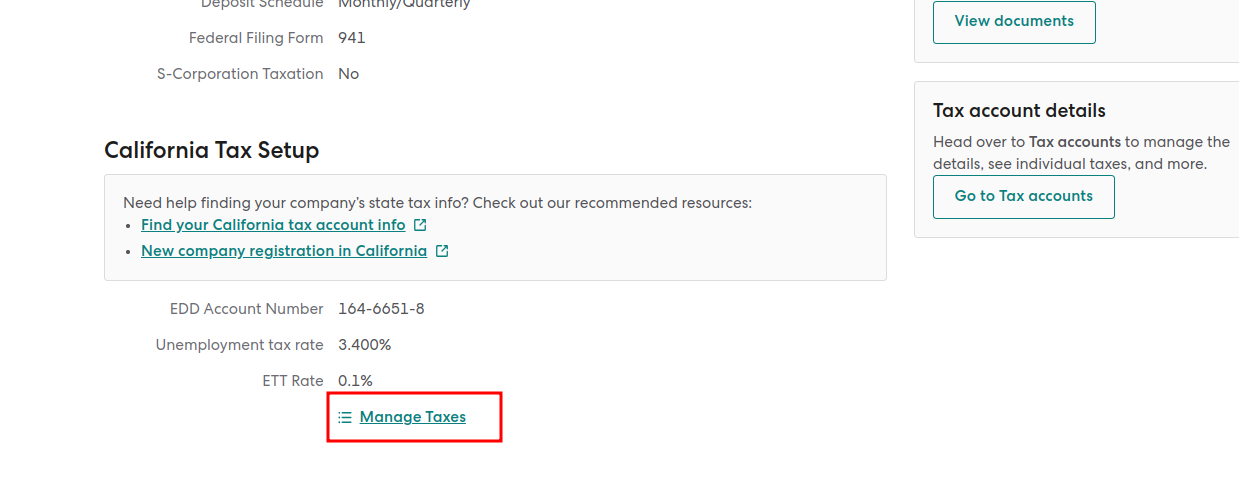
Let’s get into the step-by-step guide to how to add the federal and state tax:
As a payroll software, we take the responsibility of handling the employer’s federal tax returns and deposits, while making it a seamless process. However, for the process to go smoothly we request certain essential information from your side including Federal Employer Identification Number (FEIN), Company Type, and Official Company Name.
If you don’t know where to find the information, you can check for the form CP-575 issued by the IRS.
Now, let’s get into the step-by-step process of onboarding:
Key Point: “It is vital to not use Social Security Number (SSN) as your FEIN. It is one common mistake that most new sole proprietors and new employers make. The IRS mandates the use of a FEIN once you have hired your first employee.”
Rest assured that we’re here to support you throughout this entire process. If you have any queries or need further assistance, don’t hesitate to reach out to our dedicated team.
The Internal Revenue Service (IRS) will determine your company’s tax payment schedule (either semi-weekly or monthly) and designate a specific payroll tax return for you to file based on your past tax payment history. This may involve filing either Form 941 or Form 944.
Gusto’s Handling Process Of IRS Deposit Schedules:
To ensure timely tax payments and avoid penalties or tax delinquency notices, Gusto defaults to the faster semi-weekly deposit schedule process.
Key Point: “If you have specifically requested the monthly deposit schedule, and the IRS changes your schedule to semi-weekly, you must contact us immediately through the Help section of your account. Failure to do so may result in penalties and interest for late tax deposits, which would be the employer’s responsibility to pay.”
Gusto’s Approach To IRS Filing Forms (941 or 944):
To prevent late filings, we file the quarterly Form 941 for the following:
If you joined Gusto after Q1, please confirm the form assigned by the IRS and set up your customer account accordingly. Starting from the following year, Gusto will automatically file a Form 941 for you, eliminating the need to confirm the requirement annually.
Towards the end of the year, state agencies may issue new deposit schedules for the upcoming year based on your tax liabilities in the previous year(s). These schedules may require your company to deposit taxes more or less frequently than in the years before.
Follow these steps to enter your new updated deposit schedule into your Gusto account. These steps can assist you to review the deposit schedules you’ve had in your account in the past.
If you don’t see an option to update your schedule in Gusto, please send the notice to Gusto to ensure your setup is correct.
Key Point: “If you make this update after the deadline mentioned on the notice, you will be responsible for any penalties imposed by the agency on your account.”
In case you have entered an incorrect deposit schedule, update it in your Gusto account as soon as possible by selecting “Make a Correction” instead of choosing “Add a New Schedule.”
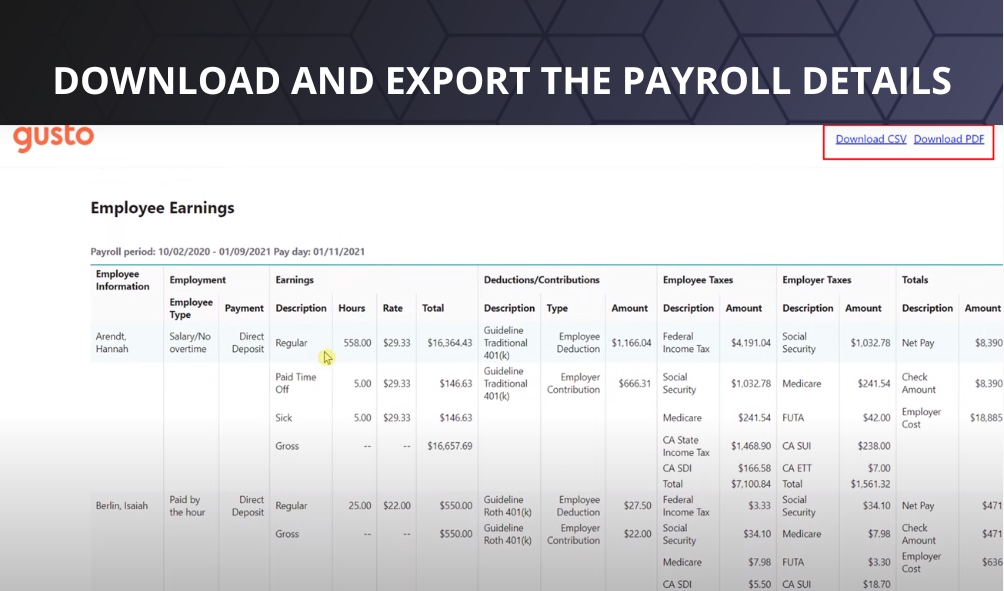
After completing your payrolls, you might want to review and analyze the data. This is where reports come in handy. Gusto provides a range of report templates that can be accessed directly or downloaded as a CSV or PDF file (in some cases, downloading is the only option). Here’s what you need to know:
Gusto offers a great selection of report templates that are categorized for easy access. Some of the categories include:
Gusto allows you to easily customize many of its reports using various filters. Let’s take the Employee Report Builder as an example:
However, it’s important to note that Gusto does not currently support drilling down into reports. For instance, you can’t click on an employee’s name to open their profile, as you can in Rippling.
Another powerful and customizable report in Gusto is the Payroll Journal Builder.
You can choose the columns you want to include and download the report in Excel, PDF, or CSV format.
With Gusto’s software integrations, you can effortlessly link your preferred software, streamlining the management of your business operations. Simply navigate to the App directory within your Gusto admin account for easy access.
To categorize Gusto Payroll in QuickBooks, you can follow these professional steps:
Open QuickBooks and go to the “Banking” tab.
ADP Run is a cloud-based payroll and HR management platform designed for small and medium-sized businesses. It offers features such as automated payroll processing, tax filing, and compliance management. ADP Run also provides tools for managing employee benefits, time and attendance, and HR tasks such as onboarding and performance management. With ADP Run, businesses can access their payroll and HR information from anywhere and at any time through a web browser or mobile app.
Paychex Flex is a cloud-based payroll and HR management platform designed for businesses of all sizes. It offers a range of features such as payroll processing, tax filing, and compliance management. Paychex Flex also provides tools for managing employee benefits, time and attendance, and HR tasks such as recruiting and onboarding. With Paychex Flex, businesses can access their payroll and HR information from anywhere and at any time through a web browser or mobile app. Paychex Flex also offers additional services such as HR consulting, retirement plan administration, and employee health insurance.
As much as Gusto stands out as an all-in-one HR platform, there are still plenty of other alternatives available on the market. Each of these alternatives offers unique features and capabilities that may be better suited for different businesses based on their specific needs.
Gusto offers a range of customer support systems designed to assist you seamlessly:
Fill out a user-friendly form to submit your inquiries, ensuring prompt and accurate assistance.
Access an extensive collection of resources and articles to find answers to common questions and explore helpful guides.
Quickly find solutions to frequently asked questions, saving you time and providing instant support.
Reach out to Gusto’s dedicated support team via email, receiving personalized assistance tailored to your needs.
Experience hassle-free customer support with Gusto, where we’re dedicated to making your experience smooth and enjoyable.
In conclusion, Gusto Payroll Software is a user-friendly and reliable solution for payroll and HR management. With its ease of use, comprehensive features, and competitive pricing, Gusto simplifies payroll processes for small businesses. From full-service payroll and employee benefits management to time tracking and robust reporting, Gusto offers a range of tools to streamline HR operations. With excellent customer support and positive user ratings, Gusto is a trusted choice for businesses seeking an efficient and stress-free payroll solution.
Gusto streamlines payroll, HR, and benefits administration by automating processes and providing an intuitive, user-friendly interface. It can calculate employee paychecks, process tax filings, manage benefits, and more.
Gusto offers a range of features, including full-service payroll, employee self-service tools, time tracking, automated tax filings, HR compliance, and employee benefits management.
Yes, Gusto offers benefits administration for health insurance, 401(k) plans, and other benefits. Gusto partners with leading benefits providers to offer a range of options for businesses.
Yes, Gusto payroll reviews say it’s known for its user-friendly interface and easy-to-use features. Gusto provides a dashboard that gives businesses an overview of their payroll and benefits information.
Yes, Gusto offers a mobile app for iOS and Android devices. The app allows employees to view their pay stubs, request time off, and manage their benefits.
Yes, Gusto is a popular payroll software among small businesses due to its affordability and ease of use. Gusto’s pricing plans are designed to be scalable for businesses of all sizes.

Alekh Shah
VIP Contributor, US | Growth Marketing
With over a decade of experience in the digital marketing landscape, Alekh has driven exponential growth for global Fortune 500 brands. He has led dynamic, results-oriented teams to acquire customers across digital channels. He develops strategies that deliver tangible business results. His expertise spans digital marketing, branding, organic growth, partnerships, and campaign management. He stays ahead of emerging marketing trends and technologies.


Deluxe Payroll is a comprehensive payroll service provider that caters to businesses of all sizes. Established in 1985,...

As businesses of all sizes continue to expand and evolve, the need for a seamless and efficient payroll system has become...

Payroll management can be a time-consuming and tedious task, but with the advent of digital solutions, businesses can now...

Paycor is a cloud-based human capital management software that provides comprehensive solutions for managing human...

Zenefits offers a customizable dashboard that allows users to track and manage employee information and HR processes in...

As we enter the year 2023, the demand for efficient and effective payroll solutions continues to rise. With the advent of...

![Unlocking Ahrefs Premium: Get Ahrefs Premium Accounts [100% Free]](https://s44815.pcdn.co/wp-content/uploads/2023/10/Ahrefs-Free-Premium-accounts-2023-330x250.webp)